Editing a 3D material
You can edit 3D materials using on-screen manipulators as well as the Tool Property palette.
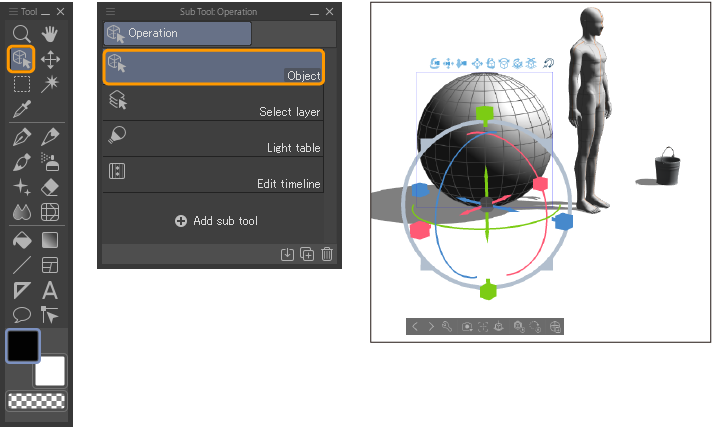
Selecting a 3D material
Tap the 3D material you wish to edit with the Object sub tool. Hold Shift and tap to select multiple 3D materials.
When a 3D material is selected, the Movement Manipulator, Object Launcher, and Root Manipulator will appear. For panorama materials, only the Object Launcher appears.
Using the Object List
You can manage 3D materials with the Object List in the Tool Property palette when using the Object sub tool. Tapping an item in the list will select that item on the canvas. You can hold Shift and tap to select multiple 3D materials.
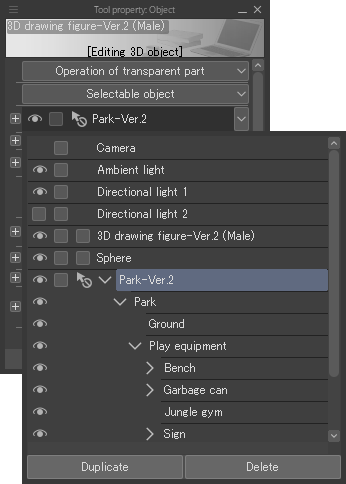
In addition to the Tool Property palette, the Object List can also be found in the Sub Tool Detail palette’s Layout category, the Sub Tool Detail palette’s Object List category, and the Object Launcher.
Memo | The Object List is not available in Clip Studio Paint DEBUT. |
Selecting parts of a 3D object material
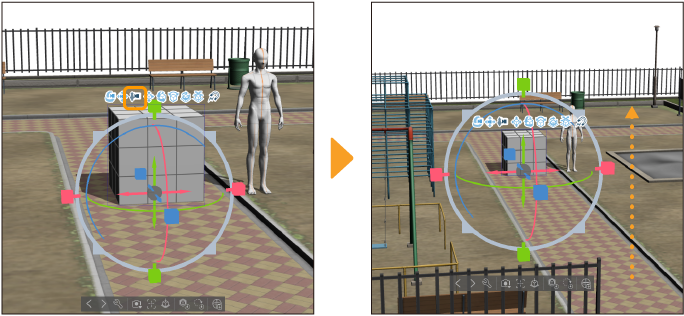
If a 3D object material has multiple parts, you can select the individual parts. Once a part is selected, you can move or rotate it with the movement and part manipulators. You can also change its scale.
After selecting the 3D object material with the Object sub tool, you can select the part on the canvas with the Object sub tool or tap the part in the Object List.
You can hold Shift to select multiple parts and move, rotate, and scale them at once.
If you cannot select a part from the canvas, the 3D object material may not have selecting enabled. You can check to see if an object has selecting enabled or disabled in the Object List. To the left of each material is a row of icons. If you see an icon with an arrow and a circle-backslash, This means that selecting is disabled.

To enable selecting, tap the icon. You should now be able to select the parts of that object.
Even if the object doesn't have selecting enabled, you can still edit it by selecting parts from the Object List. Disabling selection is useful when you want to adjust the position or angle of the entire 3D object material, or if you want to prevent accidental movement.
Movement Manipulator
The movement manipulator appears at the top of a 3D material when selected with the Object sub tool.(It does not appear when a Panorama material is selected.)
When placing a 3D material, you can use the movement manipulator to adjust the position of the camera, focal point, and the of 3D material itself.
Tap the icons to switch the manipulation mode, and drag on the canvas to manipulate the object according to the selected mode.
Tap the selected mode icon again to turn the mode off and return to normal operation.
Memo | ·Snap to 3D model can be enabled or disabled regardless of other operation modes. ·You can perform the operations assigned to the buttons by tapping and dragging. This will not change the operation mode. |
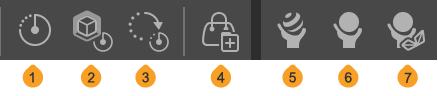
Functions of the Movement Manipulator

(1)Rotate camera
(2)Translate camera
(3)Move camera back and forth
(4)Move on plane
(5)Rotate camera view
(6)Rotate plane
(7)Rotate in 3D space
(8)Snap and move
(9)Snap to 3D model
Object Launcher
The Object Launcher appears below a 3D material selected with the Object tool. The buttons vary depending on the type of 3D material. The functions of each button are described below.
Functions for all 3D materials
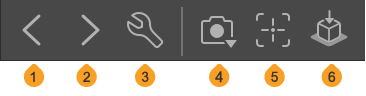
(1)Select previous 3D object
If you have multiple 3D materials on a 3D layer, you can switch between them. This selects the previous 3D object in the Object list.
(2)Select next 3D object
If you have multiple 3D materials on a 3D layer, you can switch between them. This selects the next 3D object in the Object list.
(3)Object List
This shows the Object list category in the Sub Tool Detail palette. You can select and change the settings of 3D materials using the Object list.
(4)Camera
Select from default camera angles. This does not appear when a Panorama material is selected.
(5)Focus on editing target
Focus the camera on the editing target. This does not appear when a Panorama or 3D background material is selected.
(6)Ground
Tapping this grounds the 3D material to the base (floor) of the 3D space. When a specific part of a 3D object material is selected, the selected part will be grounded to the 3D space's base. This does not appear if a Panorama or 3D background material is selected.
Memo | ·The base of the 3D space means the grid that appears when a 3D material is tapped. It is equivalent to the floor of the 3D space. ·The Object List icon is not available in Clip Studio Paint DEBUT. |
3D Drawing Figures

(1)Register full body pose as material
See "Registering a pose as a material"for details.
(2)Flip Horizontal
Horizontally reverses the 3D drawing figure pose.
(3)Initial pose
(4)Reset scale
This resets the 3D drawing figure to its initial body shape and dimensions.
(5)Reset Rotation
This resets the rotation of the 3D drawing figure to its initial state.
(6)Register body shape
(7)Apply pose to model
You can apply a pose to the 3D drawing figure. See here for details: "Importing pose materials".
(8)Fix joint
(9)Release all locked joints
(10)Change body shape
Memo | Register full body pose as material, Register body shape, and Change body shape are not available in Clip Studio Paint DEBUT. |
3D Character Materials

(1)Register character as material
See "Registering a 3D character as a material"for details.
Tap to the right to save the current pose as a material. See "Registering a pose as a material"for details.
(2)Flip Horizontal
Horizontally reverses the pose of the 3D character material.
(3)Initial pose
(4)Reset scale
This resets the 3D character material to its initial state.
(5)Reset Rotation
This resets the rotation of the 3D character material to its initial state.
(6)Enable/disable physical calculation
Enables/disables physical calculation for a 3D character with physical settings imported from Clip Studio Modeler. When the operation is enabled, the skirt and hair move with the character's movements.
(7)Apply pose to model
You can apply a pose to the 3D drawing figure. See here for details: "Importing pose materials".
(8)Fix joint
(9)Release all locked joints
(10)Face parts
(11)Facial expression list
See "Using expression settings"for details.
(12)Hairstyle
(13)Body
(14)Accessories
Register character as material is not available in Clip Studio Paint DEBUT. |
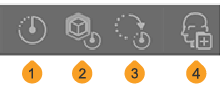
3D Object Materials
(1)Initial pose
If a 3D material has multiple parts, the parts will be set to their default position. If the scale of a specific part has been changed, the perspective scale will also return to its initial state.
(2)Reset scale
This resets the scale of the 3D object material to its initial state. Note that if the scale is changed only for a specific part, it will not return to the initial state.
(3)Reset Rotation
This resets the rotation of the 3D object material to its initial state.
(4)Save 3D object to Material palette
See "Registering a 3D object as a material".
(5)Material
Tap to display a list of materials. Select the desired material for the selected 3D object material. Selecting a material allows you to change the tone and texture of the 3D object material.
(6)Layout
Tap to display a list of layouts for the 3D object material. Select the desired layout for the selected 3D object material. The allocation of 3D object materials can be changed by selecting a layout.
(7)Movable parts
Tap to display a list of movable parts set for the 3D object material. A slider can be used to adjust the position of a movable part.
3D Head Model
(1)Default pose
This resets the 3D head model to its initial state.
(2)Reset scale
This resets the scale of the 3D head model to its initial state.
(3)Reset Rotation
This resets the rotation of the 3D head model to its initial state.
(4)Register head model as material
Memo | Register head model as material is not available in Clip Studio Paint DEBUT. |
3D Primitives

(1)Reset scale
This resets the 3D primitive material to its initial state. Note that if the scale is changed only for a specific part, it will not return to the initial state.
(2)Reset Rotation
This resets the rotation of the 3D primitive material to its initial state.
(3)Register primitive as material
Memo | Register primitive as material is not available in Clip Studio Paint DEBUT. |
3D Background Materials

(1)Material
Tap to display a list of materials. Select the desired material for the selected 3D background material. Selecting a material allows you to change the tone and texture of the 3D background material.
(2)Layout
Tap to display a list of layouts. Select the desired layout for the selected 3D background material. Changing the layout allows you to hide certain parts or change some parts.
(3)Movable parts
Tap to display a list of movable parts set for the 3D background material. A slider can be used to adjust the position of a movable part.
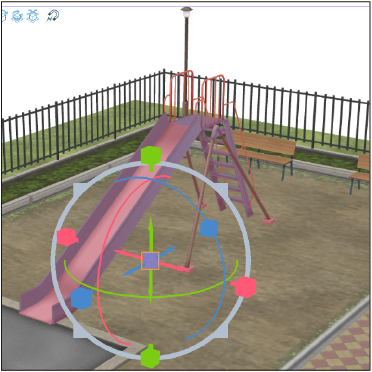
Root Manipulator
You can tap a 3D material with the Object sub tool to display the root manipulator.
·When selecting a part of a 3D drawing figure or a 3D character, a local manipulator will appear instead of the root manipulator.
·For 3D object materials with multiple parts, a part manipulator will appear if a specific part is selected.
·The root manipulator will not appear when a Panorama or 3D background material is selected.
·The root manipulator will not appear for 3D materials on a Ver. 1.5 compatible 3D layer.
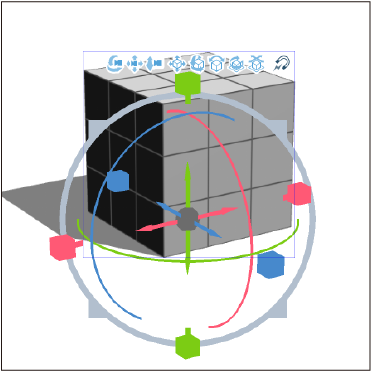
You can use the root manipulator to move, rotate, and resize 3D materials. For details, see "Positioning a 3D material", "Rotating a 3D material", and "Resizing 3D Materials".
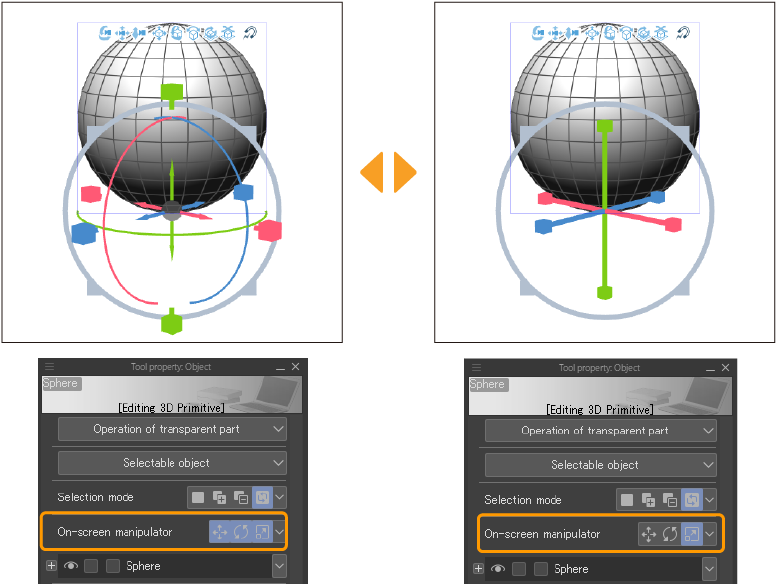
Various handles appear in red, blue, and green on the root manipulator to move, rotate, and resize 3D objects. You can choose which of these handles appear using the Tool Property palette > On-screen Manipulator setting. Tap the icons to show or hide the handles on the manipulator.
Part Manipulator
Selecting a part of a 3D object material with the Object sub tool will show the Part Manipulator.
The Part Manipulator can be used to move, rotate, and resize parts of a 3D object material. Its operation is the same as the "Root Manipulator".
Advanced settings for selecting 3D materials
The Tool Property and Sub Tool Detail palettes offer a variety of settings in addition to those described here such as specifying numerical values of for the position of 3D materials and setting the light direction and color.
You can set the following categories in the Sub Tool Detail palette of the Object sub tool when selecting a 3D material. For more information, see the links for each category.
· "Camera"
· "Lens"
· "Fog"
Other categories can be set depending on the type of 3D material.
When selecting a 3D drawing figure or 3D character, the following categories will be added.
· "3D drawing figure" or "Character"
· "Pose"
When selecting a 3D object or 3D background material, the following categories will be added.
· "Object"
When selecting a 3D primitive, the following categories will be added.
When selecting a 3D head model, the following categories will be added.
When selecting a panorama material, no categories are added to the general 3D material settings. However, the Transform category does not appear when a Panorama material is selected.
Memo | If you select a 3D material from a Ver. 1.5 compatible 3D layer, the available categories will be different, and categories added after Ver 1.6, such as Object List, Panorama, and Shadow, are not available. The available settings for each category are also different. |