M
Learn about Manga Perspective, Mesh, Move layer, and other setting categories starting with M in Clip Studio Paint.
Manga Perspective
Manga perspective can be set when 3D drawing figures or 3D character materials are selected using the Object sub tool or other tools.
Memo | The Manga perspective function has been developed based on technologies devised from "Research and Development of Ultra-realistic Communication Technologies with Evolutionary 3D Imaging Technologies," a consigned research by the National Institute of Information and Communications Technology (NICT), an independent organization, in cooperation with Naemura Laboratory at Tokyo University and HITACHI. |

(1)Manga perspective
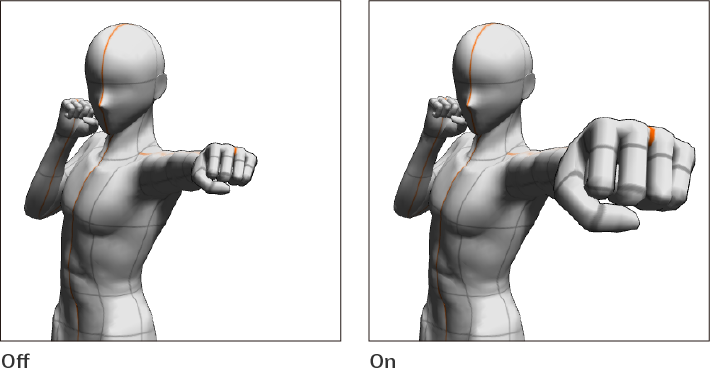
When on, you can set a manga-like perspective with the depth emphasized for a 3D drawing figures and 3D character materials. Unlike Perspective under Camera, you can emphasize the expression of depth without changing the angle of the pose. Use the slider to adjust the strength of the manga perspective effect. The larger the value, the stronger will be the effect.
(2)Collision Correction
If on, the pose can be corrected so that colliding parts do not overlap. This setting can be adjusted when Manga perspective is turned on.
Mesh
To access this, tap the Edit menu > Transform > Mesh Transformation. For details, see "Mesh transformation".
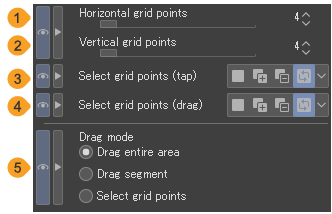
(1)Number of horizontal lattice points
Increase or decrease the number of horizontal lattice points (handles).
(2)Number of vertical lattice points
Increase or decrease the number of vertical lattice points (handles).
(3)Select grid points (tap)
You can set how to make selections when tapping a grid point on the mesh.
·New selection cancels the current selection and selects a new object or control points.
·Add to selection adds new objects or control points to the current selection.
·Remove from selection removes newly selected objects or control points from the existing selection.
·Toggle selection allows you to select or deselect an object or control point with each tap. If you tap something unselected, the operation is the same as Add to selection; and if you tap an existing selection, the operation is the same as Remove from selection.
Memo | When set to New selection, Add to selection, or Remove from selection, you can hold Alt to switch to Toggle selection. |
(4)Select grid points (drag)
When the Drag mode is set to Select grid points, You can set how to make selections when dragging over grid points on the mesh.
·New selection cancels the current selection and selects a new object or control points.
·Add to selection adds new objects or control points to the current selection.
·Remove from selection removes newly selected objects or control points from the existing selection.
·Toggle selection allows you to select or deselect an object or control point. If you drag over something unselected, the operation is the same as Add to selection; and if you drag over an existing selection, the operation is the same as Remove from selection.
(5)Drag mode
You can select the action to be performed when dragging to Drag entire area, Drag segment, or Select grid points.
Drag entire area allows you to move the entire image within the mesh.Drag segment allows you to move the parts with selected grid points.Select grid points allows you to select grid points by dragging. The selection method can be set with Select grid points (drag).
Mesh/pins
To access this, tap the Edit menu > Transform > Puppet warp. For details, see "Puppet Warp".
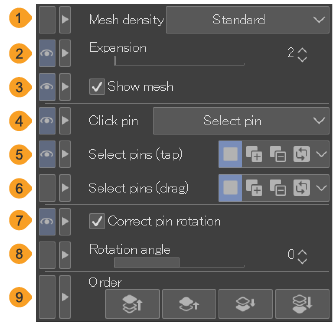
(1)Mesh density
Increase or decrease the number of horizontal lattice points (handles).
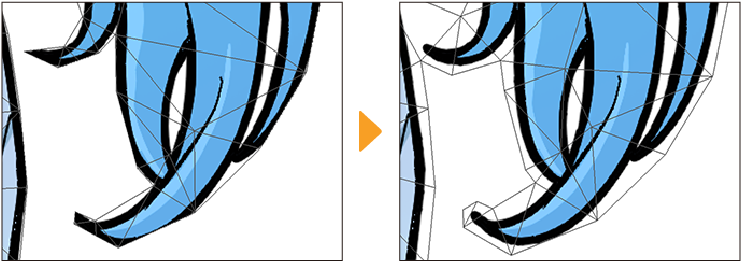
(2)Expansion
Expansion increases the range of the mesh by a specified value to cover small areas that might not have been included in the mesh.
(3)Show mesh
Use this checkbox to show or hide the mesh pattern.
(4)Click pin
Set the action that occurs when you tap a pin. If set to Select pin, tapped pins will be selected. If set to Delete pin, tapped pins will be deleted.
(5)Select pins (tap)
You can set how to make selections when tapping a grid point on the mesh.
·New selection cancels the current selection and selects a new pin.
·Add to selection adds the selected pin to the current selection.
·Remove from selection removes selected pins from the existing selection.
·Toggle selection allows you to select or deselect a pin with each tap. If you tap an unselected pin, the operation is the same as Add to selection; and if you tap an existing selection, the operation is the same as Remove from selection.
Memo | ·If you tap areas without a pin, a new pin will be created. ·When set to New selection, Add to selection, or Remove from selection, you can hold Alt to switch to Toggle selection. |
(6)Select pins (drag)
You can set how to make selections when dragging over pins on the mesh from outside the mesh.
·New selection cancels the current selection and selects a new pin.
·Add to selection adds the selected pin to the current selection.
·Remove from selection removes selected pins from the existing selection.
·Toggle selection allows you to select or deselect pins based on the current status. If you drag over an unselected pin, the operation is the same as Add to selection; and if you drag over an existing selection, the operation is the same as Remove from selection.
(7)Correct pin rotation
This automatically rotates and adjusts pins when you manipulate other pins in the mesh. This setting does not apply when multiple pins are selected.
(8)Rotation angle
You can adjust the angle of the selected pin. If a rotation angle is set for a pin, Correct pin rotation will not be applied. You can also drag the outer circle of the pin to change the angle.
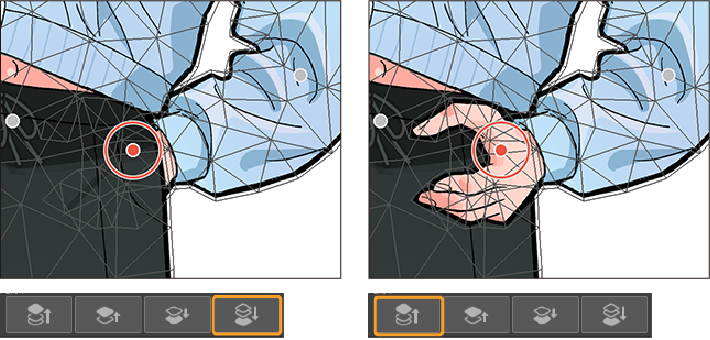
(9)Order
This setting determines the order of the pins in when overlapped. Use the icons to move the selected pin to the top, one layer higher, one layer lower, or to the bottom. If the transformation area spans multiple layers, the layer order in the Layer palette will take precedence.
Mouse/Gestures
You can set the mouse and touch gesture operations when a 3D layer is selected with the Object sub tool. For details on operating the camera, see "Set camera angle" and "Camera".
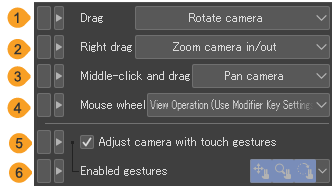
(1)Drag
You can set the behavior when dragging to Rotate camera, Pan camera, Zoom camera in/out, Change camera perspective, or Camera perspective (linked with zoom).
(2)Right drag
You can set the behavior when holding the right mouse button and dragging to Rotate camera, Pan camera, Zoom camera in/out, Change camera perspective, or Camera perspective (linked with zoom).
(3)Middle-click and drag
You can set the behavior when holding the right mouse button and dragging to Rotate camera, Pan camera, Zoom camera in/out, Change camera perspective, Camera perspective (linked with zoom), or Use Modifier Key Settings.
(4)Mouse wheel
You can set the behavior when scrolling the mouse wheel to Change camera perspective, Camera perspective (linked with zoom), Zoom camera in/out, Camera roll, or View Operation (Use Modifier Key Settings).
(5)Adjust camera with touch gestures
Turn this on to enable manipulating the camera with touch gestures. See "Setting camera angles using touch gestures" for details.
(5)Enabled gestures
See "Setting camera angles using touch gestures" for details.
Move layer
Adjust settings for moving layers, screentones, and grids with the Move layer tools.
(1)Mode
Choose what to move with the tool. Tap the icons to select whether the tool moves layers, screentones, or grids.
(2)Move the object at the clicked position
Move the layer that has that has an object at the tapped position.
(3)Move layers in the selected area
When there is a selection, this moves all layers within the selection.
(4)Moved layers become selected
Any layers that are tapped or in the moved selected area will be selected in the Layer palette.
(5)Keep original image
A copy of the original layer or selection will be created when you move a layer.