Posing 3D drawing figures
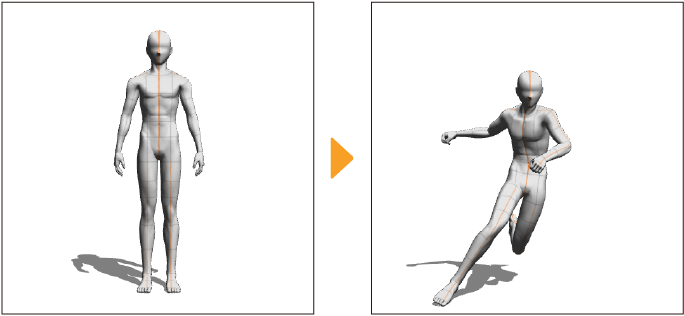
You can set poses to 3D drawing figures and 3D character materials.
Importing pose materials
The Material palette > 3D > Pose folder contains pose materials that can be used for 3D drawing figures and 3D character materials.These include full body poses, hand poses, and pose sequences.
First, use the Object sub tool to select the 3D drawing figure or 3D character material on the canvas.
Pose materials can be loaded to the model in the following ways.
Importing with the Object Launcher
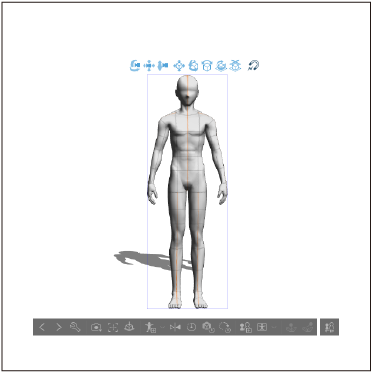
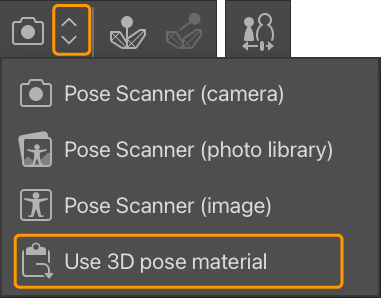
With the 3D model selected, tap Use 3D pose material from the Object Launcher. In the dialog that appears, select the pose material you wish to use, and tap OK to apply it to the 3D material.
Importing with the Tool Property palette
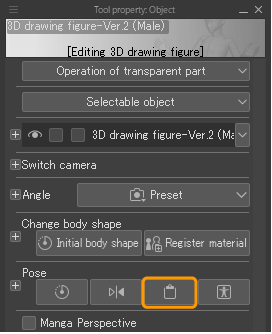
In the Tool Property palette > Pose setting, tap the Use 3D pose material icon. In the dialog that appears, select the pose material you wish to use, and tap OK to apply it to the 3D material.
Importing with the Material Palette
Select a pose material from the Material palette and tap the Paste Material icon at the bottom of the palette, or drag and drop the pose onto the 3D model.
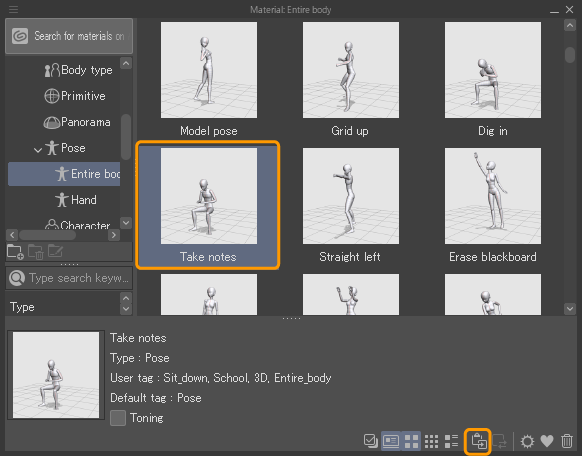
If you drag and drop a pose material to a position with no 3D drawing figure or 3D character material, a new 3D drawing figure in the selected pose will be created.
The default drawing figure can be set in File > Preferences > 3D.
Memo | ·If you drag and drop multiple pose materials to the canvas, 3D drawing figures for each of the poses will be created. ·You can create a new 3D layer when importing pose materials. See "Create 3D drawing figure layer" for details. |
Importing hand poses
If you want to import a pose onto only one hand, use the Object sub tool to select the arm part of the 3D drawing figure or 3D character material on the side you want to import the hand pose.
You can import hand pose materials the same way as full body pose materials.
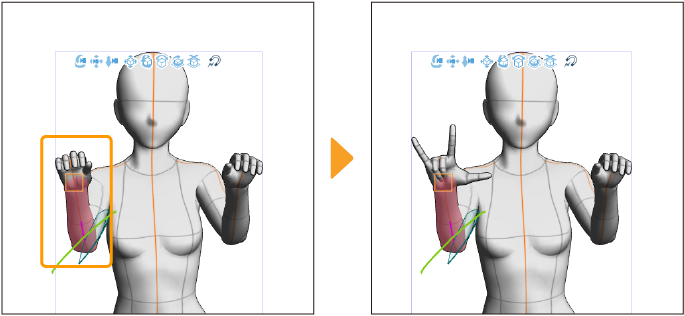
When a part in the center of the body is selected, such as the waist or head, or if a specific body part is not selected, the pose material will be applied to both hands.
Importing pose sequences
A pose sequence is a type of pose material made by importing BVH motion capture data. You can select a pose from the sequence to apply to a 3D drawing figure or 3D character.
You can import a pose sequence material in the same way as a normal full body pose material. After the pose material has been applied to the model, use the "Pose sequence" category > Pose number setting to determine which pose is used.
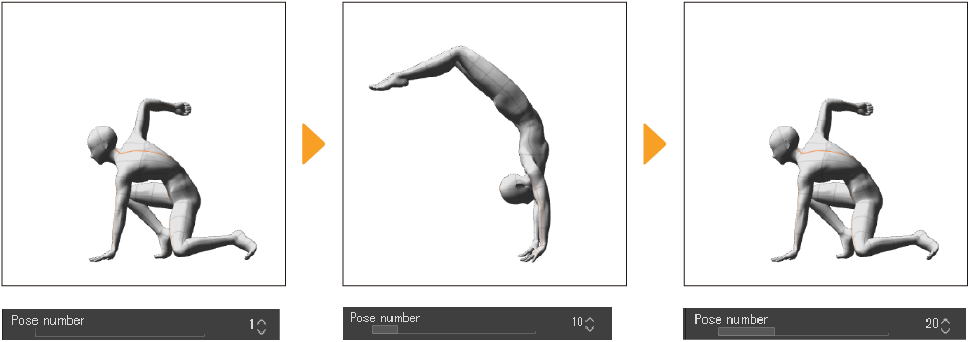
Memo | BVH format files are imported as pose sequences. For details, see "BVH format". |
Posing body parts
You can move body parts of a 3D drawing figure or 3D character material with the Object sub tool by holding and dragging the part.
3D character materials are composed of body parts such as arms, fingers, and head. Each part has standard bones configured, which move in the same way as human joints. Since the bones of the model are linked, moving a part moves other parts as well. In the below figure, the 3D drawing figure's head and left arm are tilted when the right arm is raised.
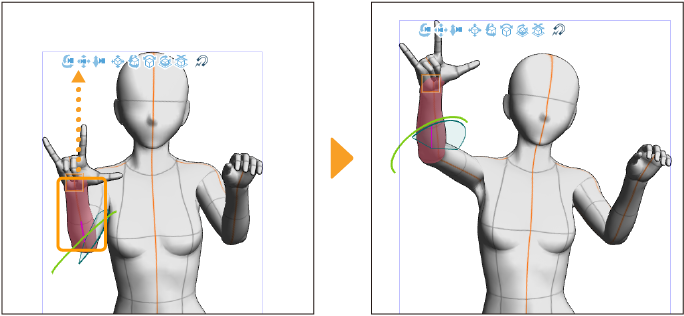
To prevent other parts of the body from interlocking, the joints can be locked or manipulators can be used to rotate and move the part.
Joint angle limit
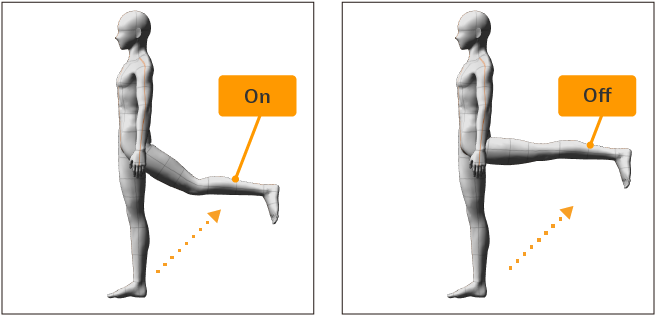
If Joint angle limit is turned on in the Tool Property palette > Pose category, the maximum angle of the body parts will be limited in the same way as human joints are when you drag them to pose.
Locking and releasing joints
Joints of 3D drawing figures and 3D character materials can be locked. The locked joint becomes the fulcrum for translation and rotation. You can create poses easier if the joints of 3D drawing figures and 3D character materials are locked as it reduces the amount of editing needed on other parts of the figure.
Memo | When no joints are locked, the waist is locked by default. |
Locking a joint
To lock a body part, select it with the Object sub tool and then tap Lock/release selected joints on the Object Launcher. You can lock multiple parts. Locked joints are marked with a blue square.
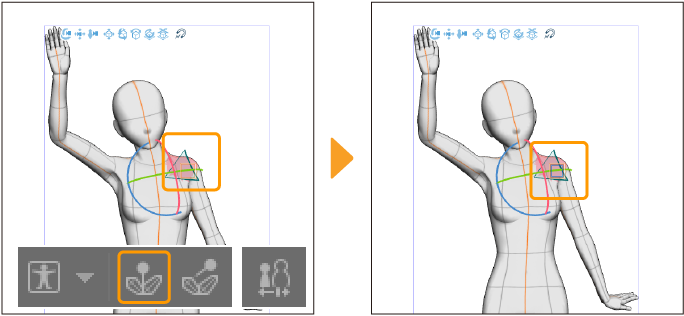
If you are using a mouse, you can right-click on the area to lock the joint. You can also lock joints by tapping Lock/release joint in the Pose category of the Sub Tool Detail palette.
Memo | Some parts have multiple bones, such as the hips and chest. If fixing a joint doesn’t result in the behavior you expect, try locking another joint. |
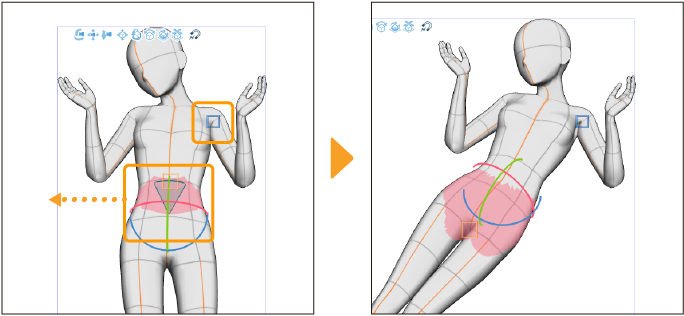
Depending on the locked body part, other body parts will be locked in position. When you move parts of a 3D models with locked joints, the locked joint becomes the center of movement, and parts on the far side will not move.
For example, if the left shoulder is locked, the left arm and hand will not move when body parts such as the hips are dragged.
Releasing a locked joint
You can release a locked joint by tapping on the locked part with the Object sub tool and then tapping Lock/release joint in the object launcher again to release it.
Alternatively, you can also tap Release all locked joints on the Object Launcher to release all joints set to the selected 3D drawing figure or 3D character.
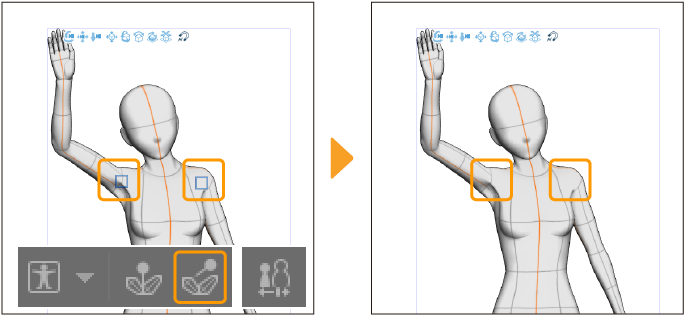
If you are using a mouse, you can right-click on the area to release the joint. To release all joints at once, right-click on an empty area of the canvas. You can also release joints by tapping Release all joints in the Sub Tool Detail palette > Pose category.
Rotating body parts with local manipulators
You can rotate body parts of 3D figures and 3D character materials using local manipulators.
Tap the area you want to edit with the Object sub tool to show a local manipulator and drag in the direction to rotate the body part.
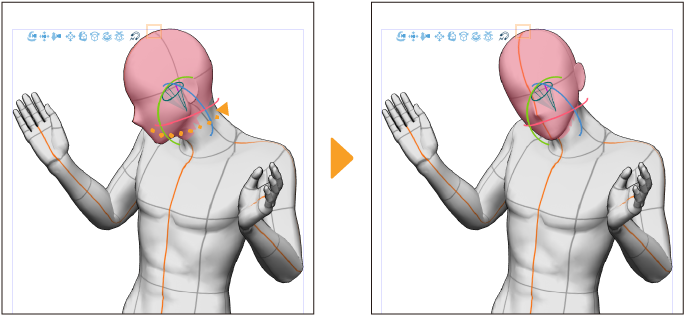
Memo | If the local manipulator does not appear, it will switch to the pose controller. Tap the body part again to display the local manipulator. |
The local manipulators can be rotated in the following directions. However, depending on the selected part, you may not be able to rotate or move in some directions.
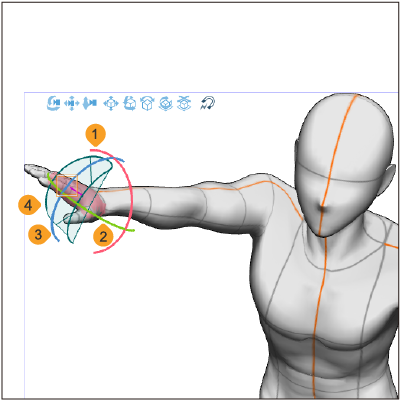
(1)Red: Twist (X)
Drag along the red ring to rotate the selected area in the direction of the ring.
(2)Green: Bending rotation (Y)
Drag along the green ring to rotate the selected area in the direction of the ring.
(3)Blue: Bending rotation (Z)
Drag along the blue ring to rotate the selected area in the direction of the ring.
(4)Movable range
This area shows the range in which the part can be moved.(This does not appear for 3D character materials compatible with Version 1.5.)
Memo | The rotation with this manipulator corresponds to the Partial rotation setting in the Sub Tool Detail palette > Transform category. |
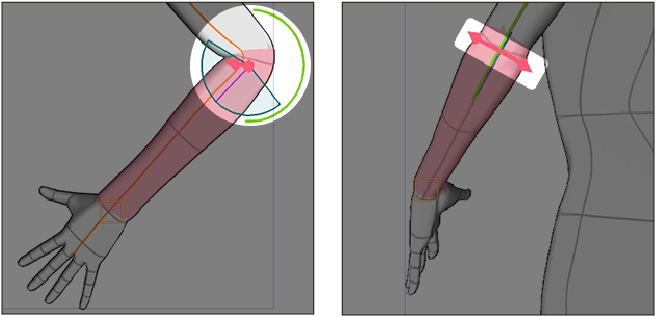
When you select the elbow or below the knee on a drawing figure or 3D character material, an additional red manipulator will appear.
·Drag the elbow manipulator to rotate only the elbow, while keeping the shoulder and wrist positions and elbow angle fixed.
·Drag the knee manipulator to rotate only the knee, while keeping the position of the hips and feet and the knee angle fixed.
Using the pose controller
The pose controller selects specific parts of a 3D figure or 3D character material, such as the waist, right hand, left hand and head. You can use this to adjust specific areas (e. g.moving only the hips or the head), without moving other areas.
Memo | When using the pose controller to move or rotate a part, locked joint settings are disregarded. |
Display the pose controllers
You can switch to the pose controllers by tapping the area where a local manipulator is displayed. The Root Manipulator appears at the same time.
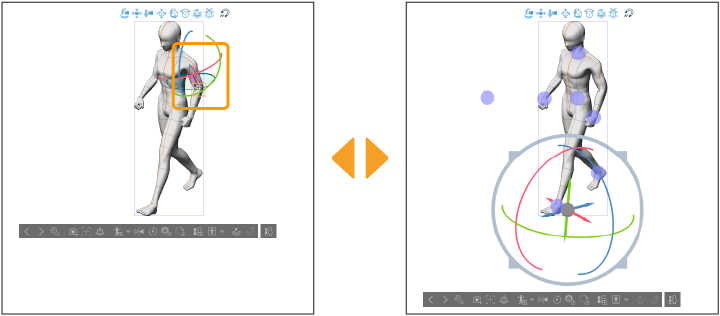
The pose controllers appear as blue circles. When you tap a pose manipulator, arrows and rotation manipulators appear around the selected controller.
Use the Object sub tool to select a pose controller and move the attached parts. In the figure, the pose controller at the waist is dragged downward.
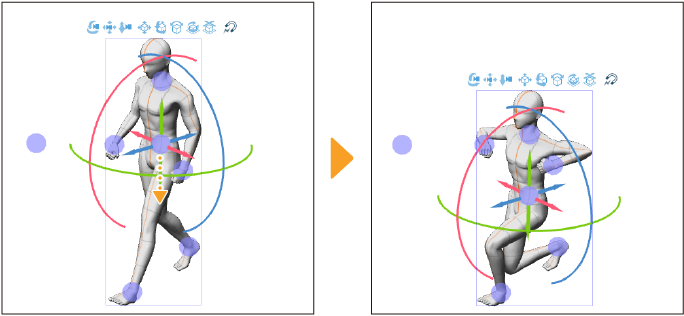
When a pose controller is selected, you can move the controller freely or drag the arrows that are shown to move the model.
You can rotate parts by dragging along the rotation rings that appear around the pose controller.
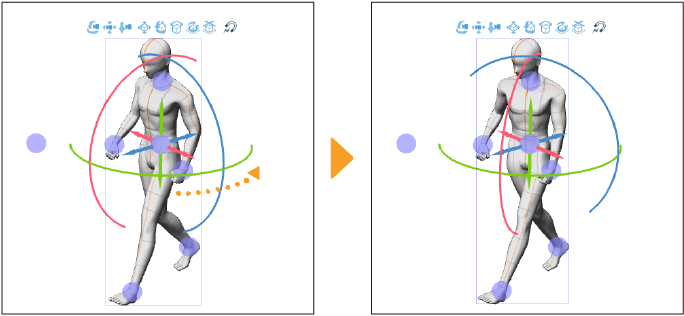
To return to the local manipulator, tap a part of the 3D drawing figure or 3D character material.
Pose Scanner
The Pose Scanner reads a picture containing a figure and applies the pose to 3D drawing figures or 3D characters to create a rough estimation of the pose you want. The Pose Scanner can read the following file formats: BMP, JPEG, PNG, WebP, TIFF and Targa. On tablets, you can also take a photo with the camera and apply it to your pose.
Memo | If you choose an image with multiple figures in it, the pose will reflect the biggest figure in it. If the figure in the image is not clear, the Pose Scanner may not be able to read the pose. The hand and finger positions will not be reflected in the pose. |
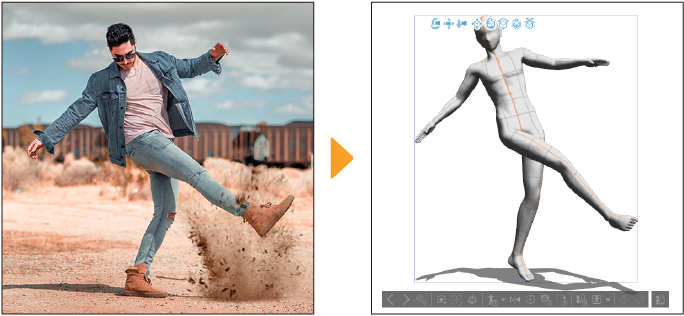
Important | ·This function is a technology preview. You can try it out before its official release. ·When you use this feature, the image data is uploaded to the server, where the AI interprets the data and estimates the pose. A network connection is necessary to execute this function. For information on images uploaded to the server and generated data, see "About AI features". |
There are three different ways to use the Pose Scanner.
Importing poses with the Object Launcher
You can access the Pose Scanner from the Object Launcher when you select a 3D drawing figure or a 3D character material with the Object sub tool.
From the drop-down to the right of the Apply pose to model icon, tap Pose Scanner (image) or Pose Scanner (image) (Technology Preview). A dialog will appear when you can select the image you want to reference. Once the photo is selected, the pose will be applied to the 3D drawing figure or 3D character material.

On tablets, you can also take photos with your device camera or choose photos from the device photo library.
iPad
·Tap Pose Scanner (camera) to activate the device camera and take a picture that you can apply to the 3D drawing figure or 3D character material.
·Tap Pose Scanner (Photo Library) to open the photo library and select an image from your device.
Android
·Tap Pose Scanner (camera) to activate the device camera and take a picture that you can apply to the 3D drawing figure or 3D character material.
·Pose Scanner (storage) opens the device file manager, where you can select an image from your device.
·Pose Scanner (image) opens the "File Picker dialog", where you can select an image from the dialog.
Importing with the Tool Property palette
When you select a 3D drawing figure or 3D character material with the Object sub tool, you can use the Pose Scanner from the Tool Property palette or from the Sub Tool Detail palette > Pose.
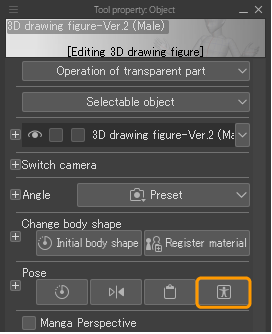
The available settings vary depending on the operating system. After tapping the item or button that shows, the operation is the same as when importing from the Object Launcher.
Importing with Menu commands
You can access the Pose Scanner from the File menu > Import.
·On Windows and macOS, you can select Pose Scanner (image) (Technology preview).
·On iPad, you can select Pose Scanner (image), Pose Scanner (camera), and Pose Scanner (Photo Library).
·On Android, you can select Pose Scanner (image), Pose Scanner (camera), and Pose Scanner (storage).
You can select photos in the same way as importing with the Object Launcher.
If you use the Pose Scanner from the File menu without selecting a 3D figure on the canvas, it will be applied to a new model. The Select material dialog will appear and prompt you to choose a model for the pose. If you are not selecting a 3D layer, it will be added to a new 3D layer.
Adjusting the body pose
You can use the Sub Tool Detail palette to make adjustments to your 3D drawing figure poses.
Making a pose symmetrical
You can copy the pose from one side of the body to the other in order to make it symmetrical.
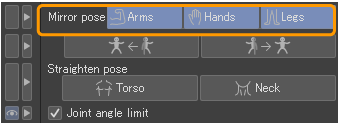
In the Sub Tool Detail palette > Pose > Mirror pose setting, first select which parts of the pose you want to mirror. You can mirror the Arms, Hands, and Legs. By default, all settings are turned on.
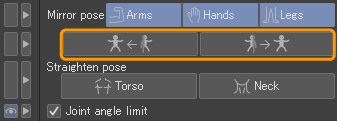
Next, tap which side of the pose you want to mirror. You can copy the left side of the pose to the right side, and vice versa.
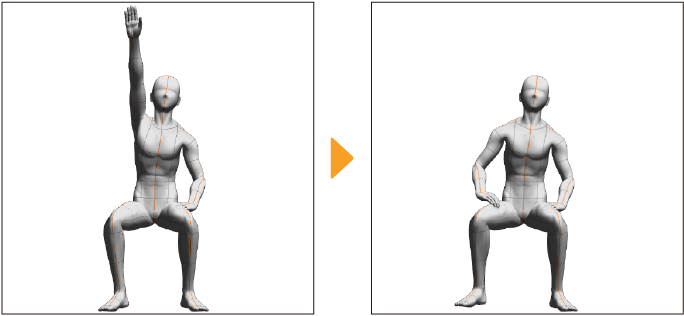
When you tap the button to mirror the pose, the selected pose elements will be mirrored.
Straightening a pose
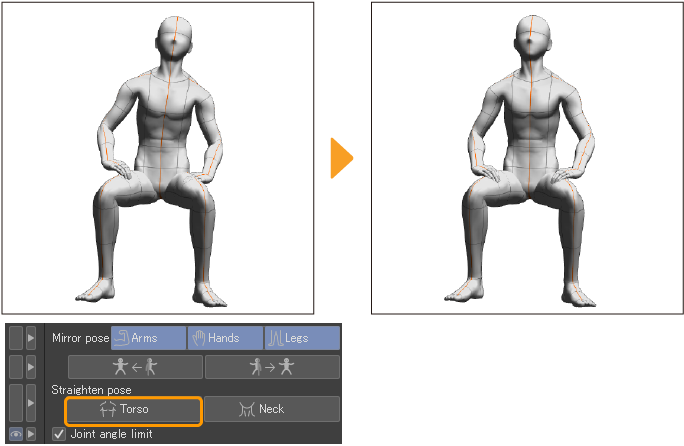
If the neck or torso of a pose is unintentionally tilted to one side, you can use Straighten pose to make the neck or torso upright while maintaining the rest of the pose.
In the Sub Tool Detail palette, tap the part of the body that you want to make upright in the Straighten pose setting. In the following example, Torso was tapped.
Using POSEMANIACS poses
You can import poses from POSEMANIACS into 3D drawing figures or 3D characters in Clip Studio Paint.
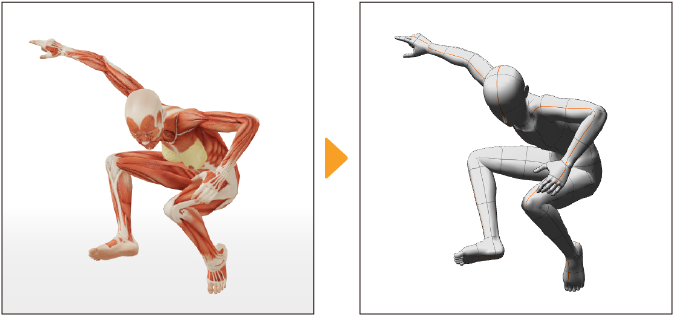
There are three ways to import poses from Posemaniacs in Clip Studio Paint.
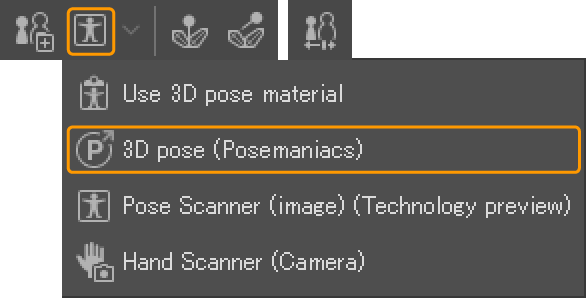
Importing poses with the Object Launcher
From the drop-down to the right of the Apply pose to model icon, tap 3D pose (Posemaniacs). The Posemaniacs site will open in your browser.
Select the pose you want to use on Posemaniacs and adjust the angle. When you’re ready, tap Open.
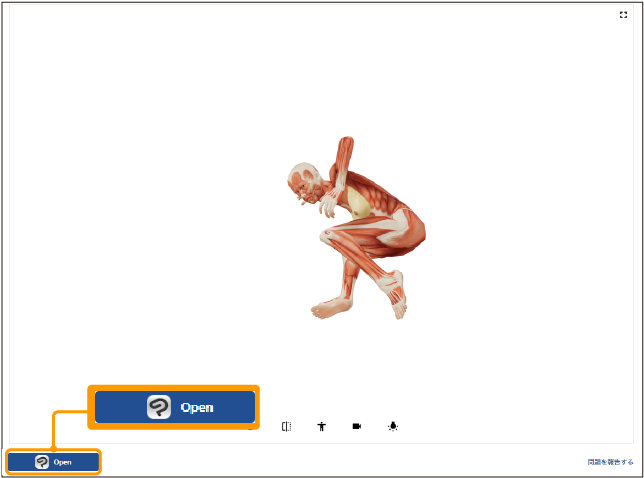
A confirmation message will appear. Select Open again to launch the pose in Clip Studio Paint.
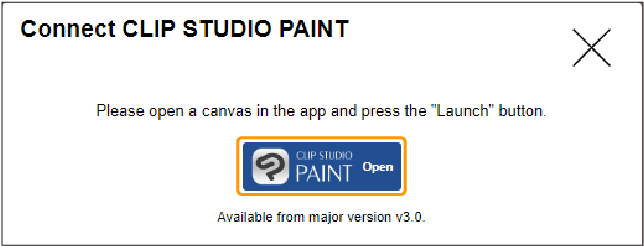
The screen will switch back to Clip Studio Paint, and the pose will be applied to your 3D model.
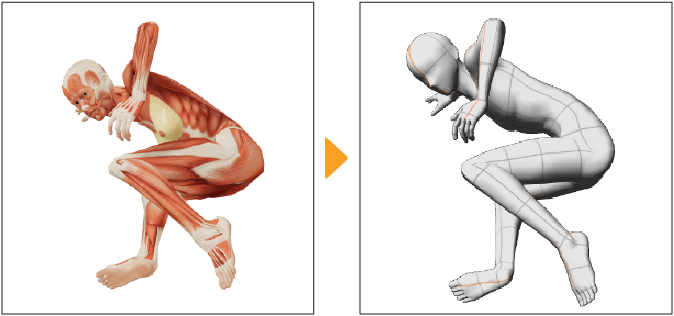
Importing with the Tool Property palette
Select the 3D drawing figure on the canvas, then select the Posemaniacs icon from the Tool Property palette or Sub Tool Detail palette > Pose category. The Posemaniacs site will launch.

The available settings may depend on your device or OS. For details on selecting and importing a pose, see "Importing poses with the Object Launcher".
Importing with menu commands
You can import poses from Posemaniacs using the File menu > Import > 3D pose (Posemaniacs).
For the steps after launching the Posemaniacs site, see "Importing poses with the Object Launcher". The selected pose will be applied in the following ways depending on the current canvas selection.
When a 3D drawing figure or 3D character is selected
The pose will be applied to the selected 3D drawing figure or 3D character.
When a 3D layer is selected
A dialog will pop up for you to select the 3D drawing figure that you want to apply the pose to. The 3D drawing figure with the selected pose will be added to the current 3D layer.
When a 3D layer is not selected
A dialog will pop up for you to select the 3D drawing figure that you want to apply the pose to. The 3D drawing figure with the selected pose will be created on a new 3D layer.
Importing from the Posemaniacs site
You can import poses directly from the Posemaniacs site. After arranging the pose, you can also tap Open under the pose to load a 3D drawing doll in the same way.
Please be sure to launch Clip Studio Paint and create a canvas before trying to import a pose from Posemaniacs with the Open button. If you have not created a canvas, the pose cannot be imported.
Adjusting the hand pose
You can adjust the hand pose with the hand controller in the Tool Property or Sub Tool Detail palettes. Use the Object sub tool to select the hand of the 3D drawing figure or 3D character material to pose it.
If you have selected a central part of the body, the pose will be applied to both hands.
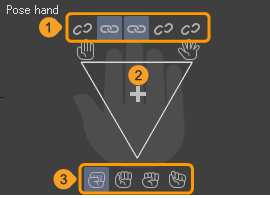
You can use the hand controller to adjust the hand pose between a flat palm with closed fingers, a flat palm with spread fingers, and a fist. Pull the controller between these extremes, while locking the pose of each finger as necessary, to adjust the pose.
(1)Lock finger
You can lock individual fingers from being affected by the hand controller.
(2)Hand controller
Drag the cross to adjust the hand pose. Moving to the left makes the fingers move closer, moving it to the right makes the fingers spread apart, moving it up opens the hand, and moving it down closes the hand.
(3)Fist presets
Tap the icons to switch between four fist shapes when the controller is pulled downward.
In this example, the pose is set so that the hand is a fist except for the index and middle fingers. First spread the fingers, then lock the index and middle fingers before dragging the hand controller toward the bottom to close all but the locked fingers.
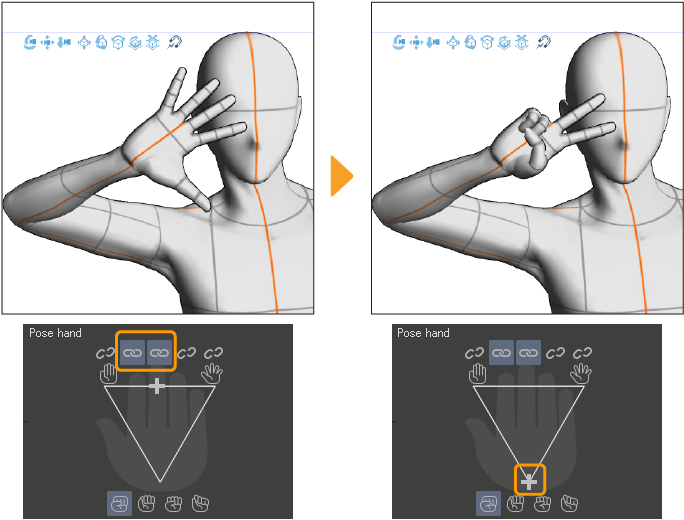
Hand Scanner
The Hand Scanner is a feature that automatically applies hand poses captured by your device's camera and applies them to a 3D drawing figure.
You can access the Hand Scanner by selecting the 3D drawing figure with the Object tool and selecting the Pose dropdown > Hand Scanner (Camera) from the Object Launcher or from the Hand Scanner button in the Tool Property or Sub Tool Detail palettes.
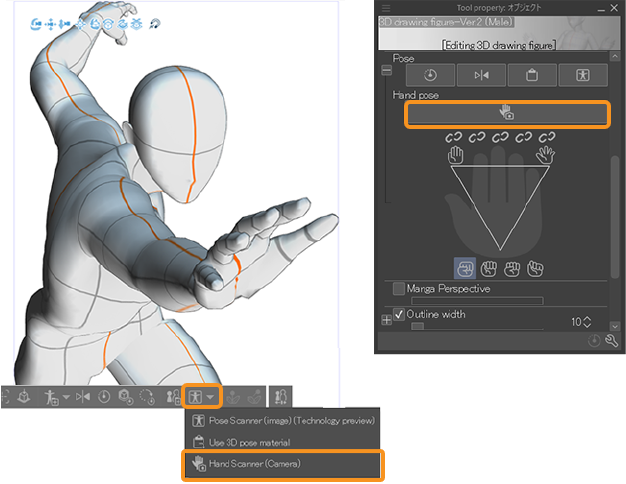
When you first launch the Hand Scanner, an information message will appear. Tap OK to open the Hand Scanner dialog.
The Hand Scanner dialog captures footage from your camera in real time and applies the pose to the hand of the 3D drawing figure. To lock the pose and stop recording, tap the Pause button in the dialog.Once you are satisfied with the hand pose, tap OK to close the dialog and apply the pose to the 3D drawing figure or 3D character.
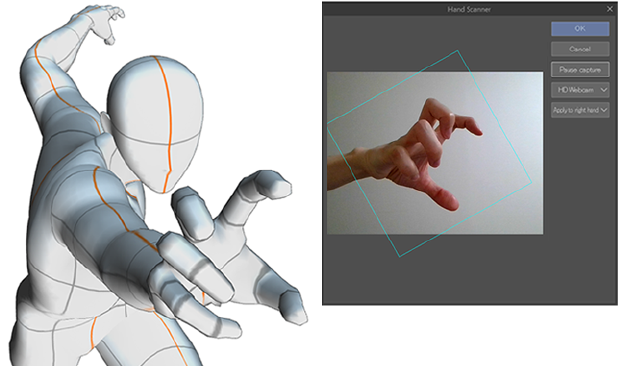
Memo | The Hand Scanner only affects one hand at a time. To pose both hands, first apply to one hand, then launch the Hand Scanner again and pose the second hand. |
You can use the following buttons on the right of the panel to control the Hand Scanner dialog.
(1)Pause/Start
Pauses the camera recording. Tap again to start recording and pose the hand again.
(2)Select camera
Tap to open a drop-down list with available cameras that you can use.
(3)Apply to right/left hand
Select which hand to apply the pose to.
Registering a pose as a material
Poses set to 3D drawing figures and 3D character materials can be registered to the Material palette as pose materials. You can save full body poses or hand poses and reuse them for other models or projects.
You can select a posed 3D drawing figure or 3D character material with the Object sub tool and register it in one of the following ways.
Memo | You cannot register materials in Clip Studio Paint DEBUT. |
Registering from the Object Launcher
Tap the Register full body pose icon and the Material property dialog will appear. Specify the material name and save location, then tap OK to register the pose material to the Material palette.
To register hand poses, tap the dropdown arrow beside the Register full body pose icon, then select Register left hand pose as material or Register right hand pose as material. Hand pose materials can be used for the left or right hand, regardless of the original pose.

Registering from the Sub Tool Detail palette
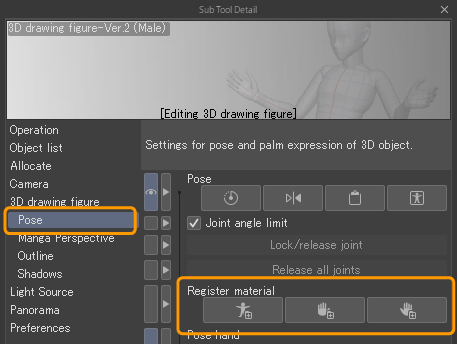
You can register a pose from the Sub Tool Detail palette > Pose category. Under the Register material setting, the following options are available: Register full body pose as material, Register left hand pose as material, and Register right hand pose as material.
Tap the option for the pose you wish to register, and the Material property dialog will appear. Specify the material name and save location, then tap OK to add the pose material to the Material palette.
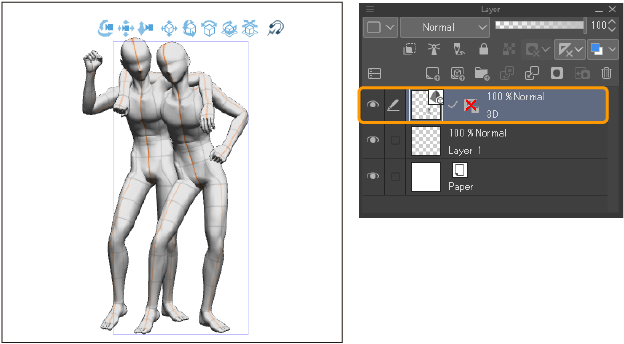
Register a pose material made of multiple figures
To save the poses of multiple 3D drawing figures on the same 3D layer, you can save the combined poses as a 3D image material.
See "Registering 3D image materials"for details.
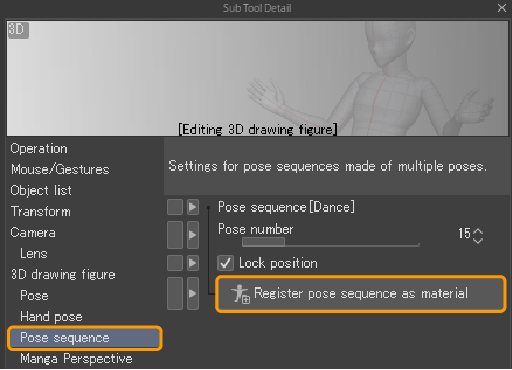
Register a pose sequence material
You can register a pose sequence material from the Sub Tool Detail palette > "Pose sequence" category. Tap Register pose sequence as material to register the material including the motion data.
The Material property dialog will appear. Specify the material name and save location, then tap OK to add the pose sequence material to the Material palette.
