O
Learn about Object, Operation, Outline, and other setting categories starting with O in Clip Studio Paint.
Object
You can set how 3D object materials appear when selected with the Object sub tool.
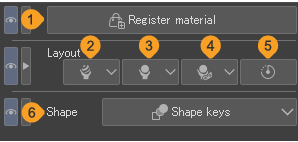
Memo | The operations in the Object category can also be performed from the Object Launcher when a 3D object material is selected. |
(1)Register material
Tap to register the selected 3D object to the Material palette.
(2)Material
Tap to select a material from the 3D object material list. Select a material to change the color and texture of the 3D object material.
(3)Layout
Tap to select a layout from the list of 3D object material layouts. You can change the allocation of 3D object materials by selecting a layout.
(4)Movable parts
Tap to display a list of movable parts set to the 3D object material. Use the slider to change the position of the movable parts.
(5)Initial pose
If a 3D material has multiple parts, they will be set to their default position.
(6)Shape
When a 3D material or 3D file with shape keys is selected, you can tap Shape keys to show the shape key sliders and edit the object appearance.
Object List
Select 3D materials or parts when on a 3D layer or saved camera settings. This can be used the same way as the Object list in the "Transform" category.
Memo | The Object List is not displayed when a Ver. 1.5 compatible 3D layer is selected. Please use the "Transform" object list. |
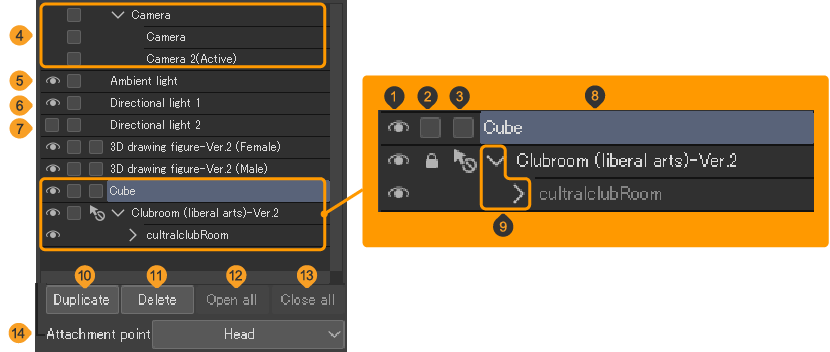
(1)Show/Hide
Toggles between showing/hiding 3D materials and parts included in 3D materials. Hidden 3D materials and parts cannot be edited. You can also edit Ambient light and Directional light display, but you cannot hide the Camera.
(2)Lock
Tap to display a padlock icon and lock the 3D material. You cannot edit a locked 3D material. When Ambient light, Directional light, or Camera is selected, the setting values are fixed and cannot be adjusted.
Tap the padlock icon to unlock it.
(3)Toggle selection
This enables or disables selection on a 3D material. An icon will be displayed if it cannot be selected. Enabling selection on a 3D object material that has multiple parts allows you to select and edit its parts.
(4)Camera
Tap to switch the "Transform" settings list in the Tool Property palette and the Sub Tool Detail palette to the camera-related settings.
If you have multiple camera settings saved, then tap on the camera setting to change the canvas view to the selected camera.
(5)Ambient light
Tap to switch the "Light Source" settings list in the Tool Property palette and the Sub Tool Detail palette to the ambient light-related settings.
(6)Directional light 1
Tap to switch the "Light Source" settings list in the Tool Property palette and the Sub Tool Detail palette to the directional light-related settings.
(7)Directional light 2
Tap to switch the "Light Source" settings list in the Tool Property palette and the Sub Tool Detail palette to the directional light-related settings.
(8)Material name
The name of the 3D material. Tap it to select the 3D material. You can double-tap to rename the selected 3D material or part in the 3D layer. The new name will only apply to the selected 3D layer. If you register the material to the Material palette after renaming, it will be registered under the new name.
(9)Open/Close folder
Folders will appear if a 3D object material with multiple parts or LWS format file is imported. Tap the chevron to open or close folder in the Object list. These also appear for 3D materials in a hierarchy. See "Linking 3D models in a hierarchy" for details.
(10)Duplicate
Select a 3D material and tap Duplicate to duplicate it. You can duplicate a camera and save multiple camera settings on a 3D layer. You cannot duplicate Panorama materials, Directional light, or Ambient light.
(11)Delete
Select a 3D material and tap Delete to delete it. When you have multiple camera settings, you can delete some by selecting Camera and tapping Delete. You cannot delete Directional light or Ambient light.
(12)Open all
Open all folders in the Object list.
(13)Close all
Close all folders n the Object list.
(14)Attachment point
This will setting is available for child objects in a hierarchy. Use the dropdown to specify which part of the parent 3D model that the child model is attached to.
Operation
These settings are available when selecting objects such as layers and 3D materials with the Object sub tool.
This category contains general settings as well as those specific to certain types of layers. For details on each setting, see "When a frame border folder is selected" and "When a 3D layer is selected".
For the Operation settings when the Text tool is selected, see "When using the Text tool".

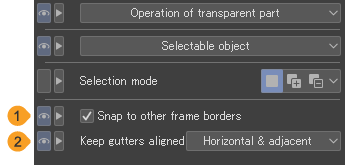
(1)Operation of transparent part
You can set what happens when you tap or drag the transparent part of a layer (an area where nothing is drawn). For details, please see "Operating transparent parts".
(2)Selectable object
Configures the types of layers and objects that can be selected by tapping.
You can select the following: Raster, Image material, 3D, Text, 2D camera, Vector, Balloon, Frame border, Gradient, Fill, Ruler, and Focus lines/Speed lines.(On Debut, you can only select raster, image material, 3D, text, and 2D camera.)
(3)Select folders
When turned on, you can select the layer folder of the selected layer when you tap or drag the canvas with the Object sub tool. If the layer is within multiple layer folders, the layer folder at the highest level will be selected. If the layer is not stored in a layer folder, only the layer will be selected.
(4)Always show frame
When turned on, a guide frame appears around the perimeter of the drawing area of the selected layer. If multiple layers or layer folders are selected, the guide line will appear around the perimeter of the entire selection. On vector layers, a guide frame and handles will appear.
(5)Selection mode
You can set how to make new selections when other objects or control points are already selected.
·New selection cancels the current selection and selects a new object or control points.
·Add to selection adds new objects or control points to the current selection.
·Remove from selection removes newly selected objects or control points from the existing selection.
·Toggle selection allows you to select or deselect an object or control point with each tap. If you tap something unselected, the operation is the same as Add to selection; and if you tap an existing selection, the operation is the same as Remove from selection.
Memo | Selection mode is not available in Clip Studio Paint DEBUT. |
Operating transparent parts
Use the Operation of transparent part pull-down menu to switch the setting.
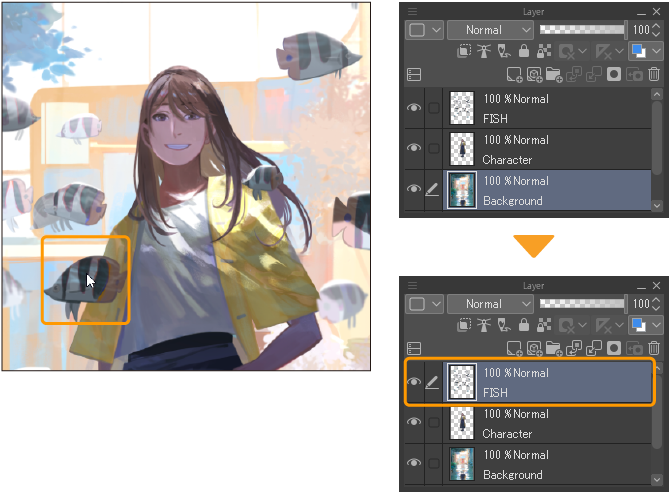
Switch to a different layer
Tapping a transparent area of the current layer will select objects on other layers that have something in that position.
Operate object by dragging
Set the behavior when dragging a transparent part of the layer.
Use 3D layer | Perform the selected operation from the 3D material’s root manipulator, such as moving the camera. |
Set direction of parallel line ruler | When a parallel line ruler is displayed, you can change the direction of the parallel line ruler in the dragged direction. |
Select area by dragging
When turned on, you can set the operation when dragging a transparent area. You can select Layer, Object or Control point. When set to Layer, the operation is the same as the "Move layer" sub tool.
When a vector layer or balloon layer is selected, you can set it to Object or Control point.
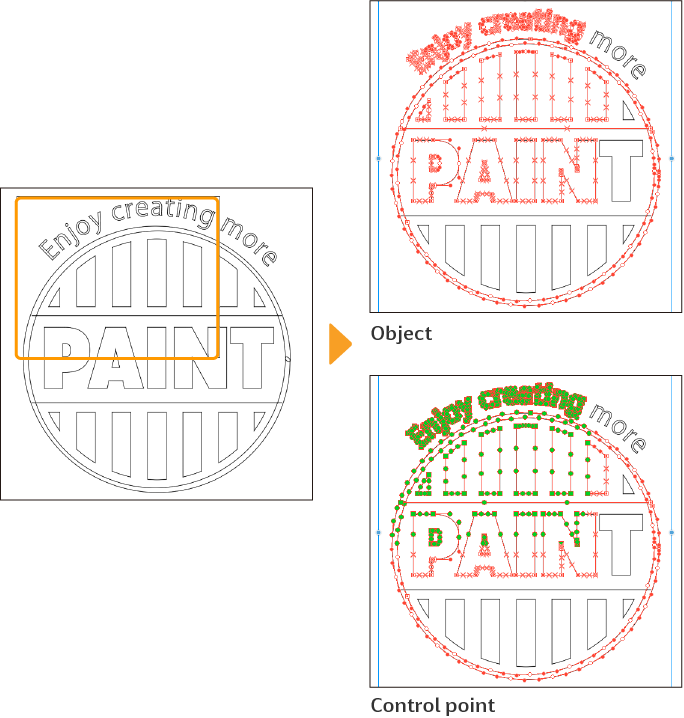
Memo | If Operation of transparent part > Switch to a different layer is turned off, you will not be able to select objects or control points even if set to Object or Control point. |
Move within transformation frame by dragging
You can set the operation when dragging a transparent area when a transformation frame is displayed on the layer.
Enable on all layers | If guide lines or a bounding box is shown on the layer, you can move the image within the bounding box or frame by dragging inside of the guide lines or bounding box. |
Enable for 2D camera folders only | You can move the transformation frame of the 2D camera folder by dragging inside the frame. The other layers cannot be moved. |
Memo | Set direction of parallel ruler and Select area by dragging are not available in Clip Studio Paint DEBUT. |
When a frame border folder is selected
(1)Snap to other frame borders
When turned on, when moving the control point or side of a frame border, it will snap to the sides of adjacent frame borders or their extension lines.
(2)Keep gutters aligned
You can select the method of moving the frame lines and control points to None, Horizontal & adjacent, or All.
None | This will only move the selected side or control point. Other sides and control points of frame borders will not move. |
Horizontal & adjacent | When moving sides or control points of a frame, connecting gutters will move as well. Horizontal frame borders adjacent to the moving side or control points will move as well. However, when moving a vertical frame border, only the immediately adjacent frame border will move. Other adjacent borders will not move. |
All | When moving sides or control points of a frame, connecting gutters will move as well. Horizontal frame borders adjacent to the moving side or control points will move as well. Vertical frame borders adjacent to the moving side or control points will move as well. |
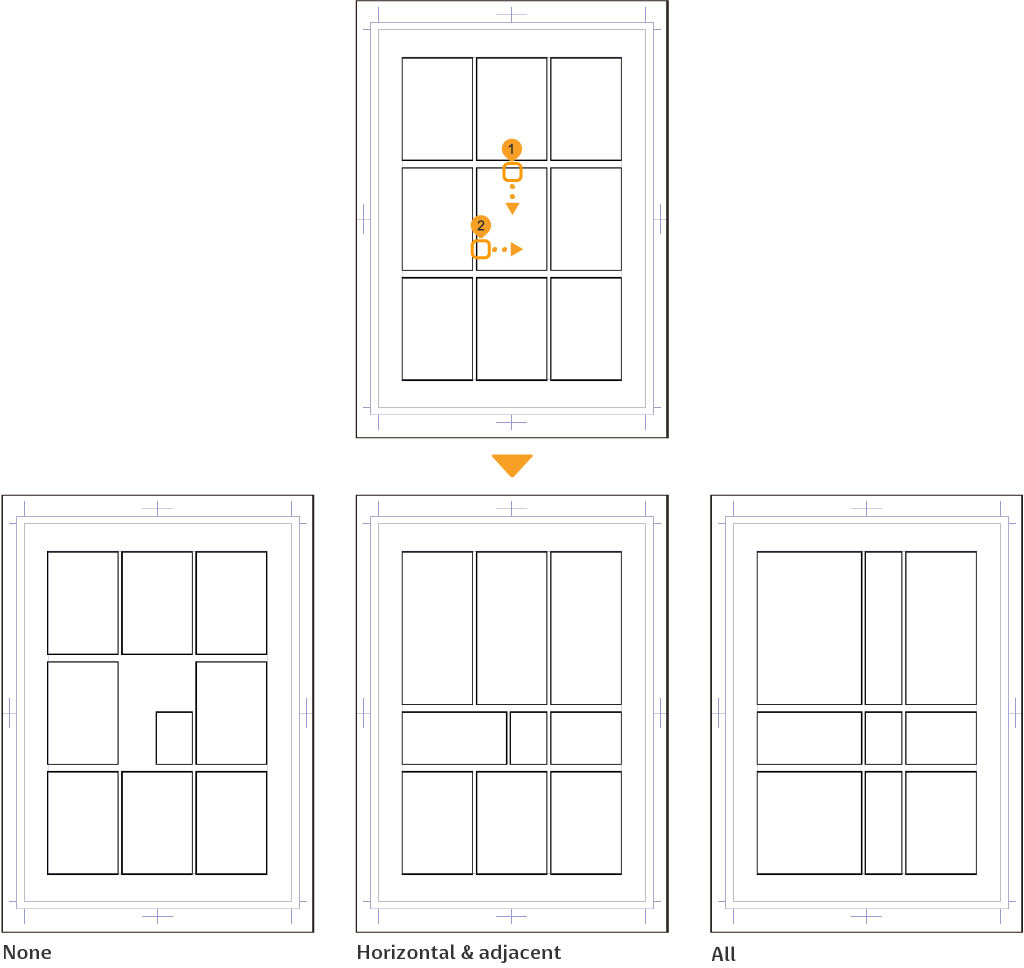
Memo | ·If the gap between frames is very wide, frames may not align to each other when you move them. In Preferences > Layer/Frame, make sure that the settings for Vertical gutter and Horizontal gutter are at least as wide as the gutters you are using. ·You cannot use Keep gutters aligned in Clip Studio Paint DEBUT. |
When a 3D layer is selected
You can adjust how the root manipulator behaves when a 3D layer is selected with the Object sub tool.
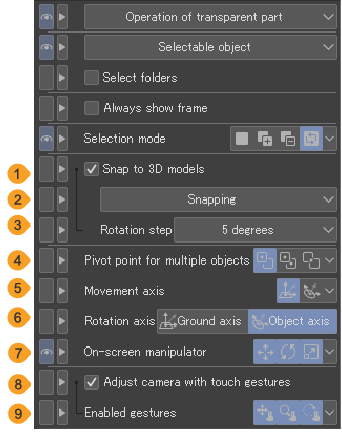
(1)Snap to 3D models
When turned on, when moving a 3D material with the manipulator, it can snap to match other 3D materials.
(2)Snapping
3D materials can snap to Position, Rotation, and Scale. You can snap to multiple settings at once.
(3)Rotation step
Set a rotation step to rotate the 3D material with the manipulator at the specified angle increments.
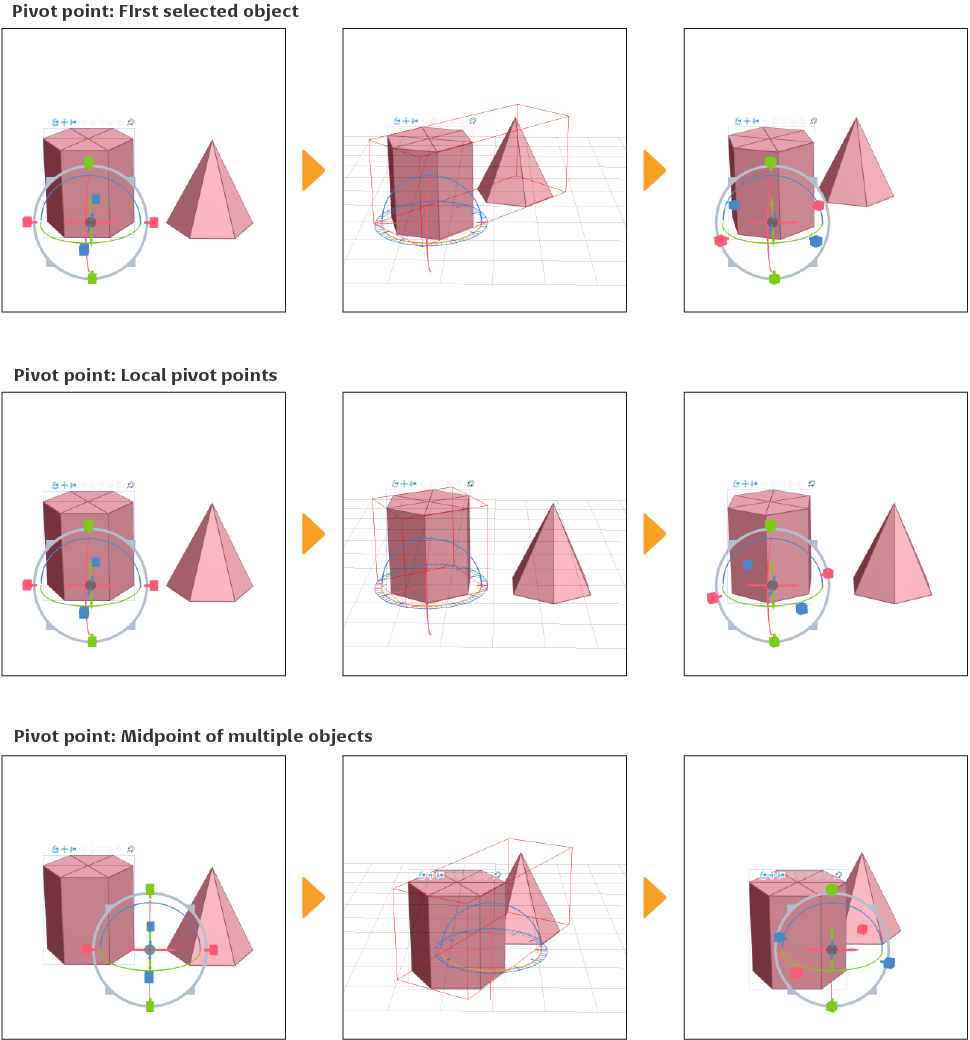
(4) Pivot point for multiple objects
You can select the reference point for enlarging/reducing/rotating multiple 3D materials to First selected object, Local pivot points, or Midpoint of multiple objects.
(5)Movement axis
You can select the reference axis for moving the 3D material with the root manipulator to be the Ground axis or Object axis. When set to Object axis, you can move the object according to its angle. You can check the position and orientation of the reference axis with the root manipulator.
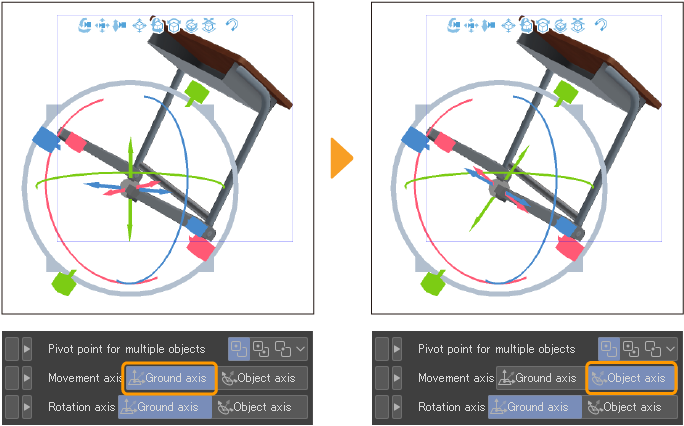
(6)Rotation axis
You can select the reference axis for rotating the 3D material with the root manipulator to be the Ground axis or Object axis. You can rotate the object according to its angle. You can check the position and orientation of the reference axis with the root manipulator.
(7)On-screen manipulator
Select which parts of the manipulator to display around the selected object. See "Root Manipulator" for details.
When using the Text tool
You can adjust how to select text when using the Text sub tool.

(1)Drag
Define what happens when you drag on the canvas with the Text tool.
·Create text box: Create a new text box on the canvas.
·Select text: Selects text within the dragged area.
·None: Nothing happens when you drag on the canvas.
(2)Selection mode
You can set how to make new selections when other objects or control points are already selected.
·New selection cancels the current selection and selects a new object or control points.
·Add to selection adds new objects or control points to the current selection.
·Toggle selection allows you to select or deselect an object or control point with each tap.
Outline
You can adjust the outline when a 3D drawing figure, 3D character, or 3D object is selected with the Object sub tool.

(1)Outline width
When turned on, an outline will be shown around the 3D material. You can set the outline size with the slider. The larger the value, the thicker the outline.
(2)Opacity
Sets the opacity of the outline. The larger the value, the higher the opacity of the outline will be.
(3)Color
Sets the drawing color of the outline. Tap the color icon to open the Color settings dialog and set the outline color.
