L
Learn about Layer, Light source, Liquify, and other setting categories starting with L in Clip Studio Paint.
Lasso
Lasso settings allow you to adjust the referenced layers and magnetic settings when dragging to lasso an area with tools such as the Lasso selection tool and Lasso Fill.
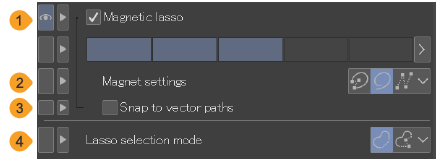
(1)Magnetic lasso
Turn on Magnetic lasso to lasso an area that snaps to lines on the reference layer. If there is no reference layer or the area of the reference layer is empty, the tool will snap to the current layer. Use the indicator to adjust the strength of the magnet. When the value is higher, the tool will snap to lines that are further away.
(2)Magnet settings
You can set the magnet settings to All, Freehand, or Polyline.
When set to Freehand, the lasso will snap as you drag. When set to Polyline, it will snap to the line at angles as you tap. When set to All, you can use both freehand and polyline input.
(3)Snap to vector paths
When turned on, the fill area or selection area will snap to the vector path. This setting only applies when snapping to vector layers.
(4)Lasso selection mode
You can set the selection mode to Single stroke or Multiple input. When set to Single stroke, the area will be created in one stroke. When set to Multiple input, you can create a selection area that combines freehand and polyline actions by combining dragging and clicking.
Layer
You can adjust the opacity on the Timeline palette when the Object sub tool is selecting a layer or 2D camera folder that has Enable keyframes on this layer turned on.
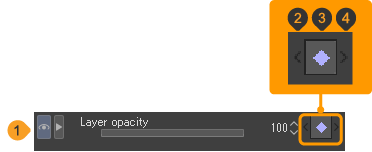
(1)Layer opacity
You can use the slider to set the opacity of the current layer or 2D camera folder to create a keyframe that records the Opacity value for the frame selected on the Timeline palette.
(2)Previous keyframe
Tap to move to the previous keyframe with the Opacity setting.
(3)Add/delete keyframe
Tap to add an opacity keyframe onto the selected frame on the Timeline palette. If a keyframe is already displayed, you can remove the keyframe from the current frame.
(4)Next keyframe
Tap to move to the next keyframe with the Opacity setting.
Lens
You can adjust how the 3D space appears (the camera lens) when a 3D layer is selected with the Object sub tool.
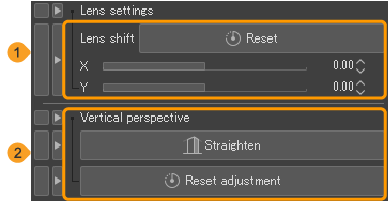
(1)Lens shift
See "Using lens shift" for details.
(2)Vertical perspective
See "Straighten" for details.
Light Source
You can adjust the light source when a 3D layer is selected with the Object sub tool.
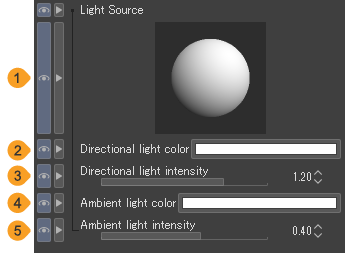
(1)Light Source
Drag the circle to change the direction of Directional light 1. Directional light 2 can be controlled when it is selected in the Object list. When using a 3D layer compatible with Ver. 1.5, you can set the direction of the Directional light.
(2)Apply light source
Apply a light source to the 3D model. See "Applying a light source to 3D materials".
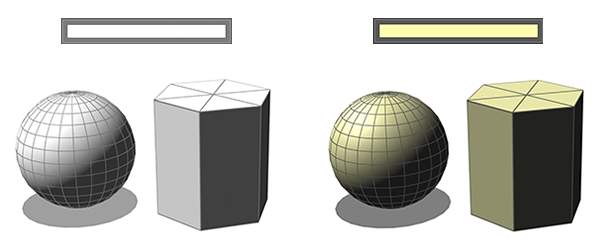
(3)Directional light color
Tap the color icon to open the Color settings dialog and set the directional light color. If Directional Light 2 is selected in the Object List, this setting will change Directional Light 2. See "Adjusting the color and intensity of directional light".
(4)Directional light intensity
You can adjust the intensity of the directional light set in Light source. The larger the value, the stronger the light. If Directional Light 2 is selected in the Object List, this setting will change Directional Light 2. See "Adjusting the color and intensity of directional light".
(5)Shadows
Set how shadows for the 3D model are cast. See "Setting shadows on 3D materials"for details.
(6)Cast shadows
Toggle whether shadows are cast by the selected model. See "Showing and hiding shadows on 3D materials"for details.
(7)Ambient light
Set the type of ambient light. See "Setting up ambient light"for details.
(8)Ambient light color
Tap the color icon to open the Color settings dialog and set the ambient light color. See "Setting up ambient light"for details.
(9)Ambient light intensity
Sets the strength of the ambient light. See "Setting up ambient light"for details.
Memo | To apply the Ambient light color and Ambient light intensity, turn on Apply light source in the Rendering settings dialog. |
(10)Use directional light
This setting appears when you select a 3D layer compatible with Ver. 1.5. Turn this on to apply a light source to the 3D material.
(6)Use parallel light
This setting appears when a 3D layer compatible with Ver. 1.5 is selected. When turned on, this applies a light source to the 3D material.
Light table
The Light Table sub tool contains settings for the operation of cels on light table layers.
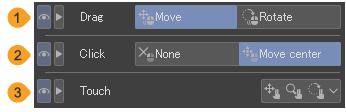
(1)Drag
You can choose to set Move or Rotate for when you drag on the canvas.
(2)Click
You can choose to set None or Move center for when you click or tap on the canvas. When Move center is selected, you can tap the canvas to specify the center point for when the light table layer is rotated or inverted.
(3)Touch
You can set up two-finger touch gestures. Note that these settings will not be applied to devices that do not support touch gestures.
Move with two fingers | Swipe with two fingers to move the light table layer. |
Scale up/down with two fingers | Pinch in/pinch out with two fingers to scale the light table layer up/down. |
Rotate with two fingers | Rotate with two fingers to rotate the light table layer. |
Line space/alignment
Set how to align and space text on a text layer when selected with the Text or Object sub tool.

(1)Alignment
Sets the position for aligning the text rows. If the text is written vertically, you can align to the Top, Center, or Bottom. If the text is written horizontally, you can align to the Left, Center, or Right.
(2)Wrap text at frame
Turn this on to automatically line break to keep text within the text box.
When Wrap text at frame is turned on, dragging the handles to increase the size of the frame will not change the font size. Text that extends beyond the frame will not be displayed. and you can drag the handles to increase the size of the frame and show the overflow text.
(3)Justify
You can set the justification if Wrap text at frame is turned on. This adjusts the text spacing so that the lines meet the edges of the text box. There are different options for the alignment of the last line.
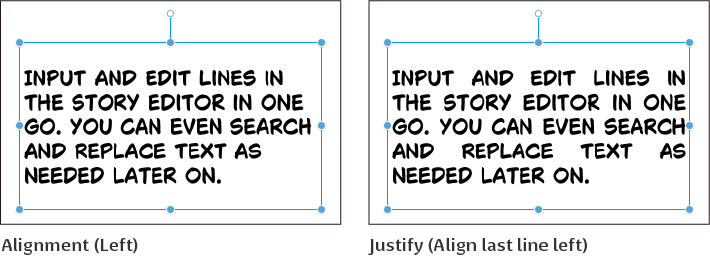
When a Justify setting is selected, the Alignment setting will be turned off. To disable justification, select an Alignment setting.
(4)Position in frame
You can set the position within the frame where the text is aligned. For horizontal writing, choose from Up, Center, or Bottom. For vertical writing, select from Left, Center, or Right.
(5)Line space
You can adjust the space between lines with a slider or numerical value. You can set the unit in How to specify.
You can change how to space each line when selecting it with the Text tool.
(6)How to specify
You can set the Line space measurement to Specify length or Specify percentage. Specify length allows you to specify the width between lines in points (pt). By percentage determines the line space as a percentage of the character size.
You can set the text units from the Preferences dialog > Ruler/Unit > Text unit.
Liquify
When using the Liquify tool, you can choose liquify modes as well as adjust the strength and hardness.
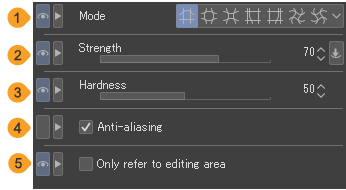
(1)Mode
Sets the liquify mode. For details on each setting, see "Liquify modes".
(2)Strength
Sets the range of the liquify effect. The larger the value, the higher the stronger the effect of the transformation.
(3)Hardness
Sets the hardness of the liquify effect. The higher the value, the more evenly the cursor area will liquify.
(4)Anti-aliasing
You can enable anti-aliasing for the Liquify tool. When anti-aliasing is on, jags are smoothed.
(5)Only refer to editing area
Sets the area to be referenced when using the Liquify tool. When turned on, only the part of the image traced with the Liquify sub tool is referenced. When turned off, images other than the traced area are also referenced.