T
Learn about Text, Texture, Tiling, and other setting categories starting with T in Clip Studio Paint.
Text
With these settings, you can set the text direction, anti-aliasing and the like when using the Text tool or when a Text layer is selected with the Object tool.
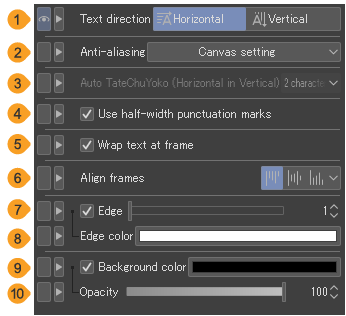
(1)Text direction
Set the text direction to Vertical or Horizontal.
(2)Anti-aliasing
You can turn text anti-aliasing on or off, or set it to Canvas setting. When set to Canvas setting, the anti-aliasing matches the basic expression color setting of the canvas.
(3)Auto TateChuYoko (Horizontal in Vertical)
For scripts such as Japanese and Chinese, this setting displays half-width letters horizontally when text is written vertically. Set the number of letters to display horizontally from None, 1 letter, 2 letters, 3 letters and 4 letters.
When set to 2 letters, up to 2 half-width letters will be typed horizontally, and 3 or more half-width letters will be typed vertically.
(4)Use half-width punctuation marks
When turned on, blank spaces for punctuation marks such as two-byte punctuation marks or parentheses are automatically filled.
(5)Wrap text at frame
When turned on, text is wrapped so that it fits within the frame.
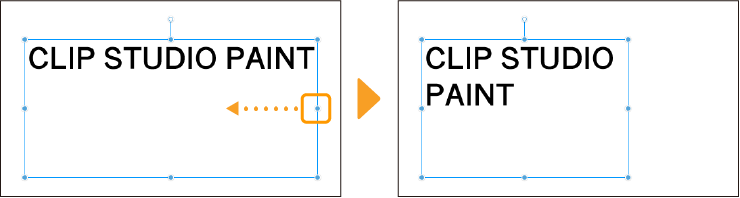
When Wrap text at frame is turned on, the text will no longer adjust size to fit the frame. If there is too much text to fit within the frame, it will be cut off. You can drag the handles to resize the frame and show all of the text.
(6)Align frames
This is the setting for aligning the position of text. You can select Left, Center or Right for vertical text. You can select Up, Center or Bottom for horizontal text.
(7)Edge
For details, see "Adding a border".
(8)Edge color
Tap the color icon to open the Color settings dialog where you can set the color of the outline.
(9)Background color
Turn this on to add a background color to the frame. Tap the color icon to open the Color settings dialog where you can set the background color.
(10)Opacity
You can adjust the opacity of the background color.
Text list
You can enter special characters and symbols when entering text with the Text tool.
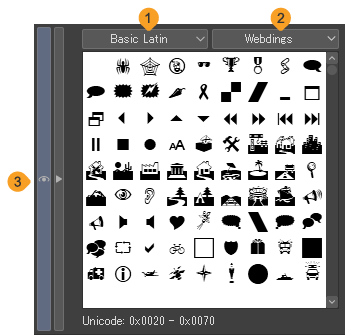
(1)Text category
Select the type of special characters. Available characters will appear in the character list.
(2)Font
Select from fonts available in the font list.
(3)Character list
List of available characters. Tap to add to the current text. The available characters depend on the Text category and Font.
Texture
You can apply textures to brushes to simulate the look of different paper mediums.
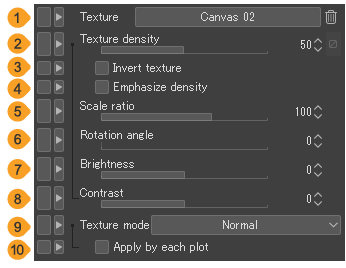
(1)Texture
Select the texture for the brush. Tap the button to open the Select paper texture material dialog, where you can choose the image material for the texture.
(2)Texture density
You can specify how strongly the texture will be applied. You can also tap the Dynamics icon to make the texture reflect changes in the pen pressure and brushstroke speed.
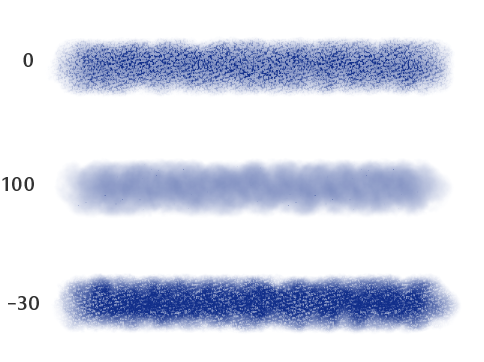
(3)Invert texture
You can apply the texture gradient to the brush with the shades inverted.
(4)Emphasize density
You can emphasize the difference in texture density.
(5)Scale ratio
You can specify the scale ratio of the image material when applied to a brush as a texture.
(6)Rotation angle
You can specify the angle of the image material when applied to a brush as a texture.
(7)Brightness
Adjusts the brightness of the image material.
(8)Contrast
Adjusts the contrast of the image material.

(9)Texture mode
You can set the blending mode of the image material. The effect depends on the texture material, hardness, and the brush density.
You can select Normal, Multiply, Subtract, Compare, Outline, Overlay, Color dodge, Hard mix, or Height.
Outline emphasizes the outline of the texture. You will see the effect at the outer edges of a soft brushstroke.Height emphasizes the texture only at the edges of the stroke.
(10)Apply by each plot
Turn this on to apply the texture to a drawing tool brush pattern (the tip of the brush). In this case, since the brush pattern overlaps in the central area of the stroke, the texture is also shown overlapped. When turned off, the texture is applied on a per-stroke basis.
Memo | The center of a drawn mark will get darker if you set Apply by each plot on with Emphasize density on, and the Hardness is set high in the Brush tip category. |
Texture settings
You can adjust the position and size of textures applied to primitives selected with the Object tool.
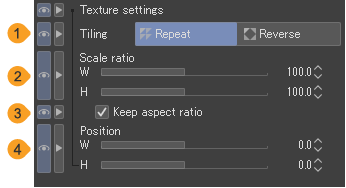
(1)Tiling
You can select the texture repetition method to Repeat or Reverse. Repeat arranges textures in the same direction.Reverse flips each instance of the texture.
(2)Scale ratio
You can set texture scaling as a ratio (%) of the original image. Ratios can be set separately for width and height.
(3)Keep aspect ratio
When this is turned on, textures will maintain their original aspect ratio when scaling.
(4)Position
The position of the texture can be adjusted with the Width (W) and Height (H) sliders.
Tiling
With these settings, you can set how to arrange repeating patterns when an image material layer or file object layer is selected with the Object tool.
Memo | You cannot use Tiling settings when a vector image layer is selected. |

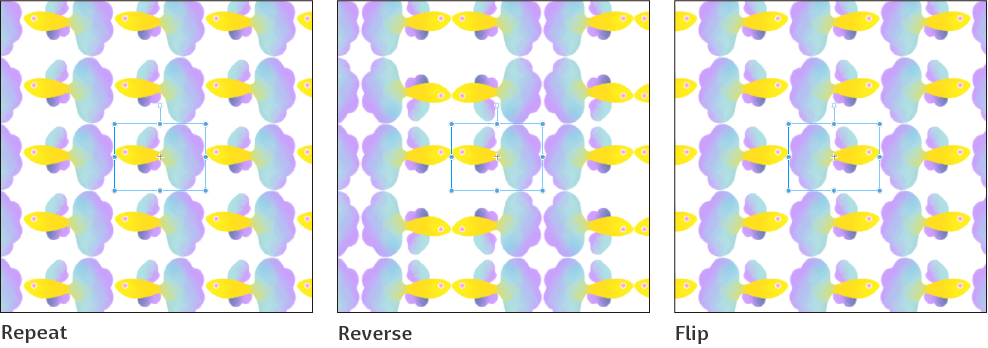
(1)Tiling
When turned on, the image will be arranged repeatedly. You can select the repetition method to Repeat, Reverse, or Flip.
Reverse alternates the direction for each repetition.Flip reverses the image horizontally for each repetition. When the Tiling direction is set to Vertical, the image is are flipped vertically.
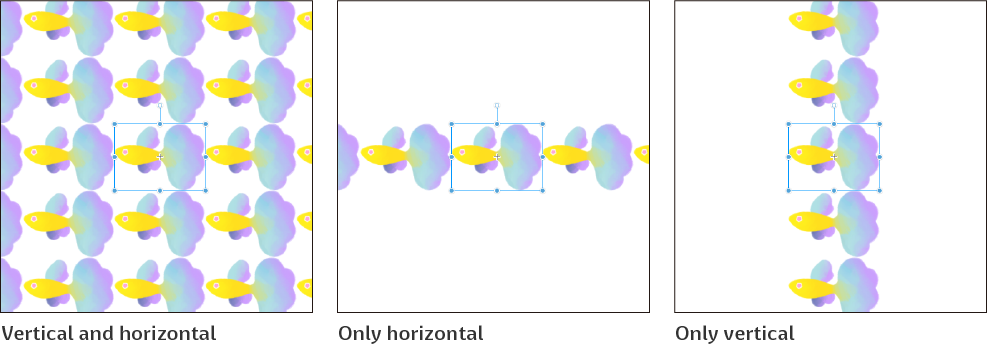
(2)Tiling direction0
You can select the tiling direction to Vertical and horizontal, Horizontal, or Vertical.
Transform
You can use these settings to transform a camera or 3D model selected on the canvas or from the Object list. The available settings depend on the selected object.
· "When a 3D drawing figure or 3D character is selected"
· "When a 3D object, 3D primitive, or 3D head model is selected"
When camera is selected
This field appears when a Camera is selected in the Object list or the Camera list. The settings are the same as the "Camera" category.
When a 3D drawing figure or 3D character is selected
You can adjust the following settings when a 3D drawing figure or 3D character material is selected in the Object list. You can change the same settings when you select an imported file in Clip Studio 3D character format (extension: cs3c).

(1)Object scale
You can adjust the scale of 3D drawing figures and 3D character materials.
When you change the Object scale value of a 3D drawing figure, the Height value in the 3D drawing figure category will change accordingly. However, when you change the height of a 3D drawing figure, the Object scale value will not change.
Tap Reset to reset the object back to the original size.
(2)Position
You can adjust the position of 3D drawing figures and 3D character materials by adjusting the X, Y, and Z sliders. Tap Ground to place the 3D drawing figure or 3D character material on the floor (base) of the 3D space.
(3)Whole rotation
You can rotate 3D drawing figures and 3D character materials with the X, Y, and Z sliders. Tap Reset to reset the object to the original rotation.
(4)Partial rotation
This setting is available when a part of a 3D drawing figure or 3D character is selected. You can rotate the part with the X, Y, and Z sliders.
If Joint angle limit is turned on in the "Pose" category, the rotation angle may be limited.
When a 3D object, 3D primitive, or 3D head model is selected
You can adjust the following settings when a 3D object material, 3D primitive, or 3D head model is selected in the Object List. You can change the same settings when you select an imported file in Clip Studio 3D object format (extension: cs3o) or a general-format 3D file.
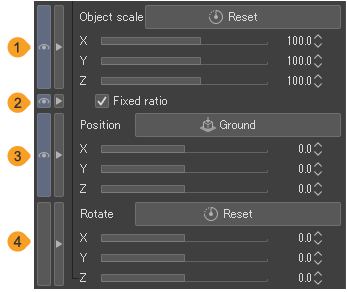
(1)Object scale
You can change the scale of the selected 3D model with the X, Y, and Z sliders. Tap Reset to reset it to the original size.
Memo | If you have selected a Ver. 1.5-compatible 3D small object, only one slider will be available instead of the X, Y, and Z sliders. You can adjust the scale of the 3D material with a fixed width/height/depth ratio. |
(2)Fixed ratio
When turned on, the ratio of X, Y, and Z will be fixed when adjusting the Object Scale sliders.
(3)Position
You can change the position of the selected 3D model, or parts of a 3D object, with the X, Y, and Z sliders. Tap Ground to place the selected 3D model on the floor (base) of the 3D space.
(4)Rotate/Whole rotation
When a 3D object material is selected, this setting is Rotate. When a 3D Primitive is selected, this setting is Whole rotation.
You can rotate the selected 3D model, or parts of a 3D model, with the X, Y, and Z sliders.
Tap to reset the rotation of the selected 3D model to the initial state. You cannot use Reset on a single part of a 3D object.
Transform image
You can use Transform image while selecting a layer with a keyframe set or while selecting a 2D camera folder.
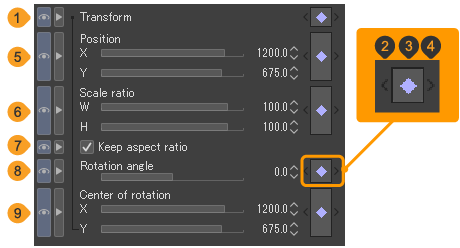
(1)Transform
A keyframe will be created on the selected frame of the Timeline palette that records all the settings from the Transform image category for the edited layer or 2D camera folder.
(2)Previous keyframe
Tap to move to the previous keyframe with the Transform setting. Besides Transform, you can move Position, Scale ratio, Rotation angle, and Center of rotation keyframes.
(3)Add/delete keyframe
Tap to add a Transform keyframe onto the selected frame on the Timeline palette. If a keyframe is already displayed, you can remove the keyframe from the current frame. Besides Transform, you can add/delete Position, Scale ratio, Rotation angle, and Center of rotation keyframes.
If you delete an Image transformation category keyframe other than Transform, the keyframe displayed to the right of Transform will become translucent.
(4)Next keyframe
Tap to move to the next keyframe with the Transform setting. Besides Transform, you can move Position, Scale ratio, Rotation angle, and Center of rotation keyframes.
(5)Position
You can change the position of layers and layer folders. The coordinates for the center of rotation for the transformation will be the reference position.
The coordinates for the center of rotation are measured in pixels from the top left of the canvas. The x-coordinate indicates the horizontal value, while the y-coordinate indicates the vertical value.
(6)Scale ratio
Set the scale ratio of layers and animation folders as a percentage of the original image. Ratios can be set separately for width and height.
However, when selecting a layer folder, 2D camera folder, gradient layer, or 3D layer, you can only edit the overall scale ratio.
(7)Keep aspect ratio
Turn this on to scale up or down while keeping the aspect ratio of the layer or animation folder.
However, this option will not appear when selecting a layer folder, 2D camera folder, gradient layer, or 3D layer.
(8)Rotation angle
You can specify the image rotation angle with respect to the horizontal position.
(9)Center of rotation
You can set the center of rotation. The reference position is the center of rotation of the frame before being scaled or moved.
The coordinates for the center of rotation are measured in pixels from the top left of the canvas. The x-coordinate indicates the horizontal value, while the y-coordinate indicates the vertical value.
Memo | You can change the center of rotation position on the canvas by dragging and dropping the center of rotation icon. Even if the location or angle of the transformation frame is changed, you cannot change the center of rotation. |
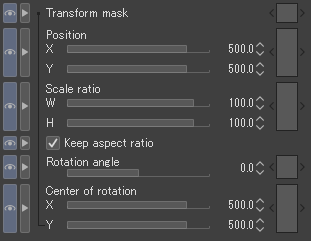
Transform mask
You can transform layer masks for layers and layer folders that have Enable keyframes on this layer turned on. To show the Transform mask, select a layer mask with the Object tool.
The settings are the same as transforming an image, but it transforms the layer mask instead of the layer.
Transformation settings
The Transformation settings category settings depend on the selected tool or layer.
· "When using Edit menu > Transform"
· "When using the Object tool"
· "When using the Light Table tool"
· "When using a Text layer or the Text tool"
When using Edit menu > Transform
You can set the transformation method from Edit menu > Transform. For details, see "Transforming Images".
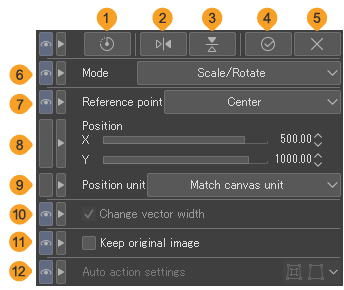
(1)Reset current transformation
Restores the image to its original state before transforming.
(2)Flip horizontal at center of rotation
You can flip the image horizontally around the center point of rotation.
(3)Flip vertical at center of rotation
You can flip the image vertically around the center point of rotation.
(4)Confirm current transformation
(5)Cancel current transformation
(6)Mode
You can select the transformation mode from the pull-down menu. For details on transformation modes, see "Types of transformations".
(7)Reference point
You can set the position of the center point that will be used when rotating or flipping the image. You can select from Center, Top left, Top right, Bottom right, Bottom left, Top, Left, Right, Bottom and Free position.
(8)Position
You can move the position of the reference point with the X and Y values or the sliders. When both the X and Y values are 0, the reference point will be the top left of the canvas.
(9)Position unit
You can set the unit for moving the reference point to Match canvas unit, cm, mm, in, px, or pt.
(10)Change vector width
When turned on, when you scale a line on a vector layer, balloon layer, or frame border folder, the width of the line will adjust accordingly.
(11)Keep original image
When turned on, the original image is kept when you move or transform it.
(12)Auto action settings
Allows you to configure how transformations are recorded in the auto action. This setting is available when recording transformation operations in an auto action.
·Record scroll amount: Records the travel distance/orientation of a handle due to transform. When the auto action is run, all handles in the selection move the same distance in the same direction.
·Record coordinates after transformation: Records the coordinate value of a transformed handle to an auto action. When the auto action is run, all handles in the selection move to the positions (coordinates) recorded by the auto action.
(13)Rotate bounding box
Use the slider to change the angle of the bounding box without transforming the selected object. Use this when you want to match the angle of the bounding box to the object being transformed.
When using the Object tool
You can make the following settings when a vector layer, Balloon layer, or Ruler is selected with the Object tool.
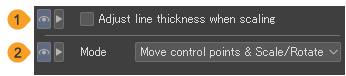
(1)Adjust thickness when scaling
When turned on, when you scale a line on a vector layer, balloon layer, or frame border folder, the width of the line will adjust accordingly.
(2)Mode
You can select the transformation mode from the pull-down menu. When using the Object tool, you can also select Control point and scale/rotate and Move control points in addition to the other options. For details, see "Editing vector lines with the Object tool".
Memo | You cannot use Change line thickness while scaling in Clip Studio Paint DEBUT. |
When using the Light Table tool
You can make the following settings when a light table layer is selected in the Light Table tool.
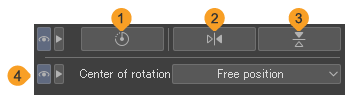
(1)Reset transformation
Restores the image to its original state before transforming.
(2)Flip horizontal
You can flip the image horizontally around the center point.
(3)Flip vertical
You can flip the image vertically around the center point.
(4)Center of rotation
You can set the position of the center point that will be used when rotating or flipping the image. You can select from Center, Top left, Top right, Bottom right, Bottom left, Top, Left, Right, Bottom and Free position.
When using a Text layer or the Text tool
You can set the mode when entering text on a Text layer and when editing a Text layer with the Object tool.
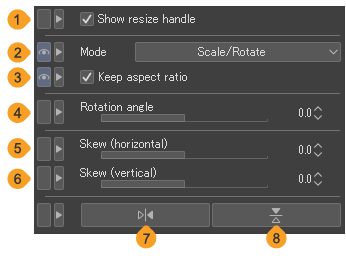
(1)Show resize handle
Displays/hides resize handles for scaling up/down the text.
(2)Mode
You can select the method of transforming the text to Scale/Rotate, Scale, Rotate, Skew, or Scale/Rotate/Skew.
For text layers, you can use the transformation mode Scale/Rotate/Skew. When dragging the handles at the four corners, you can zoom in or out. Dragging the center handle allows you to Skew and change the angle of the of the entire text. When Keep aspect ratio is turned off, you can change the width and height of the entire text at the same time as slanting it.
For details, see "Types of transformations".
(3)Keep aspect ratio
When this is on, the image will keep its original aspect ratio (proportions) when scaled up or down. The image keeps its original aspect ratio (proportions) when scaled up or down.
(4)Rotation angle
(5)Skew (W)
You can set the horizontal slant of the text.
(6)Skew (H)
You can set the vertical slant of the text.