Number
Learn about 3D drawing figure, 2D camera, dual brush settings, and other setting categories starting with numbers in Clip Studio Paint.
2 - Brush shape
Dual brush settings can be changed when using drawing tools such as the Brush tool or the Figure tool.
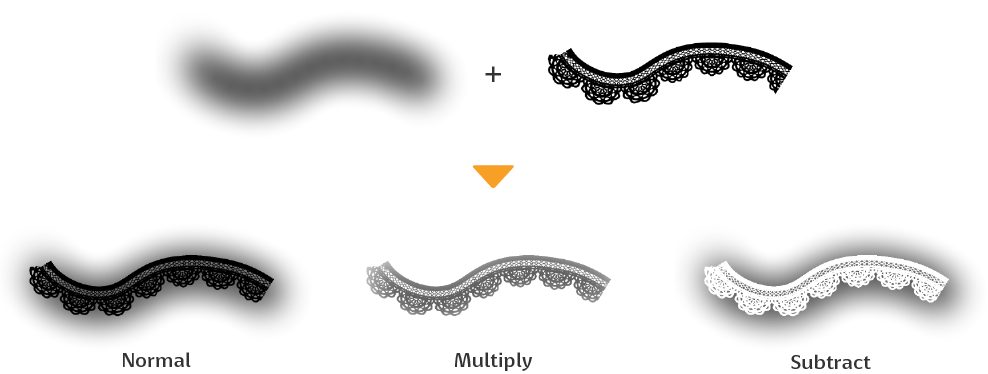
A dual brush is a function that allows you to combine a secondary brush (stroke) on a single brush. You can create strokes with new shapes by combining and overlapping brushes.
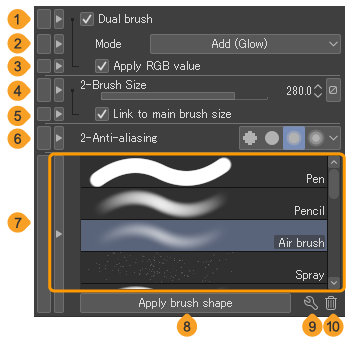
(1)Dual brush
When turned on, you will be able to set a second brush tip shape.

(2)Mode
When applying a dual brush, you can set how the secondary brush tip overlays with the blending mode.
You can choose from Normal, Multiply, Add (Glow), Subtract, Darken, Lighten, Screen, Overlay, Color Dodge, Color burn, Linear burn, Hard Mix, or Height (Linear).
Height (Linear) is similar to the blending mode Subtract, but the difference is that the density of the brush is darker than Subtract.
For more information, see "Blending modes".
(3)Apply RGB value
When turned on, the color of the secondary brush tip will be applied as it is. When turned off, the alpha value (transparency) of the secondary brush tip is combined with the primary brush tip, and the expression color of the brush tip does not have any effect.
(4)Brush size
You can set the brush size for the secondary brush tip. Tap the Dynamics icon to make the brush size reflect changes in the pen pressure and stroke speed.
(5)Link to main brush size
When turned on, when the primary brush size is changed in the Brush Size setting or the Brush Size palette, the size of the secondary brush tip is also changed.
(6)Anti-aliasing
You can set the anti-aliasing for the secondary brush tip. With anti-aliased lines, you can draw smoother outlines as jags are smoothed. You can set the anti-aliasing strength to None, Weak, Middle or Strong.
(7)Brush shape preset
This is a list of brush shape presets. Tap to select a preset to use for the secondary brush tip. You can add presets in the Brush shape category.
(8)Apply brush shape
Tap to apply the selected brush shape preset as the secondary brush tip. When a preset is applied, the following settings are replaced with those registered in the preset: 2 - Texture, 2 - Spraying effect, 2 - Stroke, and 2 - Brush tip.
(9)Preset of brush shape settings
Tap this to open the Preset of brush shape settings dialog, where you can change the name of the selected preset.
(10)Delete brush shape
Tap to delete the selected brush shape preset from the preset list.
2 - Brush tip
This setting can be adjusted when Dual brush is turned on in the 2-Brush shape category. You can set the brush tip shape for the secondary brush tip. For details on each setting, see the "Brush tip" category.
2 - Spraying effect
This setting can be adjusted when Dual brush is turned on in the 2-Brush shape category] You can adjust the spraying effect of the secondary brush tip. For details on each setting, see the "Spraying effect" category.
2 - Stroke
This setting can be adjusted when Dual brush is turned on in the 2-Brush shape category. You can adjust settings such as the space between each brush tip image in a single stroke. For details on each setting, see the "Stroke" category.
2 - Texture
This setting can be adjusted when Dual brush is turned on in the 2-Brush shape category. A paper-like texture can be set for the secondary brush tip. For details on each setting, see the "Texture" category.
2D camera
When a 2D camera folder is selected with the Object tool, you can use these settings to adjust the appearance.
![]()
Show field guides
A 2D camera folder’s camera frame will be displayed. Here, you can edit the camera frame and camera movement. You can also edit layers within 2D camera folders.
Show camera’s field of view
The image is shown on the canvas according to the camera frame of the 2D camera folder. This is useful when you want to check the appearance of the final output.

3D drawing figure
You can adjust the body shape of 3D drawing figures selected with the Object tool.
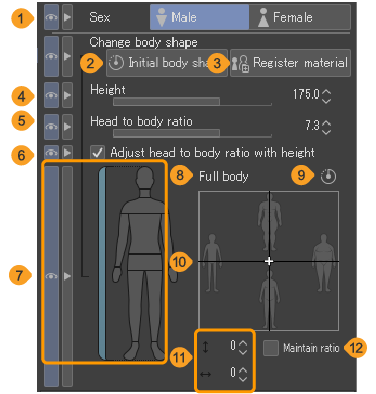
(1)Sex
Change from the male to the female model, or vice versa. See "Changing the sex of a 3D drawing figure".
(2)Initial body shape
This button resets the 3D drawing figure to its initial body shape and dimensions.
(3)Register material
Saves the current 3D drawing figure's body shape to the Material palette.
(4)Height
You can change the height of the 3D drawing figure.
(5)Head to body ratio
You can change the head-to-body ratio of the 3D drawing figure.
(6)Adjust head to body ratio with height
When turned on, the head-to-body ratio automatically changes when you adjust the height. When you adjust the head to body ratio manually, this option turns off.
(7)Select parts
You can select the body parts of the 3D drawing figure that you want to adjust. You can select the full body, head, neck, shoulders, torso, waist, arms, hands, legs, and feet. If you select a Ver. 2 or newer 3D drawing figure, you can also adjust the shoulder and waist width.
Memo | If the Tool Settings palette is too small, the Select parts setting will not appear. In that case, tap a part name to pop up the Select parts setting. |
(8)Part name
(9)Reset
This resets the 2D sliders to the initial settings for the selected part. If the full body is selected, the full body will revert to its initial settings. However, settings for individual parts will remain as they are.
The settings for Height and Head to body ratio cannot be reset to default.
(10)2D sliders
For details, see "Adjusting a 3D drawing figure body shape".
(11)Vertical/Horizontal
The value of the vertical and horizontal 2D sliders are shown here. Click the number to directly input a value. The number you enter will change the body shape of the 3D drawing figure.
(12)Maintain ratio
When turned on, the length and width ratio of the selected part will stay the same when you adjust it using the 2D slider. This option is not available when adjusting the full body, shoulders, or waist.