F
Learn about Figure, Fill, Focus lines, and other setting categories starting with F in Clip Studio Paint.
Facial features
These settings allow you to adjust each of the facial features on a 3D head model when selected with the Object sub tool. See details on using these settings in "Adjusting facial features".
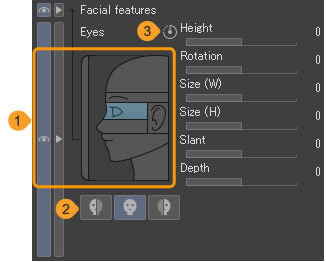
(1)Facial features
Select a part of the head on the image to show relevant sliders to the right. Adjust the sliders to change the shape of the parts on the 3D head model.
(2)Apply symmetrically/asymmetrically
For symmetrical features such as the eyes, eyebrows, and ears, set whether to change the settings symmetrically or only the adjust the left or right side.
(3)Reset
Reset the selected feature to the default settings. To reset the entire face, see "Resetting the head model".
Figure
These settings allow you to set the shape when drawing figures or creating selections in a certain shape.
Memo | Some settings are not available when a vector layer is selected. |
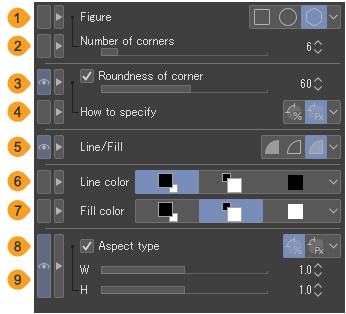
(1)Figure
You can set the shape of the figure to Rectangle, Ellipse, or Polygon. For details on how to draw each type of figure, refer to "Rectangles", "Circles", and "Polygon".
(2)Number of corners
Specify the number of sides when Figure is set to Polygon.
(3)Roundness of corner
When turned on, the corners of the figure are rounded off. The slider allows you to configure the roundness. The larger the value, the more rounded the corners. You can set the roundness of corners from How to specify.
(4)How to specify
You can set the method for determining the roundness of the corners to Specify ratio or Specify length.
·Specify ratio rounds the corners proportionally as a ratio (%) of the sides of the figure.
·Specify length rounds the corners as a set distance from the center of the corner.
(5)Line/Fill
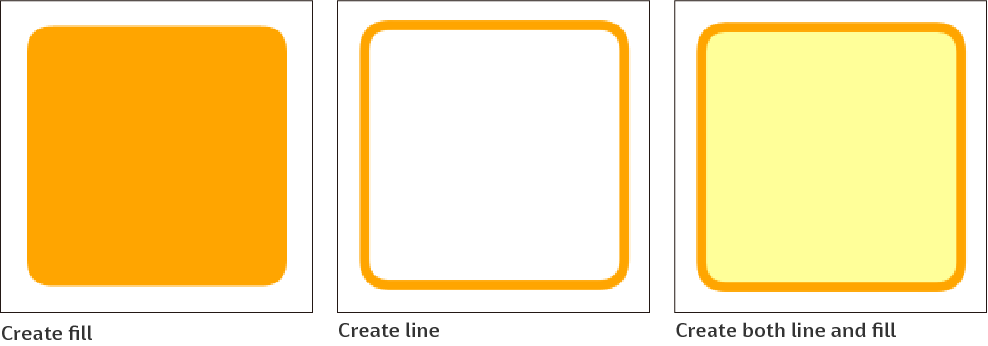
You can choose how to draw figures from Create fill, Create line, and Create both line and fill.
·Create Fill draws a figure by filling it with the drawing color. The shape will not have an outline.
·Create line draws the outline of the figure with Line color.
·Create both line and fill draws the outline of the figure with Line color and fills the inside of the figure with Fill color. You can set the line color and the fill color separately.
(6)Line color
When Line/Fill is set to Create both line and fill, you can set the outline color of the figure to Main color, Sub color, User color, or Select user color.
Main color | Tap to use the current main drawing color. |
Sub color | Tap to use the sub drawing color. |
User color | Tap to use the specified color. Tap again to use the current main drawing color as the specified color. Unlike Main color, the specified color will be used even if the main drawing color is changed with a color palette. |
Select user color | You can specify the user color from the Color settings dialog. There is not a button for this setting. You can select it from the menu that appears when you tap the rightmost button. |
(7)Fill color
When Line/Fill is set to Create both line and fill, you can set the fill color of the figure to Main color, Sub color, User color, or Select user color. The settings are the same as the line color.
(8)Aspect type
When turned on, you can select the method of specifying the height and width of the shape to Specify ratio or Specify length. Specify ratio allows you to draw figures with the desired aspect ratio Specify length allows you to draw figures with the length specified by the Vertical and Horizontal sliders.
(9)Horizontal/Vertical
When Aspect type is turned on, you can specify the vertical and horizontal size. The behavior varies depending on the mode in Aspect type. If set to Specify ratio, the sliders specify the ratio of the horizontal and vertical dimensions. If set to Specify length, the sliders specify the length of the horizontal and vertical dimensions.
Fill
The Fill category settings depend on the selected tool or layer.
· "When the Fill tool or Auto Select tool is selected"
· "When a Gradient layer is selected"
· "When a Fill layer is selected"
When the Fill tool or Auto Select tool is selected
These are detailed settings for the range to be filled with the Fill tool as well as the border for creating selections with the Auto select tool.
The Fill tool and Fill category of the Auto select tool have the same settings, but the results are different. The following describes each item using the Fill tool as an example.
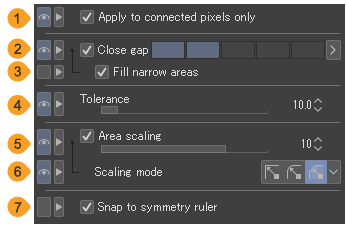
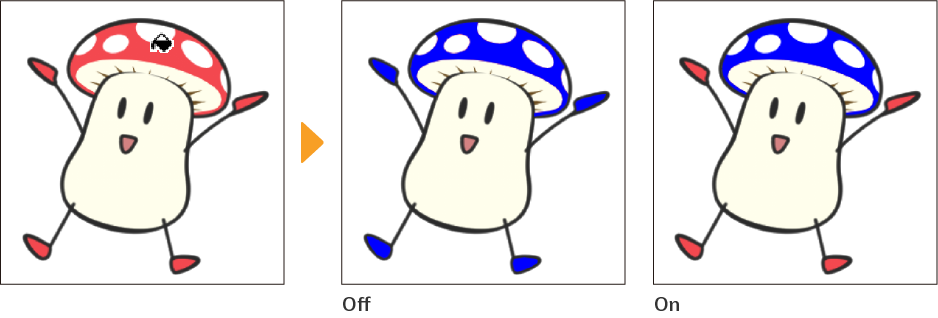
(1)Apply to connected pixels only
When turned on, the fill applies to connected pixels of the same color as the clicked point. When turned off, the fill applies to all pixels of the same color on the canvas.
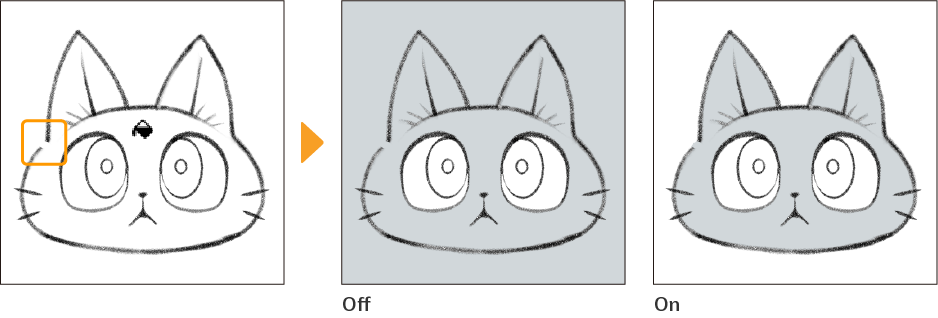
(2)Close gap
When turned on, if there are gaps in the area you want to fill, the fill will still stop at the gaps without spilling from the area. Use the indicator to specify the size that is interpreted as a gap in the lines.
Memo | Depending on your device, setting a large value for Close gap may make the fill or selection process take longer. |
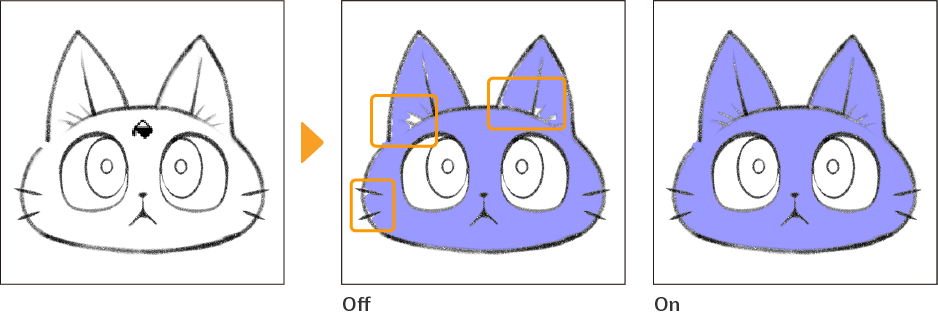
(3)Fill narrow areas
When Close gap is turned on, areas where lines are adjacent to each other are recognized as gaps, so there may be some unfilled areas. When Fill narrow areas is turned on, when a gap smaller than the set value is found, the gap is filled if that area is closed.
This setting can be adjusted when Close gap is turned on.
(4)Tolerance
You can adjust the error margin of color for filling. The larger the value, the larger the tolerance to include areas of colors different to the tapped color.
(5)Area scaling
When turned on, you can enlarge or shrink the original area by the amount of pixels specified by the slider.
(6)Scaling mode
When Area scaling is turned on, you can set the corner shape of the area to Round, Rectangle, or To darkest pixel.
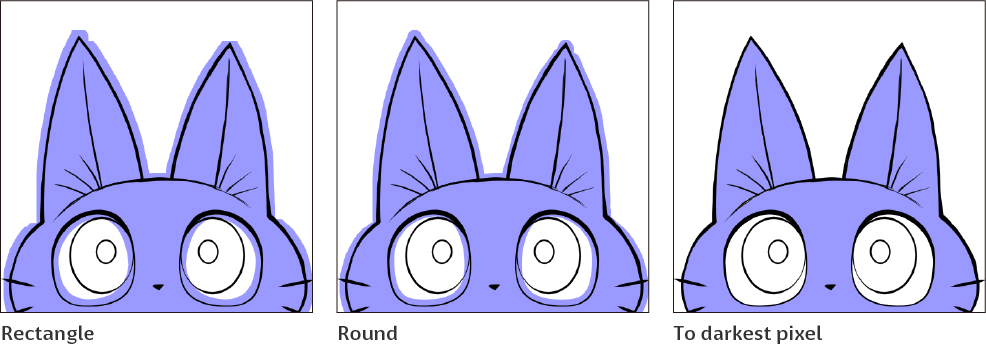
·Rectangle: Determines the area by placing a rectangle on each pixel on the outline of the area to enlarge or reduce. The outline of the enlarged or reduced area becomes sharper.
·Round: Determines the area by placing a circle on each pixel on the outline of the area to enlarge or reduce. The outline of the enlarged or reduced area becomes rounded.
·To darkest pixel: Determines the area with the darkest color (highest opacity) and fills up to that area.
(7)Snap to symmetry ruler
When turned on, the Fill tool will snap to symmetry rulers. In the case of the Auto select tool, the selection area will be created according to the symmetry ruler.
Memo | Snap to symmetry ruler is not available in Clip Studio Paint DEBUT. |
When a Gradient layer is selected
You can adjust the following settings when a gradient layer is selected with the Object sub tool.
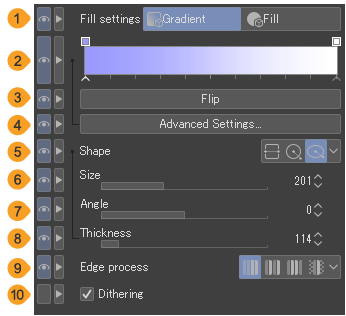
(1)Fill settings
You can select whether to color as a Gradient or Fill. The available settings vary depending on the layer type and settings. If Fill is selected, it will switch to a fill layer. For details on those settings, see "When a Fill layer is selected".
(2)Color bar
This is a preview of the gradient. Tap the color bar to open the Edit gradient dialog where you will be able to edit the gradient in detail.
(3)Reverse
Tap to invert the gradient.
(4)Advanced settings
Tap to open the Edit gradient dialog box where you will be able to configure the gradient in detail.
(5)Shape
You can set the shape of the gradient to Line, Circle, or Ellipse.
(6)Size
Sets the width of the gradient.
(7)Angle
When the shape is set to Straight line or Ellipse, you can adjust the angle of the gradient.
(8)Thickness
When the shape is set to Ellipse, you can adjust the thickness of the gradient.
(9)Edge process
You can set how gradients are drawn beyond the dragged area when creating a new gradient.
(10)Dithering
When turned on, fine noise is added to the gradient to obscure the color boundaries. This makes the gradient look smooth.
When a Fill layer is selected
You can adjust the following settings when a fill layer is selected with the Object sub tool.

(1)Fill settings
You can select whether to color as a Gradient or Fill. The available settings vary depending on the layer type and settings. If Gradient is selected, it will switch to a gradient layer.
(2)Fill color
You can choose the color of the fill layer. Tap the color icon to open the Color settings dialog and set the color. You can also select a color from other color palettes.
Focus lines
These settings for the Figure tool > Focus lines sub tools and the Balloon tool > Flash sub tool control how focus lines will be drawn.
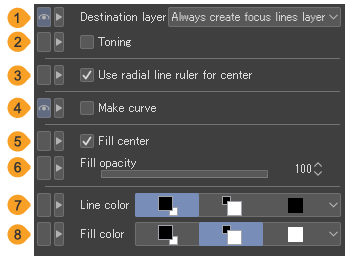
(1)Destination layer
You can set the following options when drawing focus lines on a layer.
Draw on editing layer | Draws the focus lines directly on the selected layer. Selecting a focus lines layer and choosing Draw on focus lines layer will result in a similar operation. |
Always create focus lines layer | Creates a new focus lines layer and then renders the focus lines. Focus lines can be altered after rendering when using a focus lines layer. For details, see "Editing focus lines". |
Draw on focus lines layer | When selecting a focus lines layer, new lines will be drawn based on the settings of the lines already drawn. If no focus lines layer is selected then a new focus lines layer will be created and lines will be rendered on it. |
(2)Toning
This option is available if the Destination layer has been set to Always create focus lines layer or Draw on focus lines layer. When turned on, you can create a focus lines layer with toning.
The drawing color will not be used if Toning is set on a focus lines layer. Even if you remove the tone setting, the layer will appear in gray.
(3)Use radial line ruler for center
If a radial ruler or radial curve ruler has been created and the snap settings are enabled, lines can be drawn as if snapping to the ruler.
(4)Make curve
When turned on, control points to adjust the curve are added to the shape line of the focus lines. You can then change the shape of the focus lines by editing the control points with the Object sub tool.
(5)Fill center
The area surrounded by the base lines will be filled with the specified Fill color. For details on the reference line, see "Creating focus lines".
Memo | If the Drawing position is set with Uneven reference position, the fill area will reflect the spiky edges. |
(6)Fill opacity
You can set the opacity for the base fill.
(7)Line color
You can set the focus line color to Main color, Sub color, User color, or Select user color.
Main color | Tap to use the current main drawing color. |
Sub color | Tap to use the sub drawing color. |
User color | Tap to use the specified color. Tap again to use the current main drawing color as the specified color. Unlike Main color, the specified color will be used even if the main drawing color is changed with a color palette. |
Select user color | You can specify the user color from the Color settings dialog. There is not a button for this setting. You can select it from the menu that appears when you tap the rightmost button. |
(8)Fill color
You can set the center fill color to Main color, Sub color, User color, or Select user color. The settings are the same as the line color.
When a focus lines layer is selected
You can change the focus line color when selecting the focus lines layer with the Object sub tool.
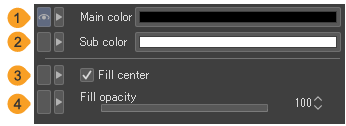
(1)Main color
Change the focus line color. Tap the color icon to open the Color settings dialog and set the focus lines color.
(2)Sub color
Change the fill color for the focus lines. Tap the color icon to open the Color settings dialog and set the fill color.
(3)Fill center
Fill the center area surrounded by lines with the color set as the Sub color. Settings are similar to the ones for drawing focus lines.
(4)Fill opacity
You can set the opacity for the base fill.
Fog
You can add a fog effect when a 3D layer is selected with the Object tool. For details, see "Fog"
Font
Allows you to set the font type, size, and other settings when you type text with the Text tool or when you select a text layer with the Object sub tool.
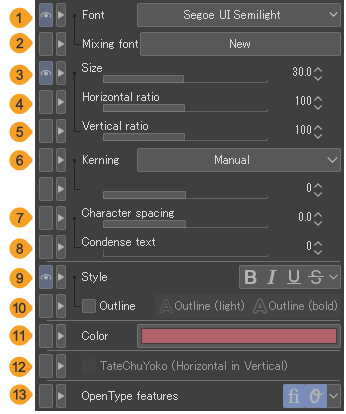
(1)Font
Tap to display the font list and select a font. For details, see "Font list".
(2)Mixing font
Mixing fonts are fonts that combine different fonts for each type of writing system, such as hiragana, numbers, and symbols. Here you can add or remove mixing fonts. The settings displayed change depending on how the Text tool is used. Note that Mixing Font is not available when using the Object sub tool.
New | Creates a new mixing font. |
Change | This shows the Create mixing font dialog. You can change the settings of the font selected in Default to create a Mixing font. You cannot set this while entering text. Edits to a mixing font are only applied to text entered after the setting change. Any text created before the change is not affected. |
Delete | Deletes the selected mixing font. |
(3)Size
Set the font size in points.
You can also set as Q points in Preferences > Ruler/Unit > Text unit.
(4)Horizontal ratio
Scales the text up or down in the horizontal direction. Specifies the horizontal direction size as a percentage.
(5)Vertical ratio
Scales the text up or down in the vertical direction. Specifies the vertical direction size as a percentage.
(6)Kerning
Kerning adjusts the spacing between each character. You can set the kerning method to Manual or Metrics.
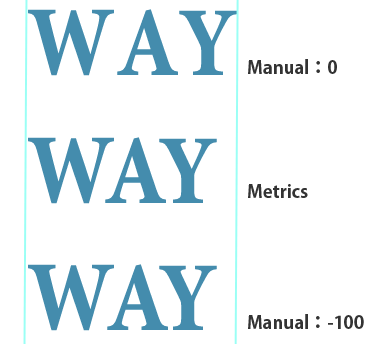
Metrics allows you to automatically adjust the spacing of character combinations based on the information the font has. Metrics kerning will be applied as you type text.
Manual allows you to set the spacing between selected letters using the slider or by entering numerical values. Place the caret at the position where you want to adjust the letter spacing and use the slider or numerical value to adjust it. You can also hold down the Alt key and press the left or right arrow keys to adjust the spacing.(For vertical writing, hold down Alt key and press the up or down keys.)
Memo | If the "Compatibility" is set to Ver. 2.3.0 or earlier, the kerning settings will be disabled. |
(7)Character spacing
Set the letter space in points. You can also set as Q points in Preferences > Ruler/Unit > Text unit.
(8)Condense text
Sets a blank space between one character and the next. The larger the value, the closer together the text is spaced.
(9)Style
Add styles to the text. You can select multiple settings from Bold, Italic, Underline, and Strikethrough. When the text direction is set to vertical, the underline and strikethrough settings are not available.
(10)Outline
When turned on, you can outline letters. You can select the thickness of the outline from Outline (light) and Outline (bold).
(11)Color
You can change the color of selected text by tapping the color icon which shows the Color settings dialog and selecting a color.
(11)TateChuYoko (Horizontal in Vertical)
You can select half width characters with the Text tool and turn on TateChuYoko (Horizontal in Vertical) to display them in the same orientation written vertically. You can only set TateChuYoko (Horizontal in Vertical) when you select a character for which Auto TateChuYoko (Horizontal in Vertical) is set to None in Text.
(12)OpenType features
You can use some features included in OpenType fonts.
When Ligatures is turned on, certain character combinations will be combined.
When Contextual alternates is turned on, the glyphs for characters will be affected by the surrounding text.
Memo | ·If the "Compatibility" is set to Ver. 1.13.2 or earlier, the Ligatures setting cannot be applied. ·If the "Compatibility" is set to Ver. 2.3.0 or earlier, the Contextual alternates setting cannot be applied. ·Mixing fonts are not available in Clip Studio Paint DEBUT. |
Font List
These settings appear when selecting a font. You can switch between font lists, change which font that the font names are displayed in, and so on.
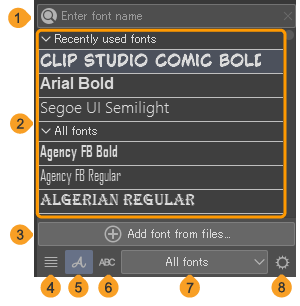
(1)Search font
Enter the name of a font you wish to use to display fonts with a partial name match. Tap the X on the right to return to the full font list.
(2)Font list
Displays a list of available fonts. Tap a font from the list to apply it to the text or to selected characters.
The font list is divided into Recently used fonts and All fonts. Up to 10 fonts can be shown under Recently used fonts. When viewing a custom font list, the Recently used fonts and All fonts categories will not appear.
Memo | ·Windows fonts (extension: fon) will not appear in the font list. ·If you want to display more fonts in the font list, drag the edge of the font list to expand it. You can change the display size of the Font list. |
(3) Add font from files
Tapping this opens the Select a file and add font dialog where you can select font to add. Supported files are OpenType (extension: otf) and TrueType (extension: ttf).
The iPad offers an additional menu option for adding fonts called Add font from device. Tapping this shows the OS FontPicker where you can select fonts installed on the device.Add font from files on the iPad is the same as on other operating systems.
(4)Display font name
This allows you to display font names in a standard font in the font list.
(5)Display font name in specific font
Each font name is displayed in the corresponding font.
(6)Display text in specific font
You can preview the text selected with the Text tool in each font in the font list. If no text is selected, sample characters for numbers, English letters, and Hiragana will show.
(7)Font list drop-down
This allows you to switch the font list. For details, see "Font list".
(8)Font list settings
Opens the Font list settings dialog, allowing you to set the font list.
Font list settings
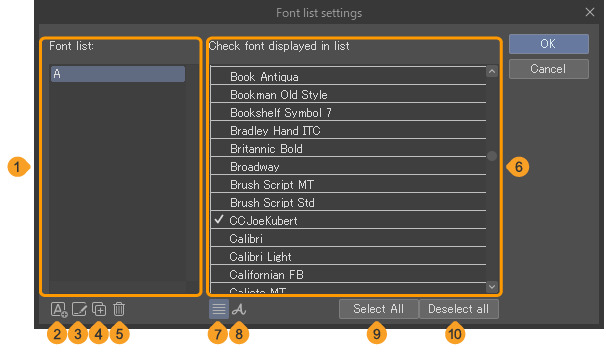
(1)Font list
A list of fonts. Select the font list to edit.
(2)Create new font list
Tap this to create a new font list. When tapped, the new list will be added to Font List and you can select font(s) from Check font displayed in list.
(3)Change name of font list
Changes the name of the selected font list. You can also rename a font list by double-tapping the name.
(4)Duplicate font list
Duplicates the selected font list.
(5)Clear font list
Deletes the selected font list.
(6)Font selection list
Allows you to select a font to register to a font list. A check mark appears next to fonts registered in the selected font list.If the Font selection list is empty, make sure you have a font list selected in the Font list column.Once selected, the fonts will appear.
Memo | ·Windows fonts (extension: fon) will not appear in the font list. ·Dragging horizontally on the edge of the Font list settings dialog to show more fonts at once. You can change the display size of the Font list settings dialog. |
(7)Display font name
You can display the font names in a standard font in the selected font list.
(8)Display font name in specific font
You can display the font names in each font in the selected font list.
(9)Select all
Selects all fonts in Check font displayed in list.
(10)Deselect all
Deselects all fonts in Check font displayed in list.
Create mixing font
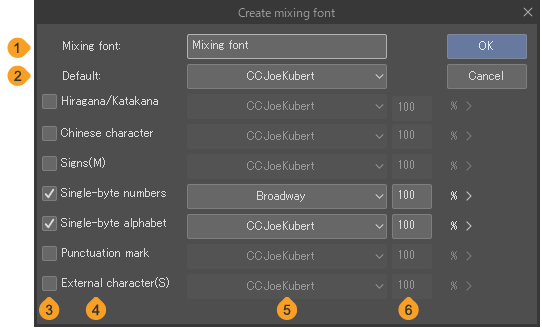
(1)Mixing font
When creating a new mixing font, you can enter a name for it. You cannot change the settings to an existing mixing font by typing its name here.
(2)Default
You can select a standard font for your mixing font from the Font list. The standard font is applied to character types for which no font or character size is set. By default, this shows the font selected in Font on the Tool Property or Sub Tool Detail palettes.
(3)Enable/Disable
You can enable or disable font and size settings for each character type using the checkboxes.
(4)Character type
Type of character to which a mixing font can be configured.
(5)Font
You can select the font to be used for each character type from the Font list.
(6)Letter size
Set the font size as a percentage. You can increase or decrease the size of text for specific letter/character types based on the value set in Size on the Tool Property or Sub Tool Detail palettes.
Frame Border
Set how frame borders will be drawn when selecting a frame border layer with the Object sub tool.
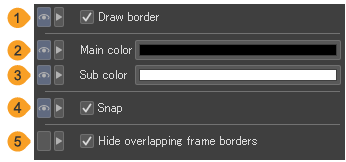
(1)Draw border
You can show or hide the frame border folder lines.
(2)Main color
You can set the frame border color. Tap the color display area to open the Color settings dialog where you can set the border color.
(3)Sub color
Set the sub color for brush shapes that use a visible sub color. Tap the color display area to open the Color settings dialog where you can set the border color.
(4)Snap lines to selected frame borders
Turn this on to draw a line along the frame border with a brush tool like the Pen tool. If this setting is on but you can’t draw a line along the frame border, try enabling the ruler for the frame border folder in the Layer palette.
(5)Hide overlapping frame borders
Turn this on to hide the frame underneath another frame when overlapping in the same frame border folder.
Freeform gradient
This category is for the Freeform gradient sub tool. See "Freeform gradient" for details on how to use this tool.With these settings, you can set how to treat black and transparency, as well as settings for the ratio of the created gradient.
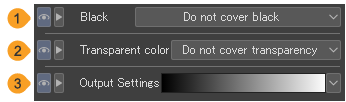
(1)Black
Set how to treat black when using the Freeform Gradient sub tool.
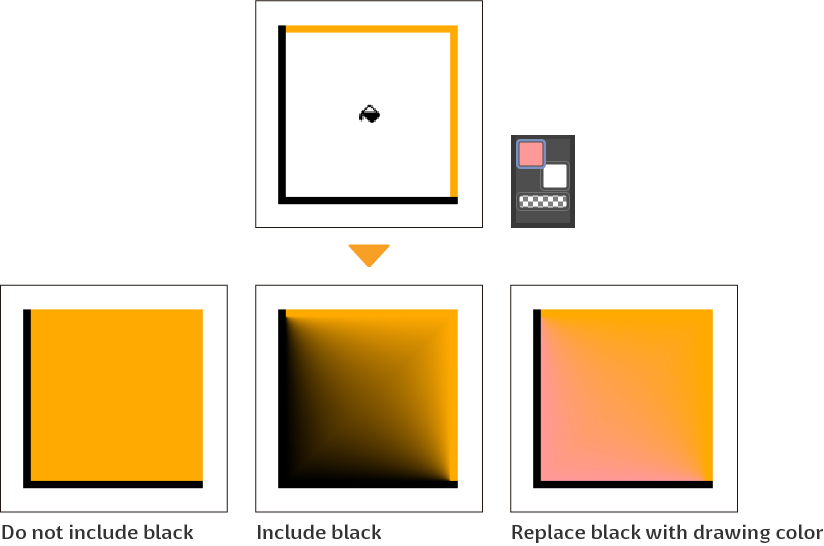
Do not include black | Black lines are recognized as a boundary, but are not recognized as a color. |
Include black | Black is treated as a drawing color. The gradient will include black. |
Replace black with drawing color | Black lines are recognized as the boundary, but are replaced with the selected drawing color in the created gradient. The drawing color becomes stronger the closer the gradient gets to the black line. |
(2)Transparent color
You can set how to treat the transparent area when using Freeform Gradient on an area filled with a single color. When referring to multiple layers, if nothing is drawn on the layer where the Freeform Gradient is applied, that area will be treated as transparency.
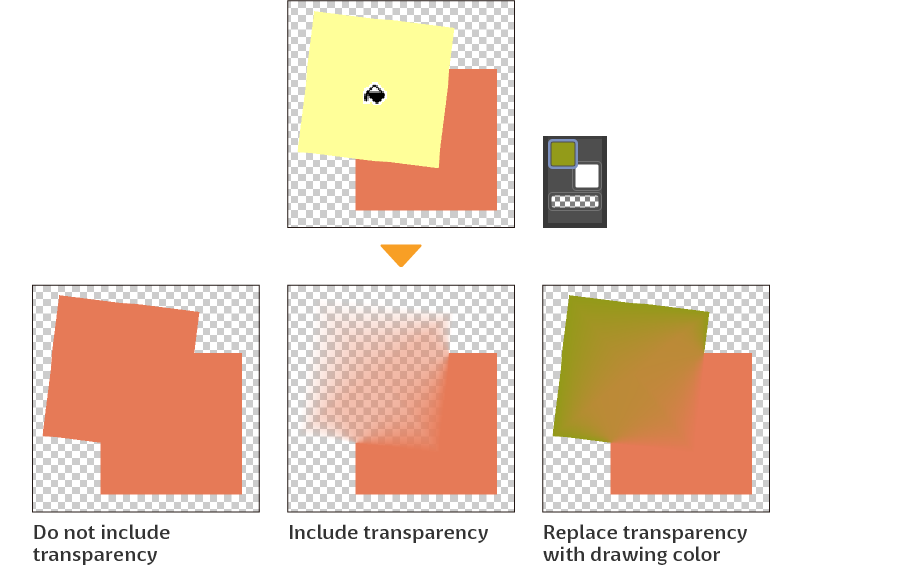
Do not cover transparency | Transparency is recognized as the boundary, but not recognized as a drawing color. |
Cover transparency | Transparency is treated as a drawing color. You can create gradients that include transparency. |
Replace transparency with drawing color | Transparency is treated as a boundary line and replaced with the current drawing color. The drawing color becomes stronger the closer the gradient gets to the transparent area. |
(3)Output Settings
Tap the button on the far right to open the Output Settings popup, where you can set how the density of the gradient changes.
To adjust the graph, tap on the graph to add points. You can adjust the curve of the graph by dragging the points.You can drag a point out of the graph to delete it.The results of the adjustment are shown in the preview below the graph.