Speed lines and Focus lines
You can use speed lines and focus lines in comics as effects to emphasize action, movement, and emotions.
Creating speed lines
You can create speed lines using the Comic tool > Speed lines group or by using a parallel line ruler as a guide.
Creating speed lines with the Comic tool
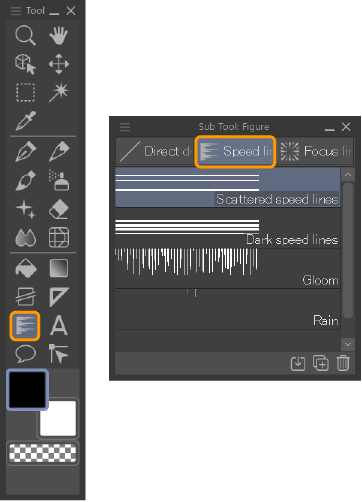
On the Tool palette, select the Comic tool, then select a sub tool from the Sub Tool palette > Speed lines group.
Memo | Speed lines are not available on Clip Studio Paint DEBUT. |
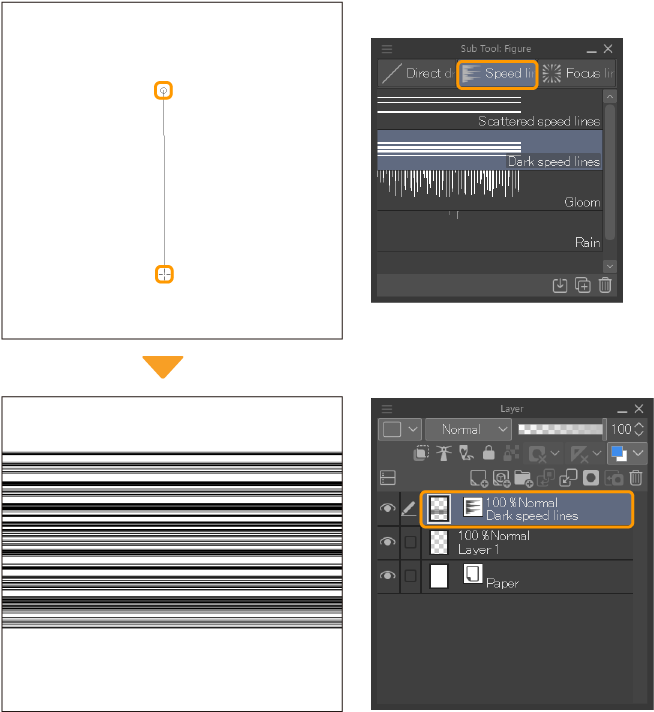
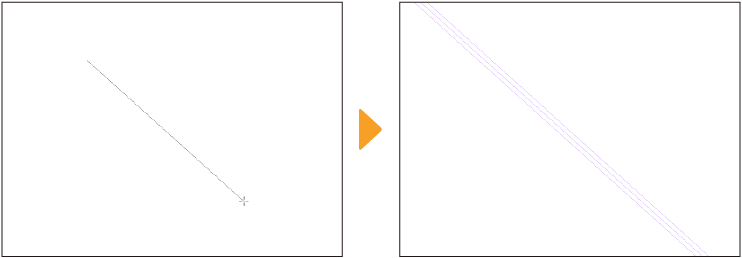
Drag on the canvas to draw the line that indicates the width and angle of the speed lines. Double-tap or tap outside the canvas to confirm the line.
When you draw speed lines on the canvas, this also creates a speed lines layer in the Layer palette.
You can access other settings such as how speed lines are added and line spacing from the Tool Property and the Sub Tool Detail palettes. For details, see "Speed lines", "Continuous curve", "Drawing interval", and "Drawing position".
Other settings such as the line style and color are the same as for brush tools. For details, see the "Settings Glossary".
Use a special ruler
You can hand-draw speed lines on both raster and vector layers by creating a parallel line ruler on the canvas. Once the ruler is made, you can draw parallel lines along the ruler in the desired shape. For details, see "Parallel line".
Editing speed lines
You can edit speed lines using the Operation tool > Object sub tool. The reference line and shape lines will appear so that you can edit the lines. Control points will also appear on the reference line and shape line.
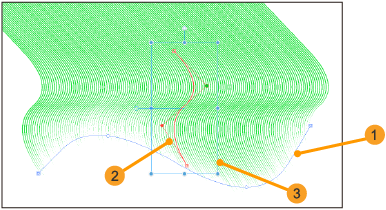
(1)Reference line
A line that determines the position and overall shape of the speed lines. This line is blue.
(2)Shape line
A line that determines the shape of each of the speed lines. This line is red.
(3)Bounding box
If the control points do not appear on the reference line and shape line, check that the Mode in the Tool Property palette is set to Control point and scale/rotate.
You can also use the Mode setting to change the transformation mode for the bounding box and handles. It is set to Control point and scale/rotate by default. For details on each mode, see "Types of transformations".
Moving speed lines
With the speed line layer selected, click on an empty area of the canvas window, and the bounding box and handles will appear around both the reference and shape lines. You can drag the bounding box and handles to adjust the speed lines' position, orientation, and size.
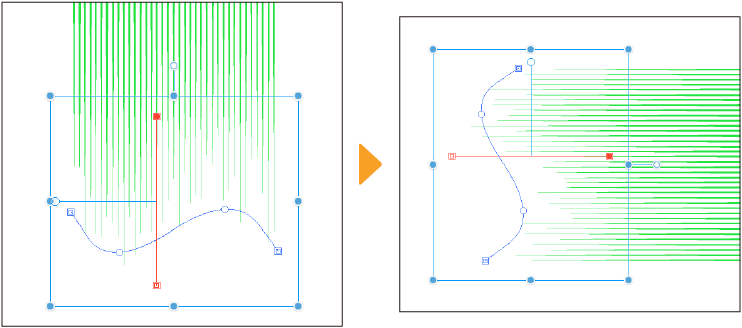
·To reposition the speed lines, drag the bounding box on the canvas to the new position.
·To rotate the speed lines, drag the rotation handle at the top of the bounding box.
·To resize the speed lines, drag the handles on the bounding box.
Editing the reference line
You can edit the reference line by itself to change the position and range of the lines without changing the direction or thickness. To edit only the reference line, tap it. The line will become thicker, and the bounding box shape will adjust to fit the reference line.
When the reference line is selected, you can drag the bounding box and handles to adjust the reference line's position, orientation, and size.
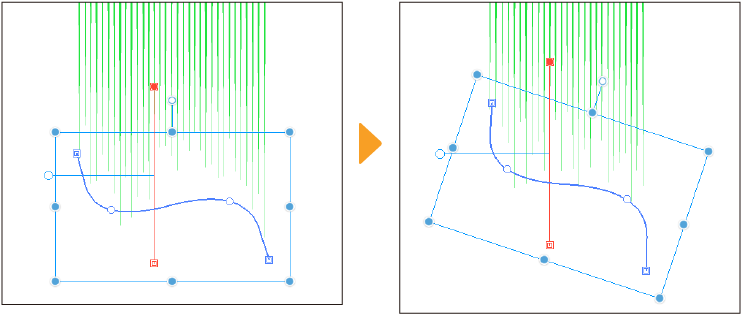
You can drag the control points of the reference line to transform the shape.

You can also add and delete control points using the Correct line tool > Control point sub tool.
Memo | For details, see "Correct Line tool". |
On Windows/macOS, you can also add or remove control points by right-clicking on the reference line to open the context menu.
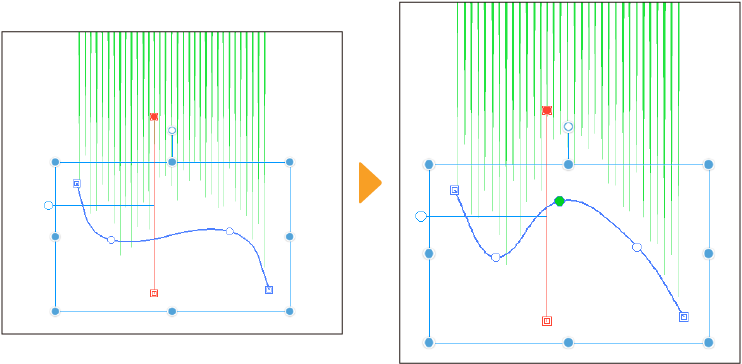
Editing the shape line
You can edit the shape line by itself to change the direction and spacing of the lines without changing the position. To edit only the shape line, tap it. The line will become thicker, and the bounding box shape will adjust to fit the shape line.
You can drag the bounding box and handles to adjust the shape line's position, orientation, and size. The line thickness and spacing of the speed lines will also change accordingly.
You can drag the control points to change the orientation of the shape line. The orientation of the speed lines will also change accordingly.
You can add and delete control points using the Correct line tool > Control point sub tool. You can also add and edit control points to draw curved and polygonal speed lines.
Memo | For details, see "Correct Line tool". |
On Windows/macOS, you can also add or remove control points by right-clicking on the shape line to open the context menu.
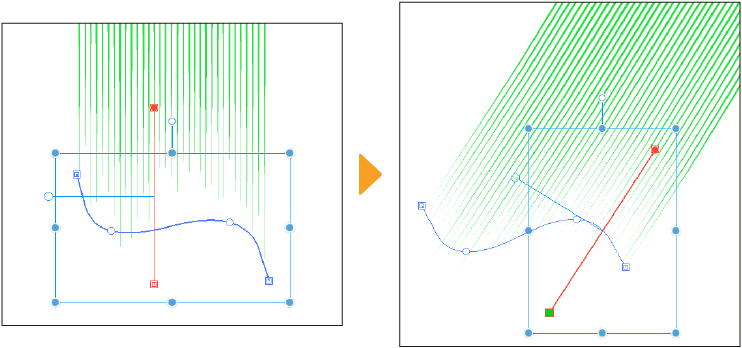
You can adjust the orientation of the speed lines by dragging the controller for the shape line. This is useful when adjusting the density of the speed lines.
Advanced settings for speed lines
You can access other settings for speed lines, such as changing the color and specifying the exact position and angle, from the Tool Property and the Sub Tool Detail palettes. For more information, see "Operation", "Speed lines", "Drawing interval", "Drawing position", and "Transformation settings".
Other settings are the same as brush tools. For details, see the "Settings Glossary".
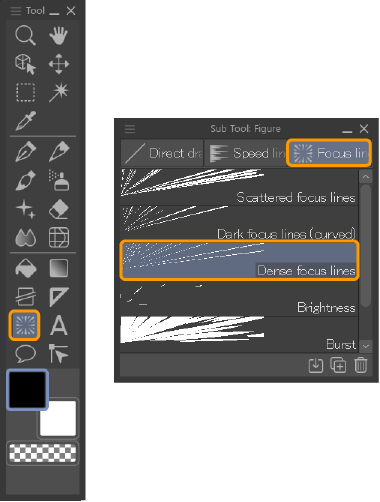
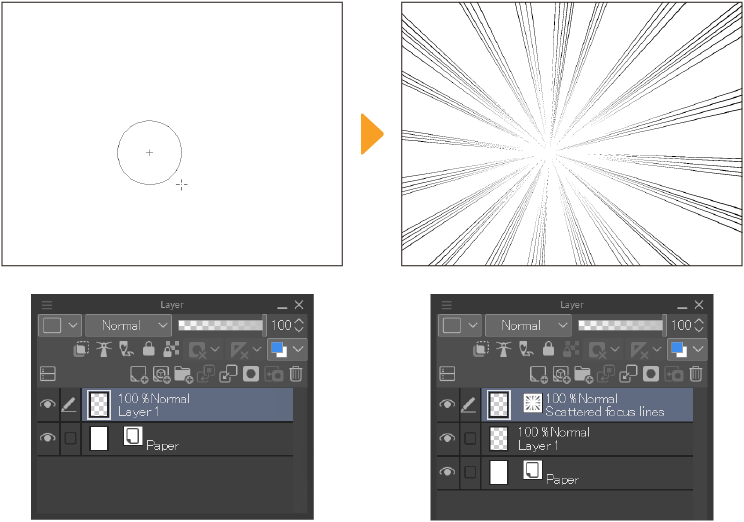
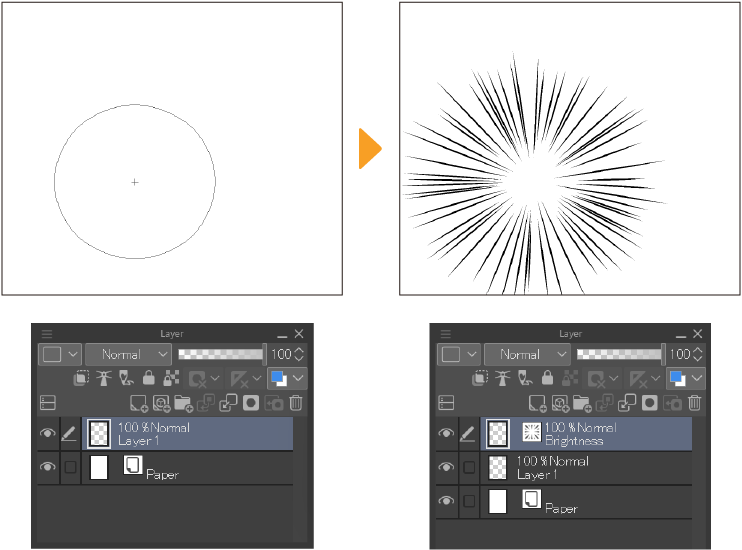
Creating focus lines
You can create focus lines using the Comic tool > Focus lines sub tool group or by using a radial line ruler as a guide.
Creating focus lines with the Comic tool
On the Tool palette, select the Comic tool. Select a sub tool from the Sub Tool palette > Focus lines group.
Memo | Focus lines are not available on Clip Studio Paint DEBUT. |
The Scattered focus lines, Dense focus lines, Brightness, or Burst sub tools create radial focus lines in a circular shape around one focal point.
To draw these focus lines, drag from where you want the center of your focus line circle to be. The size of the circle determines how far the focus lines will start from the center point. A bigger circle will create focus lines starting further from the center point.
You can create a perfect circle by holding Shift while you drag.
When the lines are drawn, a focus line layer will be added to the Layer palette.
If you select the Comic tool and then select Flash from the Sub Tool palette, you can also draw a flash-type balloon using the same procedure. A focus line layer will also be created in the Layer palette.
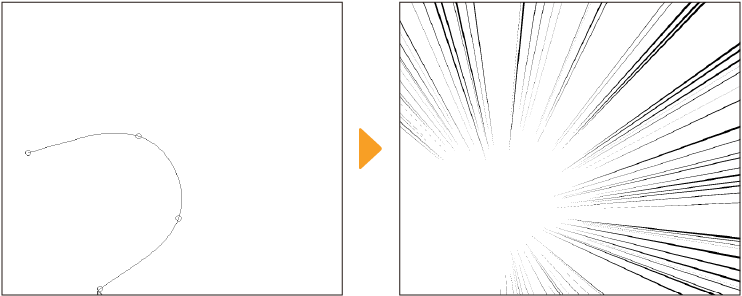
Focus lines along a curve
When the Dark focus lines (curve) sub tool is selected, you can draw focus lines as if drawing a curve. Tap on the canvas to specify the anchor point of the curve. Double-tapping will draw a focus line along the curve and create a Focus lines layer in the Layer palette.
The curve is drawn in the same way as a Spline. For details, see "Curves (Splines)".
You can access other settings to focus lines such as the length of and spacing between focus lines from the from the Tool Property and the Sub Tool Detail palettes. For more information see "Focus lines", "Figure", "Shape operation", "Drawing interval", and "Drawing position".
When setting to a curve as with the Dark focus lines (curve) sub tool, you can use Continuous Curve settings. However, the settings for the Shape and Shape operation categories are not available.
Other settings are the same as brush tools. For details, see the "Settings Glossary".
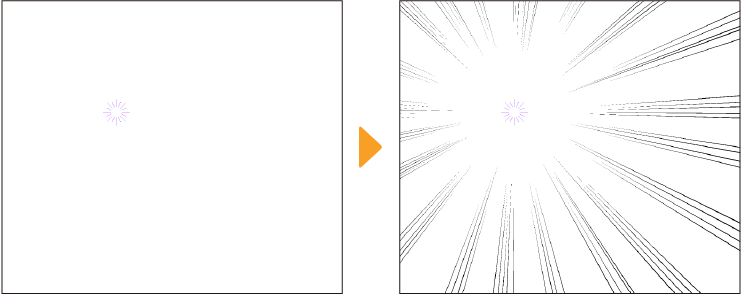
Drawing focus lines with a special ruler
If you create a radial curve ruler on the canvas, you can draw focus lines along the ruler on both raster and vector layers. For details, see "Radial line".
Editing focus lines
When focus lines are created on a focus lines layer, you can edit them later using the reference line and shape line.
Click on the focus lines you want to edit on the canvas using the Operation tool > Object sub tool. The reference line and shape lines will appear so that you can edit the lines. Control points will also appear on the reference line and shape line.
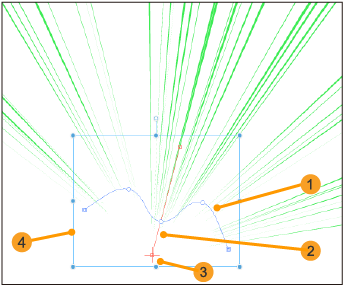
(1)Reference line
A line that determines the position of the focus lines. This line is blue. Lines following the form of the shape line will appear side-by-side.
(2)Shape line
A line that determines the shape of each of the focus lines. This line is red.
(3)Center point
This is the center point at which the focus lines converge.
(4)Bounding box
With the Object sub tool, drag the control points to adjust the shape of the line. You can also use the handles on the bounding box to move or rotate the focus lines.
If the control points do not appear on the reference line and shape line, check that the Mode in the Tool Property palette is set to Control point and scale/rotate.
You can also use the Mode setting to change the transformation mode for bounding box and handles. By default, it is set to Control point and scale/rotate. For more details on each mode, see "Types of transformations".
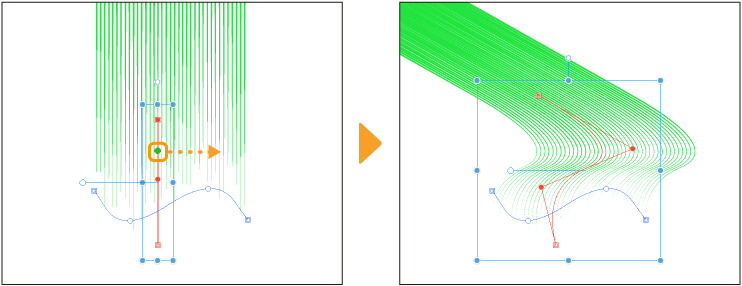
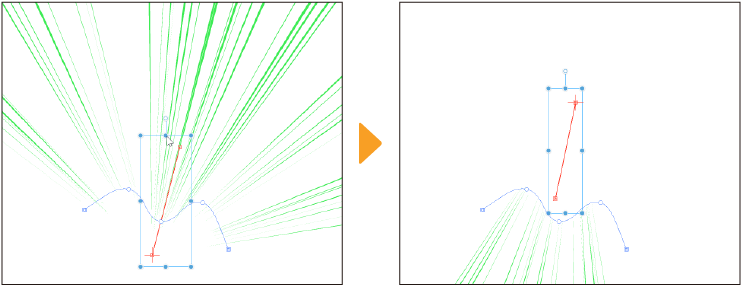
Moving focus lines
With the focus lines layer selected, click on an empty area of the canvas window, and bounding box and handles will appear around both the reference and shape lines.
You can drag the bounding box and handles to adjust the position, orientation, and size of the focus lines.
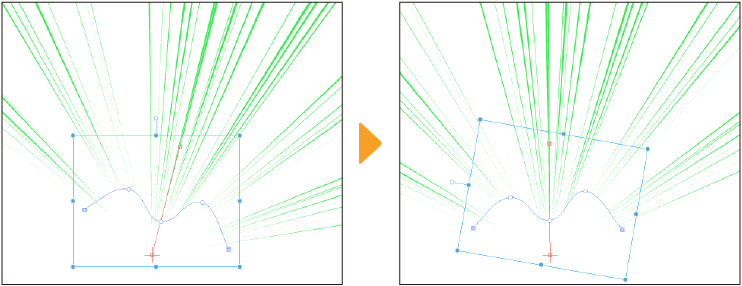
·Tap and drag the bounding box to move the focus lines.
·Drag the rotation handle at the top of the bounding box to rotate the focus lines.
·Drag the handles on the bounding box to change the size and range of the focus lines.
Editing the reference line and control points
By editing only the reference line, you can change the position and range of the lines without changing the direction.
To edit a reference line, first tap to select it. A bounding box and handles then appear around it, and its color will darken.
Editing the reference line
You can drag the bounding box and handles to adjust the position, orientation, and size of the reference line. The method is the same as when editing the focus lines overall.
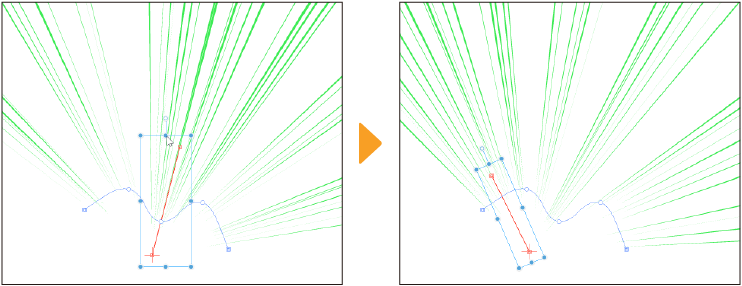
Changing the shape of the reference line
You can drag the control points of the reference line to transform the shape.
You can also add and delete control points using the Correct line tool > Control point sub tool. For details, see "Correct Line tool".
On Windows/macOS, you can also add or remove control points from the context menu by right-clicking on the reference line.
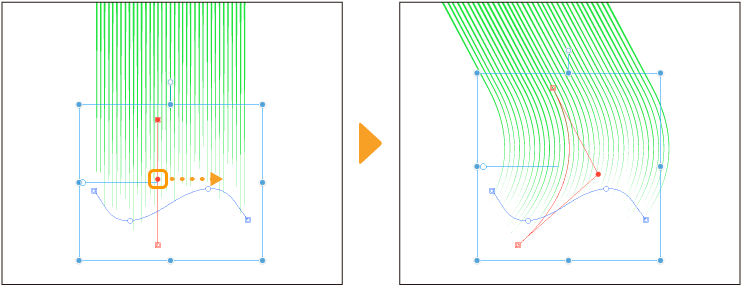
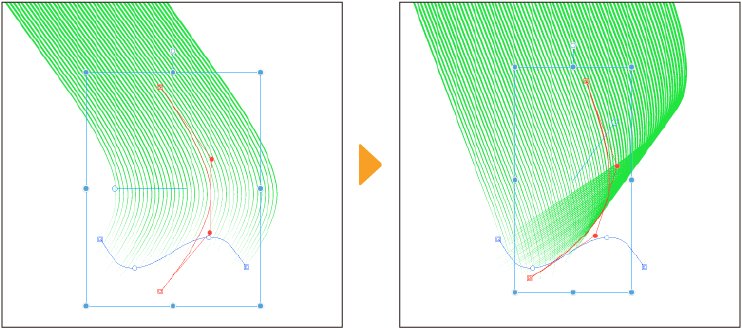
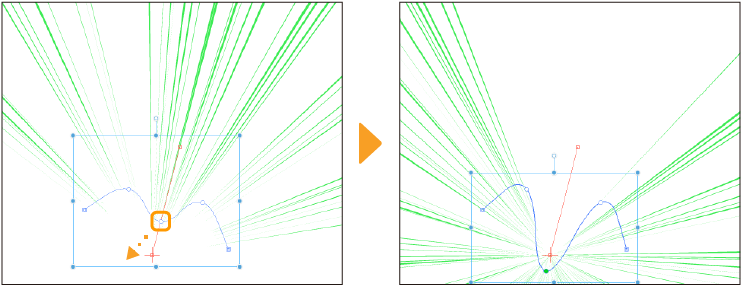
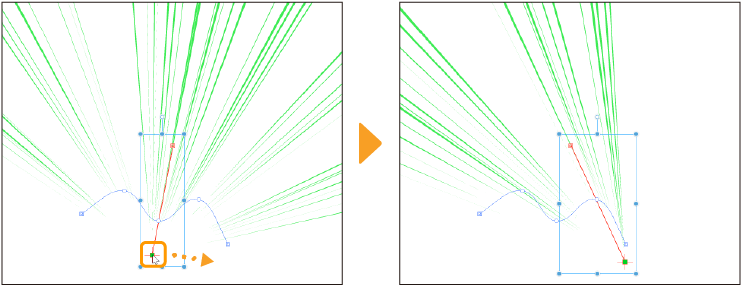
Editing the shape line and center point
By editing only the shape line, you can change the direction and shape of the focus lines and the position of the center point.
To edit a shape line, first tap to select it. A bounding box and handles then appear around it, and its color will darken.
Editing the shape line
You can drag the bounding box and handles to adjust the position, orientation, and size of the shape line. The line shape and center point will also change accordingly.
The method is the same as when editing the focus lines overall. For details, see "Moving focus lines".
Moving the center point
Dragging the center point moves the center of the focus lines to the dragged position.
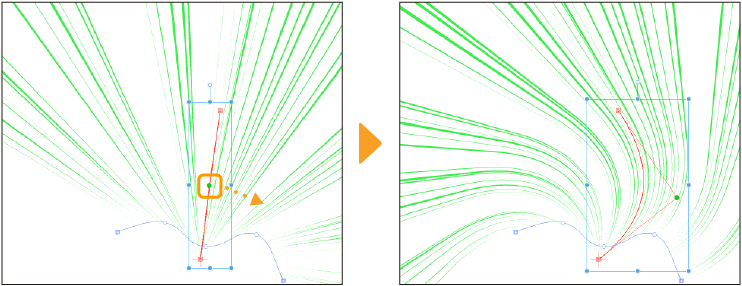
Changing the shape of the shape line
Dragging a control point allows you to change the orientation of the shape line, as well as the shape of the focus lines. The orientation of the focus lines will also change accordingly.
You can also add and delete control points using the Correct line tool > Control point sub tool. For details, see "Correct Line tool". You can add and edit control points to draw curved and polygonal focus lines.
On Windows/macOS, you can also add or remove control points from the context menu by right-clicking on the reference line.
Advanced settings for focus lines layers
You can access more settings from the Tool Property palette and the Sub Tool Detail palette such as changing their color and specifying their position and angle. For more information, see "Operation", "Focus lines", "Drawing interval", "Drawing position", and "Transformation settings".
Other settings are the same as brush tools.