Preferences
In the Preferences dialog, you can change various settings for using Clip Studio Paint, such as the interface color, touch gestures, and brush tool cursor shapes. You can find the Preferences dialog here:
·On Windows, select the File menu > Preferences.
·On macOS and tablet devices, select the CLIP STUDIO PAINT menu > Preferences.
To navigate the Preferences dialog, select the categories from the left side to see detailed settings you can adjust.
Tools
Switch tool temporarily (Tool shift)
(1)Switch tool temporarily by pressing and holding shortcut key
You can press and hold shortcuts assigned to tools to switch to that tool only while the key is held down.
(2)Length of keypress to switch tools
Specifies the time, in milliseconds, needed to switch to a tool via keypress.
Options
(3)Minimum drag distance
This option allows you to change the distance that the cursor needs to be dragged before it is recognized as a drag action. This is useful for tools where taps and drags have different outputs, such as the Object or the Move layer tool. The smaller the value, the smaller the distance the pen or mouse must move to be interpreted as dragging.
(4)Auto-scroll at edge of canvas
Sets how the mouse cursor behaves when it leaves the canvas. When None is selected, tapping and dragging outside the canvas will not change the position of the canvas. When Drag is set, dragging outside the canvas scrolls it in the direction of the mouse cursor. When Drag with mouse is set, in addition to dragging, moving the mouse cursor outside the canvas also scrolls it in the direction of the mouse cursor. The Drag with mouse option is only available on Windows and macOS.
(5)Handle size
Sets the size of control points when Simple view & control points or Line preview & control points is set in Drawing tool > Figure tool guidelines.
The size set here also applies to control points on vector layers, frame border folders, balloon layers, and rulers, as well as handles on perspective rulers.
(6)Use fast view while navigating canvas
Puts the canvas in fast view mode when dragged with viewing tools such as the Zoom and Move tool. This reduces the required processing capacity when using a viewing tool.
(7)Hover over drawing on applicable devices
Turn on to reflect the stylus hover information on your device. However, if the hover data causes intended marks, turning this setting off can improve it.
Brush/line
(8)Start from current size when changing brush size by dragging on canvas
When the brush size is adjusted by dragging while pressing Ctrl + Alt, the adjustment will start from its current size.
(9)Display brush size adjustment on canvas
Turn this on to preview the brush size. A circle will appear in the center of the canvas when changing the size of a brush.
(10)Reduce pen pressure when drawing with finger/mouse at the start and end of brush strokes
When you operate a brush tool with your finger or mouse, you can automatically reduce the pen pressure at the start and end of brush strokes based on the speed of the stroke.
(11)Preview lines by pressing modifier key (Shift)
You can preview straight lines created by holding Shift and tapping with a drawing tool.For iPad and Android tablets, you can only preview lines if using a mouse.
(12)Use stroke preview (iPad/Galaxy)
When turned on, a stroke or cursor preview will appear temporarily when you draw. This can improve lag between the pen tip and the drawing on the screen.
This feature is only compatible with Apple Pencil on iPad and the S Pen on Galaxy.
Figure
(13)Figure tool guidelines
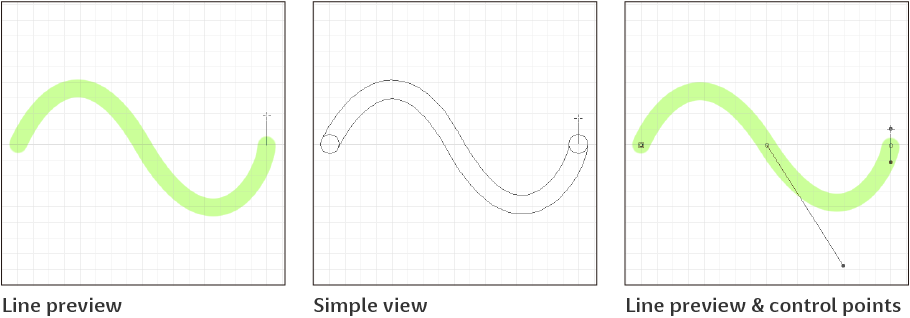
A simplified preview of lines appears when lines are created with the Figure tool > Direct draw sub tool group. You can change how the preview appears by selecting from Line preview, Simple view, Line preview & control points, or Simple view & control points.
Note that any Starting and ending settings aren’t reflected in the preview even if the mode is set to Line preview or Line preview & control points.
(14)Confirm shape with double-click or double-tap
When this is turned on, you can double-tap to confirm lines when using a sub tool that creates continuous curves or polygonal lines, such as Continuous curve and Bezier curve.
Color
(15)Disable drawing with transparency on transparency locked layers
If you try to draw with transparent color on a layer with Lock transparent pixels turned on, the color will be replaced with white. The same applies if you use an Eraser tool.
Pen/Touch (tablets)
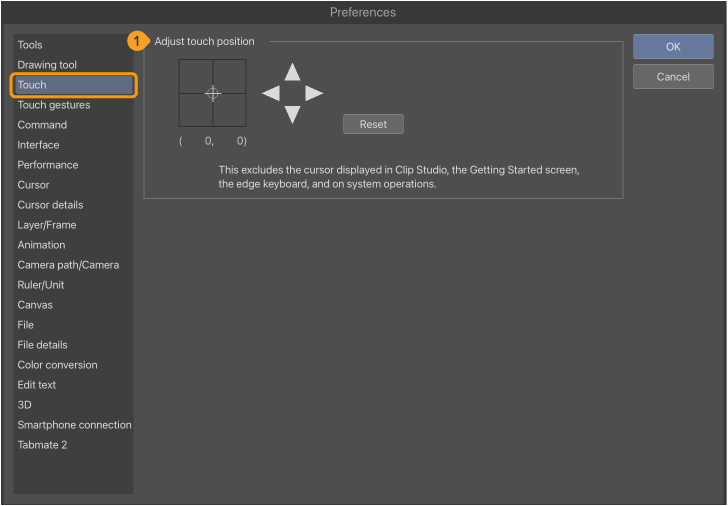
(1)Adjust touch position
When drawing with a pen or finger or using touch gestures, you can adjust the position of the touched area if it is misaligned on the screen. You can adjust the position using the up/down/left/right triangle buttons on the right side of the screen. To return to the default settings, tap Reset.
(2)Switch input (Android)
When Convert finger input with pressure into pen input is turned on, you can switch finger input to pen input. This allows you to draw with variable pressure with your finger. The same applies when you draw with a stylus that does not support pen pressure input.
(3)Hover (iPad)
When Use stylus hover on applicable devices is turned on, you can display a cursor on the screen when you hover your Apple Pencil. This setting is not applicable if your iPad does not support Apple Pencil hover.
Tablet (Windows)
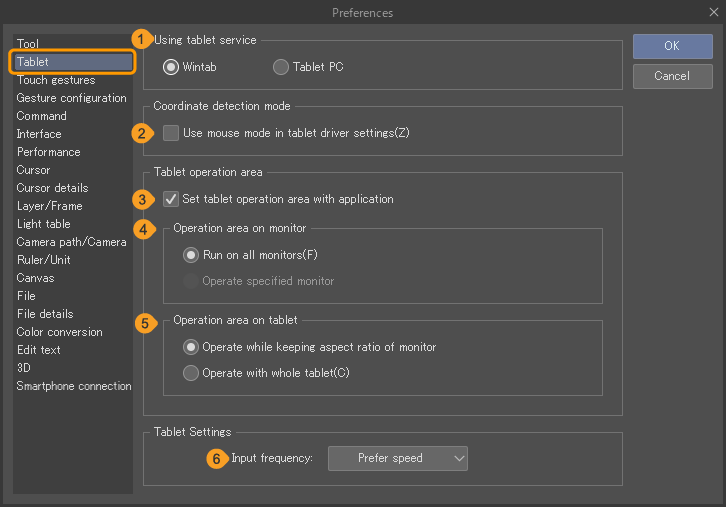
(1)Using tablet service
Click this to select the tablet type. If you have a screen tablet or pen tablet connected, select Wintab. If you are using a tablet PC, select TabletPC. For tablet PCs without a pen, set Using tablet service to Wintab to switch between touch and tool operation.
(2) Coordinate detection mode
The settings depend on the Using tablet service setting.
·Use mouse mode in tablet driver settings: If the driver settings of the connected tablet has a mouse mode, it will be turned on.
·Use more accurate coordinate detection: If you are using a tablet PC, turning this on improves pen coordinate detection accuracy, resulting in smoother lines.
Tablet operation area
To display this option, set Using tablet service to Wintab.
(3)Set tablet operation area with application
Sets the tablet Display area and Tablet operation area for Clip Studio Paint. Use this setting if there is no setting for the operation area of the monitor or tablet in the tablet driver. If the tablet driver can be used to configure the settings, please do so from the driver instead.
(4)Operation area on monitor
Sets the area of the monitor in which the cursor can move.
·Run on all monitors: The cursor can move around the entire area of the connected monitor. This applies to multi-monitors, independently of how they are arranged.
·Operate specified monitor: This setting is only available for multi-monitor setups. Turning it on displays the monitor number on the right side. You can change the value with a pop-up slider that displays as many values as the number of connected monitors. The cursor can move in the area around the upper left corner of the specified monitor.
(5)Operation area on tablet
Sets the area of the tablet in which operation is possible.
·Operate while keeping aspect ratio of monitor: You can operate it within the range that fits in the tablet while maintaining the monitor's aspect ratio.
·Operate with whole tablet: The aspect ratio is ignored, and the entire tablet is set as the operation area.
Tablet Settings
(6)Input frequency
Sets the amount of information sent from your tablet when using it. You can select from Prefer speed or Prefer quality.
Tablet (macOS)
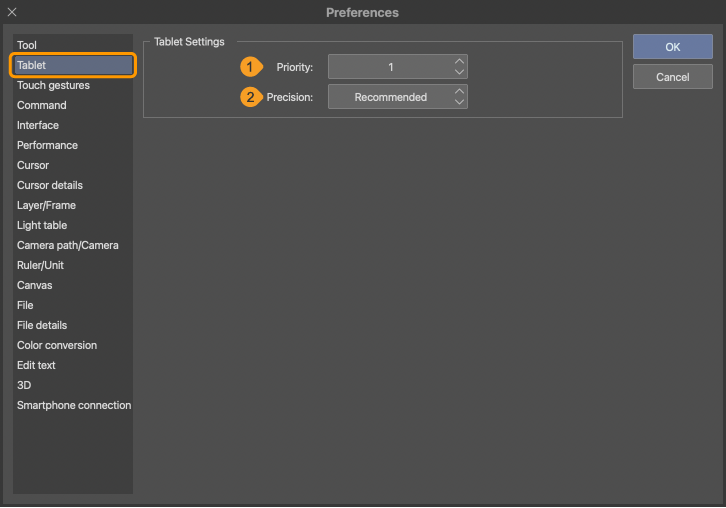
Tablet Settings
(1)Priority for process
Sets the processing priority when using a tablet. The priority can be set between 1 and 6. The lower the figure, the higher the priority of tablet processing becomes.
Important | Drawing operations may not perform properly if the tablet is used in Clip Studio Paint while another application is running. In this case, setting Priority for process may improve the situation. If the Priority for process value is reduced, Clip Studio Paint may become slower. |
(2)Precision
Sets the volume of information to be sent from your tablet. You can select Prefer quality, Recommended, or Prefer speed.
Sending a larger volume of information from your tablet improves drawing precision. However, more information than necessary may be sent, which can result in slow drawing. Setting Precision to Recommended or Prefer speed may resolve this issue. Tapping Settings opens the Display resolution settings dialog. Here you can set the display resolution shown in View > Print size.
Touch gestures
Canvas operation
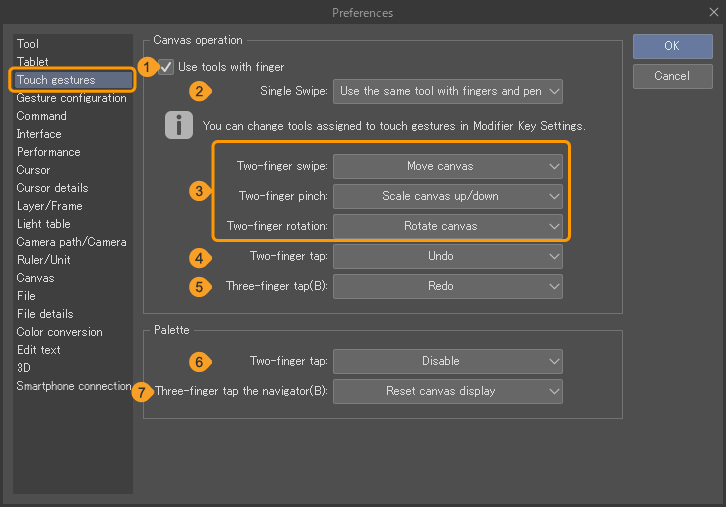
(1)Use tools with finger
Turn this on to use tools with your finger.
(2)Single swipe (Windows/tablet)
You can choose between Use different tools with finger and pen and Use the same tool with finger and pen for single swipe operation. This can be set when Use tools with finger is turned on. If you select Use different tools with finger and pen, you can set these tools in the Modifier Key Settings dialog.
For details, see "Modifier Key Settings".
(3)Two-finger swipe / Two-finger pinch / Two-finger rotation
You can enable or disable the operation assigned to each touch gesture. If a touch gesture is disabled, it cannot be used on the canvas.
(4)Two-finger tap
You can enable or disable the Undo operation assigned to the two-finger tap. If disabled, the two-finger touch gesture cannot be used on the canvas.
(5)Three-finger tap / Press and tap
You can enable or disable the Redo operation assigned to the three-finger tap. If disabled, the three-finger touch gesture cannot be used on the canvas.
For Windows, Press and tap appears when Windows gestures is set in Gesture configuration. The function is the same as the three-finger tap.
Palette
(6)Two-finger tap
When Show/Hide property/command bar is selected, a two-finger tap shows or hides the command bar of a palette. If disabled, the two-finger touch gesture cannot be used on palettes.
(7)Three-finger tap / Press and tap the navigator
When Reset canvas display is selected, a three-finger tap on the Navigator palette resets canvas rotation and horizontal and vertical flipping. If disabled, the three-finger touch gesture cannot be used on palettes.
For Windows, Press and tap the navigator is displayed when Windows gestures is set in Gesture configuration. This is the same function as the three-finger tap.
Memo | Three-finger tap / Press and tap, and Three-finger tap / Press and tap the navigator are not available on macOS. |
Limit touch operation
(8)Disable palette operation with finger or mouse
When turned on, you cannot use your finger or mouse to manipulate the palettes. If your finger or mouse touches a palette while drawing, you will not be able to change the palette position or settings.
However, you can still move palettes in floating display even if this setting is turned on.
Memo | You can also lock the width and position of palettes. See here for details: "Lock palette position" & "Fix the width of the palette dock" |
Touch gesture settings (Windows)
(9)Windows gestures/Clip Studio gestures
·Windows gestures lets you use press and tap like a standard Windows tablet.
·Clip Studio gestures lets you use 3-finger taps and assign settings to long presses in the Modifier Key Settings dialog. You can also use combination operations such as pinch-in, pinch-out, rotate, and swipe.
Command
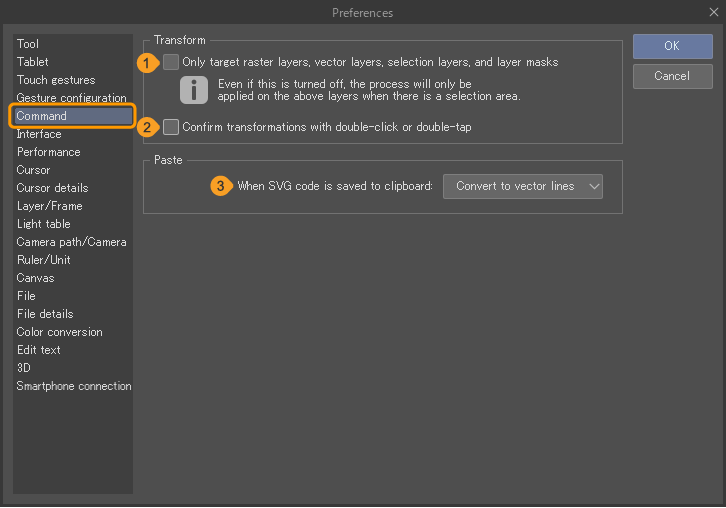
Transform
(1)Only target raster layers, vector layers, selection layers, and layer masks
When turned on, you can only use the Edit menu > Transform command on raster layers, vector layers, selection layers, and layer masks.
When turned off, image material layers, text layers, folders, frame folders, gradient layers, rulers, and special rulers can also be transformed by the Edit menu > Transform. Even if this is turned off, only raster layers, vector layers, selection layers, and layer masks will be transformed when a selection is created on the canvas. Furthermore, when Only target raster layers, vector layers, selection layers, and layer masks is turned off, some transformations may not be supported depending on the layer type.
(2)Confirm transformations with double-click or double-tap
When turned on, you can confirm transformations from the Edit menu > Transform by double-clicking or double-tapping on the canvas.
Paste
(3)When SVG code is saved to clipboard
This setting defines how SVG code (vector lines) on the clipboard are treated when pasted to Clip Studio Paint.
When set to Convert to vector lines, the lines and fills in the SVG data will be converted to vector lines and pasted in a new vector layer. You can use this to copy graphics from Adobe Illustrator and paste them into Clip Studio Paint. For details on data compatibility, see "Importing vector data"
When set to Raster Image, the data will be rasterized and pasted in a new raster layer.
Memo | When SVG code is saved to clipboard is not available on iPadOS, Android or Clip Studio Paint DEBUT. |
Interface
IME control (Windows/macOS)
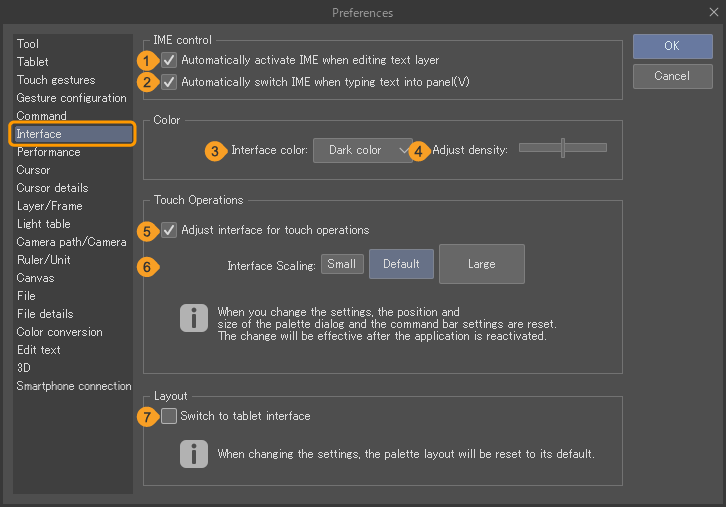
(1)Automatically activate IME when editing text layer
When this is turned on, the input method will automatically change to the IME when you type on a Text layer. With this option, you can automatically switch to IME input without manually toggling the input settings, depending on your IME settings.
(2)Automatically switch IME when typing text into panel
The input mode of the IME will change automatically when you type in a palette. For example, in Japanese, the IME mode will toggle to hiragana input when the mouse cursor is moved to the field to input the layer name on the Layer palette, or to alphanumeric input when the mouse cursor is moved to type in a numeric field in the Tool Property palette.
Color
(3)Interface color
Choose the color scheme for the user interface. You can select from Dark mode or Light Mode.

(4)Adjust density
Use the slider to adjust the density of the user interface. Move it to the left to increase contrast and to the right to increase brightness.
Touch Operations (Windows)
Allows you to adjust settings related to Windows touch operations. The changes will take effect after clicking OK in the Preferences dialog and restarting Clip Studio Paint.
(5)Adjust interface for touch operations
Turn this on to optimize the sizes of the buttons, text, and operations for touch operations.
(6)Interface Scaling
When Adjust interface for touch operations is checked, you can choose the following sizes for buttons and text: Small, Default, and Large. Depending on your Windows settings, this setting may not appear.
Layout (Windows/iPad)
(7)Switch to tablet interface
Switches the basic palette layout to a layout optimized for tablets. Turn this off to switch the basic palette layout to one optimized for computers. The palette layout switches when the setting is switched, and the Preferences dialog is closed.
To save the current placement of the palettes, you should register it as a workspace. For details, see "Register Workspace".
Workspace (macOS)
(8)Use application frame
Toggles whether to show the application frame. When you turn this setting on, the application frame will be shown the next time you launch the application.
Status bar (iPad)
(9)Show status bar
Displays the iPad status bar while Clip Studio Paint is running.
Edge keyboard (tablet)
(10)View
You can display the edge keyboard from the following options: Hide, Button, Swipe.
·Hide will disable the edge keyboard.
·Button shows a button on the edge of the screen that you can tap to toggle the edge keyboard.
·Swipe shows the edge keyboard when you swipe inwards from the left or right edges of the device.
For details, see "Edge keyboard (Tablet)".
(11)Modifier Keys (Android)
The edge keyboard can be set to use modifier keys. When Push is selected, the modifier key is only active while you hold it down. This is recommended when drawing with a finger. When Toggle is set, the modifier key will remain active after being tapped once. Press it again to return it to its original state. This is recommended when drawing with a pen.
Touch view settings
(12)Show explanation when tapping icon (iPad/Android)
When you tap an icon in the Command Bar, an explanation will appear to explain the tool features.
Performance
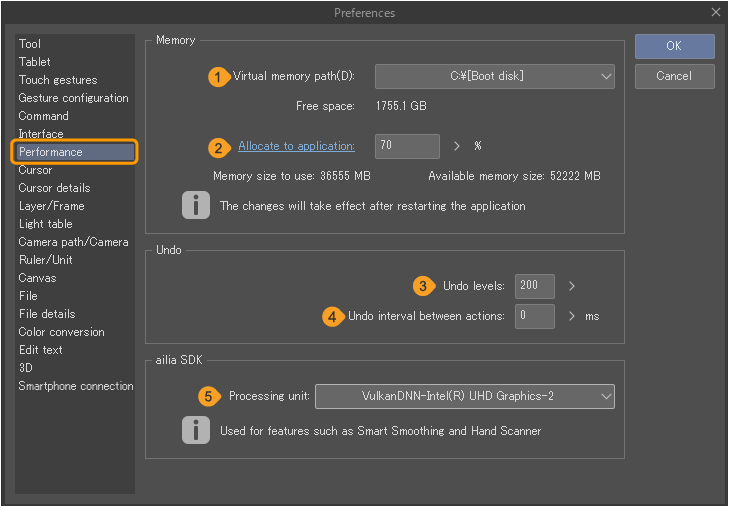
Memory
(1)Virtual memory path
Specify the disk drive where to create the virtual memory.
Important | Make sure to specify a folder in a disk drive with sufficient capacity. The program may become unstable if the virtual memory is created in a location with insufficient capacity. |
(2)Allocate to application
Specify the percentage of memory to allocate to the Clip Studio Paint application. When you specify a percentage, the size of the allocated memory will be shown below as the Memory size to use.
For Windows/macOS versions, setting changes take effect after the application is restarted. For the iPad/iPhone, setting changes take effect after tapping OK in the Preferences dialog.
Memo | Allocate to application is not available on Android. |
Important | Be sure that the allocated memory size is not too small. If the allocated memory size is too large, the operating system may become unstable. |
(3)Warn about memory usage
When turned on, a message stating that memory usage is increasing will pop up when memory usage increases. This prevents unintended closure of the Clip Studio Paint app by the system.
Tap “See here for how to reduce memory usage” in the pop-up to launch your browser and check what to do when memory usage increases.
Undo
(4)Undo levels
Specifies the maximum number of operations you can undo with Edit menu > Undo.
(5)Undo interval between actions
Specifies the number of seconds without any operation necessary to recognize an operation as another when consecutively using the same tool. For example, specify the number of seconds necessary to recognize an operation as another when drawing with fast strokes using a drawing tool.
ailia SDK
(6)Processing unit
Set the processing unit used for features such as "Smart Smoothing" and "Hand Scanner".
Cursor
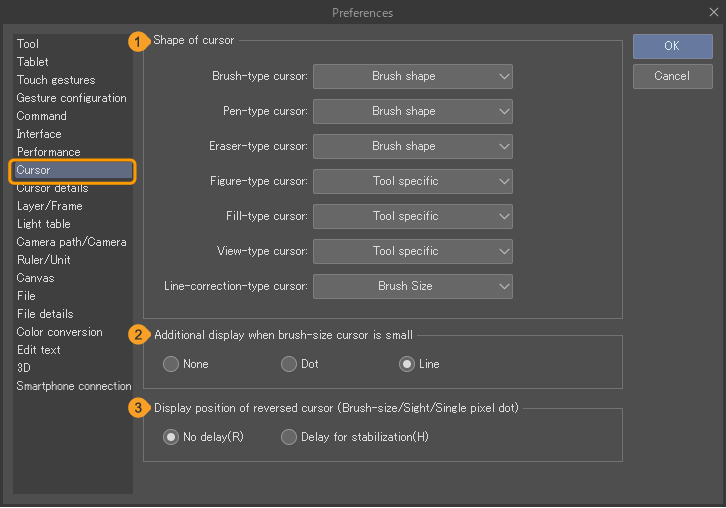
(1)Shape of cursor
Specifies the shape of the cursor. Available cursor shapes depend on the tool. On macOS and tablets, even if you select None, the Sight cursor will appear on the canvas when you use a mouse or trackpad.
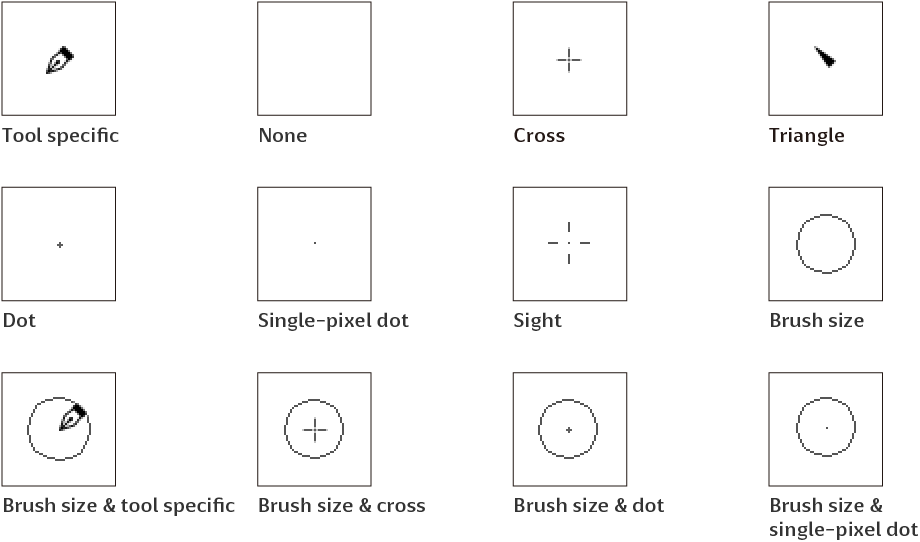
Each item corresponds to the following tools.
Brush-type cursor | Pencil tool > Pastel group Brush tool Airbrush tool Decoration tool Eraser tool Blend tool Liquify tool Selection tool > Selection pen / Erase selection sub tool Fill tool > Paint unfilled area sub tool Ruler tool > Ruler pen sub tool Frame Border tool > Frame border pen sub tool Balloon tool > Balloon pen sub tool Correct line tool > Correct line group > Simplify vector line / Connect vector lines / Adjust line width sub tools Correct line tool > Remove dust group > Fill leftover sub tool |
Pen-type cursor | Pen tool Pencil tool > Pencil group |
Eraser-type cursor | Eraser tool |
Figure-type cursor | Figure tool Ruler tool > Linear ruler / Curve ruler / Figure ruler sub tool Balloon tool (excluding Balloon pen) Select layer tool Fill tool > Enclose and fill sub tool Gradient tool > Gradient group Frame Border tool > Rectangle frame / Polyline frame sub tools Correct line Tool > Remove dust group > Remove dust / Select dust sub tool |
Fill-type cursor | Auto select tool Fill tool (excluding Enclose and fill, Fill leftover areas, and Lasso fill sub tools) Gradient tool > Freeform gradient group |
View-type cursor | Zoom tool Move tool Eyedropper tool |
Line-correction-type cursor | Correct line tool > Correct line group (excluding Simplify vector line / Connect vector lines / Adjust line width sub tools) |
(2)Additional display when brush-size cursor is small
When using a small brush size mouse cursor, you can set how it appears. You can select from None, Dot, or Line. This setting applies to all tools, regardless of the tool type.
(3)Display position of reversed cursor (Brush-size/Sight/Single pixel dot)
You can set the display position of the cursor when drawing with a cursor set to Brush Size, Sight, or Single pixel dot. Changing this setting may improve drawing speed when it is slow. Selecting No delay sets the center of the cursor at the input position.
Selecting Delay for stabilization sets the center of the cursor at the position corrected by Stabilization. When you move the pen, the cursor follows with a delay.
Cursor Options
(4)Change brush cursor
When Cursor Shape is set to display Brush Size or Brush Shape, you can set how the brush cursor appears in response to pen operation.
·Do not change: The brush cursor does not reflect pen operation.
·Change direction only: The direction of the stroke is reflected by the brush cursor.
·Change size, thickness & direction: Brush size and thickness change due to pen pressure and tilt, and the brush cursor reflects the direction of the stroke.
·Change size, thickness & direction when pen is hovering: Changes brush size, thickness & direction when the pen is hovering. The brush cursor is fixed to the point where you start drawing.
Memo | Change size, thickness & direction when pen is hovering is not available on iPadOS. |
Layer/Frame
Adjust settings related to layers, layer masks, and frames.
In Clip Studio Paint DEBUT, this section is called Layer, and some functions are unavailable.
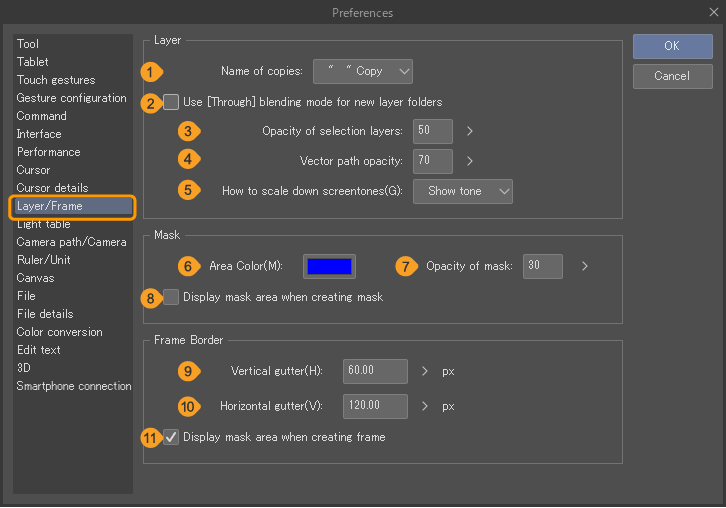
Layer
(1)Name of copies
Select the layer name format for new layer copies.“ ” Copy adds the word “Copy” at the end of the layer name.“ ” 2 adds a number at the end of the layer name.Select None to duplicate layers without changing the layer name.
(2)Use Through blending mode for new layer folders
When turned on, Through will be the default blending mode for new layer folders except for frame border, animation, and 2D camera folders.
(3)Opacity of selection layers
Sets the opacity when creating a new selection layer.
(4)Vector path opacity
Adjusts the opacity of displayed vector paths. You can show vector paths by selecting the View menu > Show vector paths.
(5)How to scale down screentones
Adjusts how tones are displayed when the canvas is scaled down.
When Show Tone is selected, the pattern of tones, such as dots, will be prioritized for display. In some instances, the scale or frequency may cause interference (moiré) or make the tone appear gray.
Select Show gray to omit the tone pattern and display the screentones as gray.
Memo | Opacity of selection layers, Vector path opacity, and How to scale down screentones are not available in Clip Studio Paint DEBUT. |
Mask
(6)Area Color
Sets the color of masks. You can select it by clicking the color tile.
(7)Opacity of mask
Adjusts the opacity of the mask area.
(8)Display mask area when creating mask
Indicates the masked area when a mask is created via Create layer mask. This can also be set from the Layer menu.
Frame Border
You can set the default values used when dividing frames using the Comic tool > Frame border group > Divide frame border and Divide frame folder sub tools.
(9)Vertical gutter
Configures the space between frame borders when a frame border is divided vertically.
(10)Horizontal gutter
Configures the space between frame borders when a frame border is divided horizontally.
(11)Display mask area when creating frame
Indicates the masked area when a frame is created.
Memo | The Frame Border section is not available in Clip Studio Paint DEBUT. |
Animation
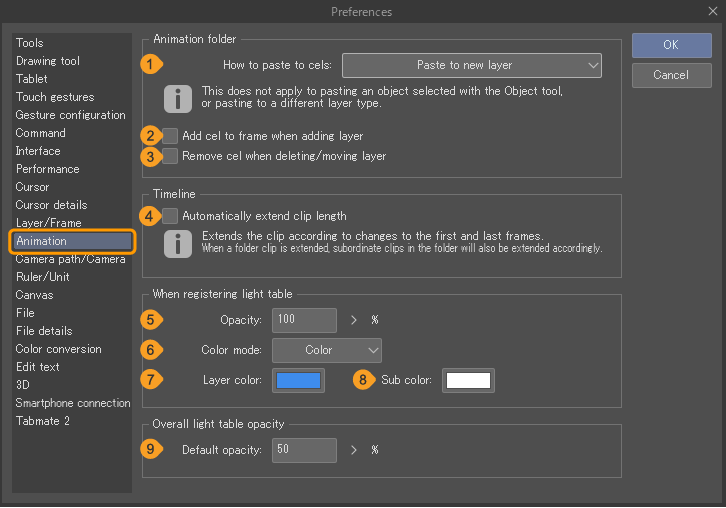
Animation folder
(1)How to paste to cels
You can determine the process for pasting content from the clipboard into an animation folder. You can choose between Paste to selected layer and Paste to new layer.
If you select Paste to new layer, you can specify cells in the Timeline palette at the same time as pasting by turning on Add cel to frame when adding layer.
(2)Add cel to frame when adding layer
When turned on, when you add a layer to the animation folder, a corresponding cel with the same name will be added to the Timeline palette. If there are multiple timelines, the cel will be added only to the currently displayed timeline.
If you use the Layer menu > Ungroup layer folder for a layer folder that already has cels assigned to the timeline, the existing cels will remain in the Timeline palette, and cels for each layer from the folder will not be added to the timeline.
(3)Remove cel when deleting/moving layer
When turned on, deleting a layer in the animation folder will simultaneously delete the corresponding cel from the Timeline palette. Similarly, when a layer in the animation folder is moved to another position in the Layer palette, the cel will be removed from the Timeline palette.
Cels will be removed even if Enable timeline is turned off.
Timeline
(4)Automatically extend clip length
When turned on, when you extend the timeline by dragging the end frame in the Timeline palette to the right, the length of the clip displayed up to the end frame will also be extended. Similarly, dragging the start frame in the Timeline palette to the left to extend the length of the timeline will also extend the length of the clip from the start frame.
Note that clips in locked tracks, audio tracks, and movie tracks will not be extended.
When registering light table
(5)Opacity
Sets the opacity of all light table layers registered in the Animation cels palette.
(6)Color mode
Sets the default color mode for light table layers. You can choose from Color, Half color, or Monochrome.
(7)Layer color
Sets the display color to be used when Half color or Monochrome is selected for the Color mode. You can select the color by tapping a color tile. When using the Monochrome display mode, the layer color will be used in place of black.
(8)Sub color
Sets the display color to be used in place of white when Monochrome is selected for Color mode. You can select by tapping a color tile.
Overall light table opacity
(9)Default opacity
Sets the default opacity for all light table layers. This is the opacity when Switch opacity target between All or Individual is set in the Animation cels palette.
Camera path
Shows or hides the camera path by selecting the Animation menu > Show camera path.
(10)Show these layers
Sets on which layers to show the camera path.
When set to Editing layers, the camera path will be shown for the currently selected layers in the Layer palette. To display the camera path, the layers must have keyframes.
When set to 2D camera, the camera path will be shown for all visible 2D camera folders. However, the camera path will not be shown for hidden 2D camera folders.
(11)Color
Sets the display color of the camera path. You can select the color by clicking a color tile.
(12)Opacity
Sets the opacity of the camera path.
(13)Show field guides
The camera frames (field guides) for the layers set in Show these layers will be shown. These field guides can be selected.Keyframe displays only the frames for which keyframes are set.All frames displays all frames.
(14)Display in different colors
The first frame will be shown in the color set in First color, and the last frame will be shown in the color set in Last color. The frames in between are displayed as a gradient between the first and the last color.
When turned off, all frames will be shown in the color set under Camera path.
(15)First color
Sets the color of the frame displayed first. You can select by clicking a color tile.
(16)Final color
Sets the color of the frame displayed last. You can select by clicking a color tile.
(17)Show lines
When turned on, lines will show the movement of the camera frames for the layers set in Show these layers. Corners will show lines connecting the corners of the field guides, while Center of rotation will show a line connecting the center point of the field guides.
If an image material layer with free transform settings is selected, the camera path of the Center of rotation is not displayed.
(18)2D camera
Sets the Color and Opacity of the displayed frame when using the 2D camera folder. The setting method is the same as for Color and Opacity under Camera path.
(19)Show all field guides
Sets the Color and Opacity of the field guides for the frame selected on the Timeline palette. The setting method is the same as for Color and Opacity under Camera path.
Ruler/Unit
In Clip Studio Paint DEBUT, this is called Unit, and some functions are not available.
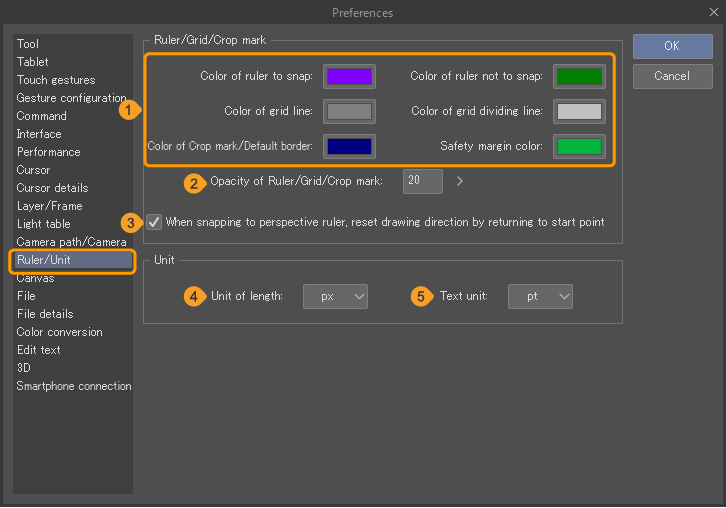
Ruler/Grid/Crop mark
(1)Line color
You can set the color for the following items by tapping the color tile next to them: Color of ruler to snap, Color of ruler not to snap, Color of grid line, Color of grid dividing line, Color of Crop mark/Default border, and Safety margin color.
(2)Opacity of Ruler/Grid/Crop mark
Sets the opacity of rulers, grids, and crop marks.
(3)When snapping to perspective ruler, reset drawing direction by returning to start point
While drawing by snapping to the perspective ruler, you can change the snapping direction by moving the mouse cursor back to the point where you started drawing.
Memo | The Ruler/Grid/Crop mark section is not available in Clip Studio Paint DEBUT. |
Unit
(4)Unit of length
Sets the unit of length to use from px (pixels) or mm (millimeters) in Clip Studio Paint. Brush size and dialog settings will use the units set here.
(5)Text unit
Sets the unit of text size for the Text tool, from pt (points) or Q (quarter).
Canvas
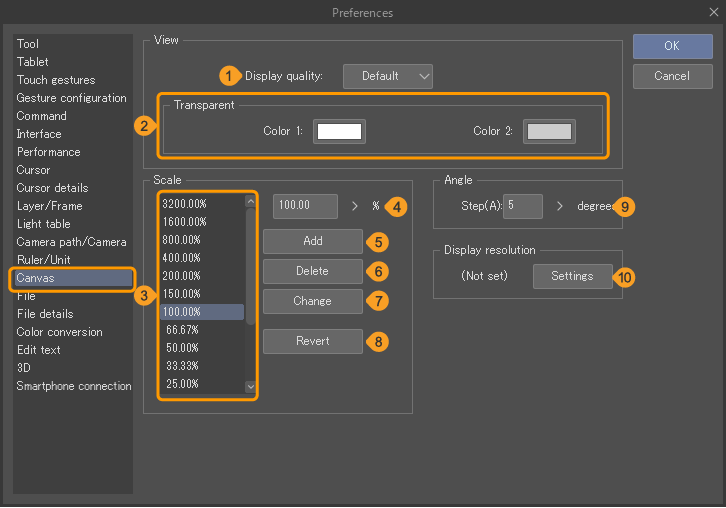
View
(1)Display quality
Sets the display quality of the canvas.
Selecting Default may result in the image appearing pixelated when the canvas is rotated or at some scaling settings. However, you will be able to perform operations more quickly as image processing does not require as much processing capacity.
Setting High quality displays images in high quality. Please note that this may slow down your device.If canvas operations become slow, try turning on Use fast view while navigating canvas in Preferences > Tool to improve the operating conditions.
(2)Transparent
Sets the display color of the checkerboard pattern that indicates transparent areas. You can select by clicking the color tiles next to Color 1 and Color 2.
Scale
(3)Scale list
Displays a list of scales for zooming in to or out of the canvas with the View menu. You can zoom in and out of the canvas according to the magnification scale shown in the list.
(4)Scale input field
You can manually enter a value to scale.
(5)Add
Adds the scale in the input field to the scale list.
(6)Delete
Deletes the selected scale from the scale list.
(7)Change
Changes the scale selected from the scale list to the value specified in the input field.
(8)Revert
Restores the scale list to the default state.
Angle
(9)Step
Sets the increment in which you can rotate the canvas left or right. This item can be found in the View menu.
Display resolution
(10)Settings
Tapping Settings opens the Display resolution settings dialog. Here you can set the display resolution shown in View > Print size.
File
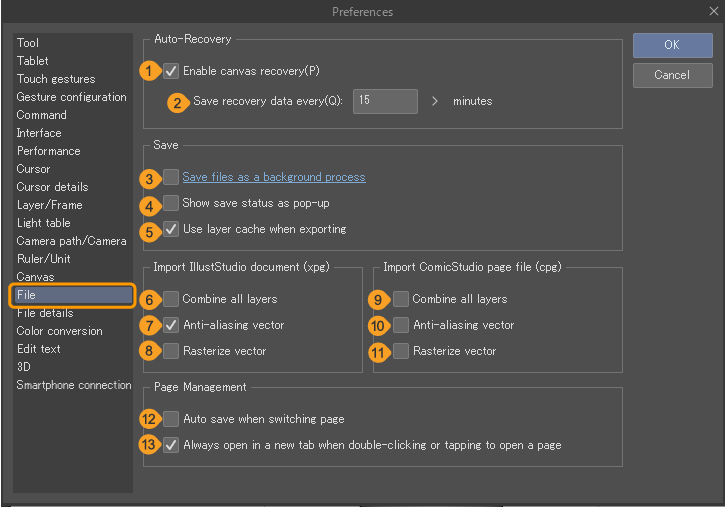
Auto-Recovery (Windows/macOS)
(1)Enable canvas recovery
Saves canvas recovery information at regular intervals. If Clip Studio Paint closes abnormally, it will automatically restore the canvas from its recovery information when the software is next launched.
Important | Canvases using linked functions of Clip Studio Modeler cannot be restored. |
(2)Save recovery data every X minutes
You can adjust how often recovery information is saved. Recovery information is automatically saved at the set interval.You can set an interval between 5 and 60 minutes.
Save
(3)Save at regular intervals (tablet)
Save your canvas automatically at regular intervals.
(4)Save interval (tablet)
You can adjust how often the canvas is saved, from an interval between 5 and 60 minutes.
(5)Save mode (tablet)
Set whether to overwrite your canvas or save as recovery information.
(6)Save files as a background process
When turned on, Clip Studio Paint will save files in the background, so you can keep working on the file while it saves. This setting does not apply when using Save as or Save Duplicate.
Important | Edits made during the save process are not saved. You will need to save again to record changes made after beginning the save process. |
(7)Show save status as pop-up
When turned on, a pop-up appears at the top of the canvas to show the save progress.
(8)Use layer cache when exporting
The layer cache will be used when exporting and saving files. This can shorten the time it takes to export or save the canvas.
Import IllustStudio documents (xpg) (Windows/macOS)
Adjusts settings for importing IllustStudio documents (extension: xpg).
Important | When using macOS with Apple M series chips, this will not be displayed and IllustStudio documents cannot be imported. |
(9)Combine all layers
Flattens the layers and imports the image.
(10)Anti-aliasing vector
Imports vector layers with anti-aliasing.
(11)Rasterize vector
Imports vector layers by converting them into raster layers.
When loading an IllustStudio document, the drawing contents of the vector layer may not display correctly. To import the content correctly, convert them into raster layers.
Memo | Import IllustStudio documents (xpg) is not available in Clip Studio Paint DEBUT. |
Importing ComicStudio page files (cpg) (Windows/macOS)
Adjusts settings for importing ComicStudio (Manga Studio 4) page files (extension: cpg).
Important | When using macOS with Apple M series chips, this will not be displayed and ComicStudio (Manga Studio 5) files cannot be imported. |
(12)Combine all layers
Flattens the layers and imports the image. In macOS version, text layers will not be merged.
(13)Anti-aliasing vector
Imports vector layers with anti-aliasing.
(14)Rasterize vector
Imports vector layers by converting them into raster layers.
When loading an ComicStudio page file, the drawing contents of the vector layer may not display correctly. To import the content correctly, convert them into raster layers.
Memo | Import ComicStudio page files is not available in Clip Studio Paint DEBUT. |
Page Management
(15)Auto save when switching page / Auto save when switching canvas
Switching to another page automatically saves and closes the last page.
(16)Always open in a new tab when double-clicking or tapping to open a page
Sets how page files open when double-clicked in the Story window.
When on, tapped page files will open in a new tab. When off, the current page file will close, and the selected page will open.
Memo | Page Management is not available in Clip Studio Paint DEBUT or PRO. |
PNG
(17)PNG compression level
You can select the compression level for saving in PNG format to high, mid, or low. When the compression is higher, the file size becomes smaller, but the longer it takes to output the image.
Compatibility mode
(18)Save in compatibility mode
When saving a Clip Studio Paint (extension: clip) or a management file (extension: cmc), you can set how to save the layer version compatibility information. When saved in compatibility mode, the project can be opened in other versions even if it contains layers that are incompatible.However, you cannot edit incompatible layers even when saved in compatibility mode.
Saving in compatibility mode may increase the file save time and file size.
You can set this to Do not save, Save, and Confirm when saving. When Confirm when saving is selected, you will be asked if you want to save in compatibility mode when you save a new file.
Memo | When saving a canvas that contains layers that are already locked due to version incompatibility, the Save or Confirm on Save settings cannot save the version compatibility information. |
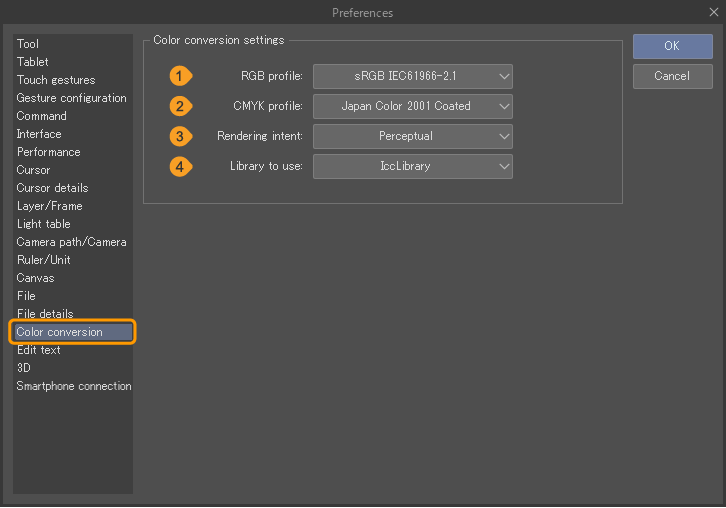
Color conversion
Color conversion settings
(1)RGB profile
Specifies the RGB color profile. You select the desired color profile via the pull-down menu.
(2)CMYK profile
Specifies the CMYK color profile. You select the desired color profile via the pull-down menu.
(3)Rendering intent
Sets how to process the color conversion between color spaces with the color management system.
·Perceptual: Preserves the visual relationship between colors so that colors are perceived as natural even when color values are changed.
·Saturation: Compares the maximum highlight in the source color space with the maximum highlight in the destination color space and shifts the difference.
·Relative Colorimetric: Tries to reproduce vivid colors, even at the expense of color accuracy.
·Absolute Colorimetric: Does not change colors that fall within the destination gamut but changes out-of-gamut colors.
(4)Library to use (Windows)
Select whether to use the Icc Library or MicrosoftICM.
(5)Existing profile at time of saving
When set to Preferences RGB profile, the RGB color profile set in Preferences can be embedded in the file even when the Export Settings dialog does not appear, such as when using Save As in a generic RGB image format.
Memo | Color conversion is not available in Clip Studio Paint DEBUT. |
Edit text (EX only)
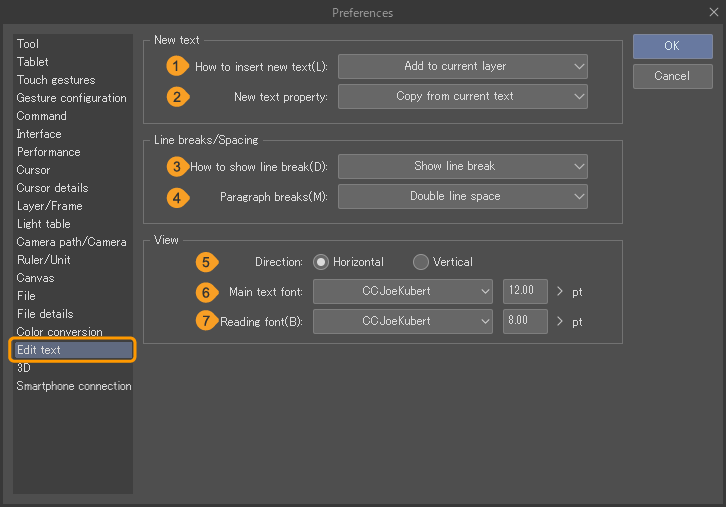
New text
You can set how new text is entered into the story editor.
(1)How to insert new text
Selects how to create the layer from Add to current layer and Always create new layer.
(2)New text property
Adjusts the default settings for text, such as text size and font.
·Selected text tool property will reflect the settings in the Tool Property palette for the Text tool.
·Copy from current text uses the settings of other text on the same page. This setting is reflected only on the canvas, and not in the Story Editor.
Line breaks/Spacing
(3)Line breaks
Sets how to display line breaks in the Story Editor.
·Show line break shows a sign to indicate a line break in the specified position without breaking the line.
·Show symbol only shows a sign to indicate a line break in the specified position without breaking the line.
(4)Paragraph breaks
Sets how to divide text by pressing Enter when writing in the Story Editor.
·No paragraph breaks does not create a break in the text area when enter is pressed.
·Single line space adds a break in the text area when enter is pressed.
·Double line space and Triple line space add a break in the text area when enter is pressed twice consecutively. Only the number of key presses differs between Single and Double or Triple line space.
View
Sets how to display line breaks in the Story Editor. This setting is not reflected on the canvas.
(5)Direction
Sets whether text displays horizontally or vertically in the Story Editor.
(6)Main text font
Sets the font and size of text displayed in the Story Editor. Click on a font name to select a font from the font list.
(7)Reading font
Sets the type and size of the reading font displayed in the Story Editor.
3D
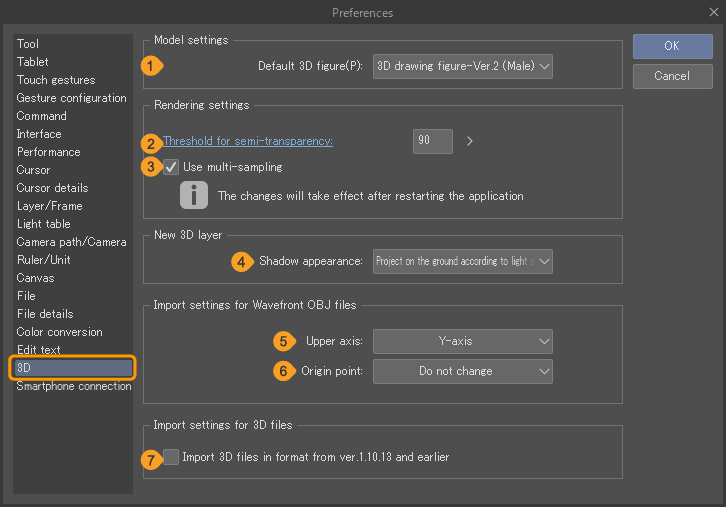
Model settings
(1)Default 3D figure
Sets the default settings for drawing figures when pose materials are pasted to the canvas. You can set the version and choose Male or Female.
Rendering settings
(2)Threshold for semi-transparency
You can specify a value at which the texture of a 3D object is be considered translucent. Areas that have lower opacity than the specified value will be shown as translucent.
When the value is larger, the transparency information will be more accurately reflected on the 3D object, but it may be slow if the object has many polygons. Smaller values make the 3D object more opaque and lighter.However, transparent textures may become opaque, which can cause rendering distortion.
(3)Use multi-sampling
Applies multi-sampling to 3D materials. Turn this on to improve the display quality of 3D materials.
New 3D layer
(4)Shadow appearance
You can choose how shadows are projected on new 3D layers.For details on the settings, see "Shadow appearance". When set to Ver.1.12.6 and earlier, shadows on the ground will be cast directly down and will not follow the light source.
For details on setting the shadow appearance separately for each 3D layer, see "Rendering settings".
Import settings for Wavefront OBJ files
(5)Upper axis
Select whether the upper axis will be the X or Y axis.
(6)Origin point
Set the origin point to Do not change or Bottom middle.
Import settings for 3D files
(7)Import 3D files in format from Ver.1.10.13 and earlier
Turn on to import 3D files in a format that is compatible with Clip Studio Paint Ver. 1.10.13 and earlier versions.
Language (Android)
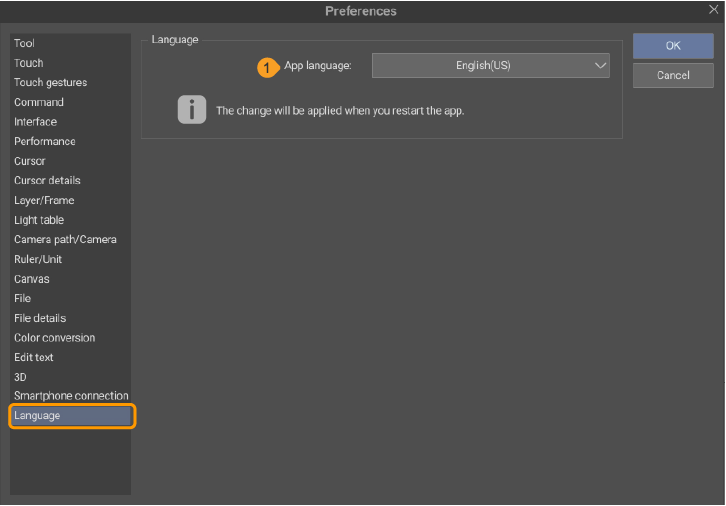
Language
(1)App language
Sets the language of the Clip Studio Paint interface. The default setting is the system language.
Privacy Settings
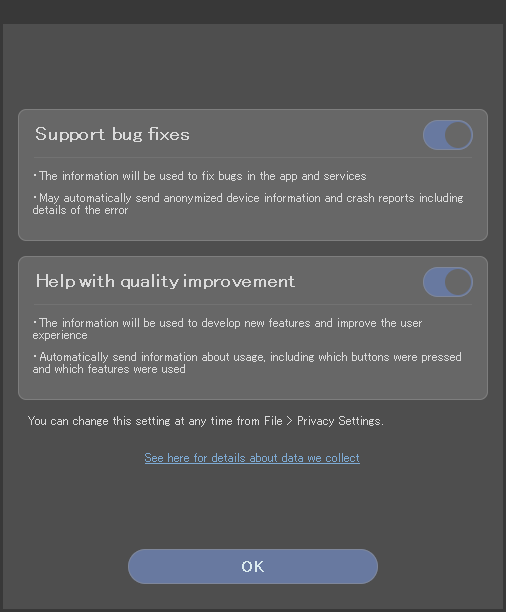
The Privacy Settings screen allows you to adjust settings related to the sending data to improve the quality of Clip Studio Paint. The Privacy Settings screen appears when Clip Studio Paint is launched for the first time.It can also be displayed by performing the following operations.
·Windows: File menu > Privacy Settings.
·macOS/tablet: Clip Studio Paint logo menu > Privacy Settings.
Tap Next on the first screen that appears to go to the Privacy Settings screen, with the options Support bug fixes and Help with quality improvement. See the descriptions in the Privacy Settings dialog for more information.
Tap OK to confirm your privacy settings and close the dialog.
