S
Learn about Selection, Shadows, Speed lines, and other setting categories starting with S in Clip Studio Paint.
Select layer
You set what layers can be selected with the Select layer sub tool.
(1)Exclude
Use the icons to exclude certain layer types from being selected. You can exclude draft layers, text layers, locked layers, and fill layers.
Memo | You cannot exclude draft layers in Clip Studio Paint Debut. |
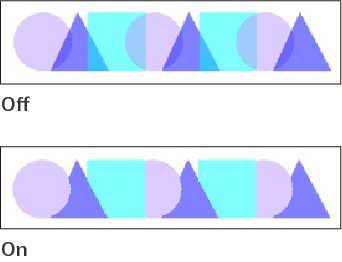
Selection
You can set how to create a selection with selection tools.
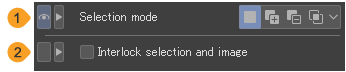
(1)Selection mode
Set how to create a new selection when there is already a selection area on the canvas. For details on creating selections, see "Selection".
(2)Interlock selection and image
When turned on, when you drag and move a selection area, you can also move the image within the selection area.
Shape operation
When drawing a figure or creating a selection with a figure, you can set the starting point, method of confirming the rotation angle, and other related settings.
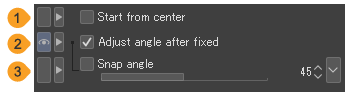
(1)Start from center
When turned on, you can start drawing from the center of the shape.
(2)Adjust angle after fixed
When turned on, after dragging and releasing to draw a figure, you can drag again to adjust the angle of the figure. Tap to confirm the angle of the figure.
When using a mouse, you can adjust the angle after drawing the figure by simply moving the mouse, without pressing the mouse button. Click to confirm the angle of the figure.
(3)Snap angle
When Adjust angle after fixed is turned on, you can adjust the minimum angle to rotate the object.
Special ruler
Use these settings to adjust the position and angle of a ruler, as well as snapping settings, when a special ruler or symmetrical ruler is selected with the Object sub tool.
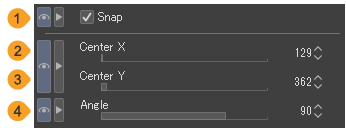
(1)Snap
When turned on, drawing tools such as the Pen tool will snap to the selected ruler.
(2)Center X
Adjust the offset of the center of the ruler from the canvas left edge. This setting can apply to the radial ruler, radial curve ruler, concentric circle ruler, symmetrical ruler, and vertical guide lines.
(3)Center Y
Adjust the offset of the center of the ruler from the canvas top edge. This setting can apply to the radial ruler, radial curve ruler, concentric circle ruler, symmetrical ruler, and horizontal guide lines.
(4)Angle
You can set the angle of the ruler. This setting can apply to the parallel line ruler, concentric circle ruler, and symmetrical ruler. For the multiple curve ruler, you can set the direction of drawing lines with the same shape as the ruler.
Speed lines
You can adjust settings for drawing speed lines with the Speed lines sub tools of the Figure tool.
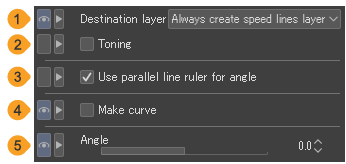
(1)Destination layer
You can set where speed lines are drawn from the following options.
Draw on editing layer | Draws the speed lines directly on the selected layer. If a speed line layer is selected, speed lines can be drawn the same way as Draw on speed lines layer. |
Always create speed lines layer | Creates a new speed lines layer to draw the speed lines. This allows you to edit focus lines even after the speed lines are drawn. For details, see "Editing speed lines". |
Draw on speed lines layer | When a Speed line layer is selected, allows you to redraw the reference line while keeping the settings of the already drawn stream line. You can change the position of the reference line of the speed lines, or add a reference line to only a portion of the speed lines. When a layer that isn’t a speed lines layer is selected, this creates a new speed lines layer to draw the speed lines. |
(2)Toning
This can be set when Destination layer is set to Always create speed lines layer or Draw on speed lines layer. When turned on, you can create a focus lines layer with toning.
You cannot draw with the drawing color on speed line layers when Toning is turned on. Even if you remove the tone setting, the layer will appear in gray.
(3)Use parallel line ruler for center
When there is a parallel line or multiple curve ruler with snapping turned on, you can draw speed lines that snap to the angle of the ruler.
(4)Make curve
When turned on, control points to adjust the curve are added to the shape line of the speed line. You can then change the shape of the speed lines by editing the control points with the Object sub tool.
(5)Angle
You can set the direction to draw the speed lines. For example, If the default setting is for horizontal speed lines, setting it to 90 will draw them vertically. If Use parallel line ruler for angle is turned on, the ruler angle takes precedence.
When a speed lines layer is selected
When a speed line layer is selected with the Object sub tool, you can change their color and angle.
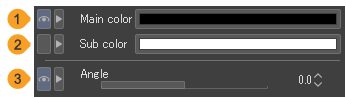
(1)Main color
You can change the color of the speed lines. Tap the color icon to open the Color settings dialog and set the speed lines color.
(2)Sub color
You can change the sub color of the speed lines. Tap the color icon to open the Color settings dialog and set the sub color.
Memo | The sub color can be set if the expression color of the image material used for the brush tip is gray and the image is drawn only in black and white. |
(3)Angle
Specifies the angle of the speed lines. This changes the angle of the lines without moving the reference line.
Spraying effect
Configures settings related to the spread of the brush tip images. Turn on Spraying effect to scatter the brush tip images like a spray.
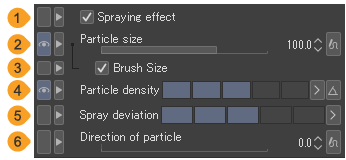
(1)Spraying effect
Turn this on to allow spraying for the brush tip selected in the Brush tip category.
(2)Particle size
Set the size for each brush tip. Tap the Dynamics icon to make the particle size reflect changes in the pen pressure and brushstroke speed.
(3)Brush Size
Turn this on to automatically have the Particle size follow changes in Brush size. A larger brush size means a larger particle size.
(4)Particle density
You can adjust the particle density. The higher the value the more brush tips will be added, resulting in more density. Tap the Dynamics icon to make the particle density reflect changes in the pen pressure and brushstroke speed.
(5)Spray deviation
You can adjust how far proportionally the brush tips will be centered. The higher the value the closer the brush tips will be to the center.
(6)Direction of particle
You can adjust the direction of the brush tip. This is different from the brush angle.0 means that it will be the registered direction. Tap the Dynamics icon to make the particle density reflect changes in the brushstroke angle.
Dynamics settings (Direction of particle)
This screen appears when you tap the adjustment settings button for Direction of particle, which you can see from the Spraying effect and 2 - Spraying effect categories in the Sub Tool Detail palette. You can set what brush input will affect the Direction of particle.
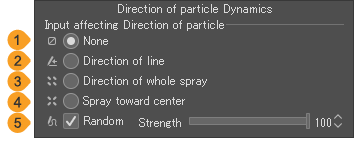
(1)None
The direction of particles will remain consistent without input from the brush.
(2)Direction of line
The direction of particles will follow the direction of the line being drawn.
(3)Direction of whole spray
The direction of particles will follow the angle set in the Brush tip > Angle.
(4)Spray toward center
The direction of particles will change to face the center of the brush tip.
(5)Random
The orientation of the pen will change randomly. You can adjust the strength of the effect. You can set this even if you have selected other settings.
Starting and ending
You can use this setting when using tools like the Pen or Brush tool.Starting and ending is an effect that gradually changes the strength of the stroke at the start and end of a line.
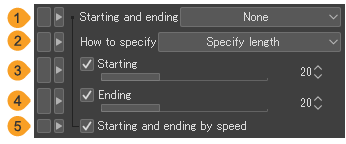
(1)Starting and ending
Tap this to display Starting and ending effect dynamics. You will be able to set Brush Size, Brush density, and many other options. Check the boxes you want reflected for the starting and ending of the stroke. This allows you to select minimum value for each setting. You can select multiple settings to be applied to the starting and ending effects of brushstrokes.
Depending on what tool you have selected the available Starting and ending effect dynamics options will differ.
(2)How to specify
You can change how Starting and Ending is set from Specify length, By percentage, or Fade.
Specify length: This sets the length of the brushstroke affected by Starting and Ending.
By percentage: Sets the values in Starting and Ending to percentage units.
Fade: From the beginning of the drawing, this will gradually change the settings so that they reach the Minimum value set in Settings for effect of starting and ending. You can determine the Minimum value for the Ending with the slider. Once the Minimum value is reached it will stay at that value until the end of the stroke.
(3)Starting
Turn this on to apply the settings in Starting and ending for the start of a stroke. The stroke will start as the Minimum value set in Starting and ending effect dynamics and will gradually get larger with the values set with the slider until it reaches the Maximum value (100%).
You can set the Starting range with the slider. The values that can be set differ depending on How to specify is set.
If How to specify is set to Fade, you cannot use Starting settings.
(4)Ending
Turn this on to apply the settings in Starting and ending for the end of a stroke. The stroke will start as the Minimum value set in Starting and ending effect dynamics and will gradually get smaller with the values set with the slider.
You can set the Ending range with the slider. The values that can be set differ depending on How to specify is set.
(5)Starting and ending by speed
Turn this on to have speed factor into the Starting and ending of a brushstroke. When a line is being drawn slowly the starting and ending effect will be less dramatic.
Stroke
When using drawing tools such as the Brush tool, you can adjust settings such as the interval between brush tips.
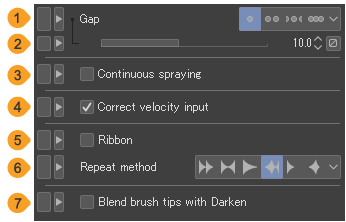
(1)Interval
You can set the interval to Fixed, Wide, Normal or Narrow. The tighter the spacing, the smoother the line, but the heavier the stroke.
When set to Fixed, you can specify the drawing interval numerically from the slider below. Tap the dynamics icon next to the slider to make the interval reflect changes in the pen pressure and stroke speed.
(2)Continuous spraying
When turned on, the brush continues to draw as long as you keep pressing the pen in the same place.
This setting allows you to easily draw lines of varied density by varying the speed of the stroke. With slow strokes, you can draw dark lines, while with fast strokes, you can draw lighter lines.
Continuous spraying is not available when Post correction is turned on in the Correction category.
(3)Correct velocity input
When Dynamics such as Speed are enabled for Brush Size or Opacity, you can then set Correct velocity input. This allows you to switch between methods that calculate the speed of a pen stroke.
(4)Ribbon
When turned on, the shape of the brush tip changes along the pen stroke. It creates a selection with a natural sequence of patterns.
Note that Ribbon is not available when Spraying effect is turned on or when the Tip shape is set to Round.
(5)Repeat method
When using multiple image materials in for the brush tip shape, you can set the order in which they appear.
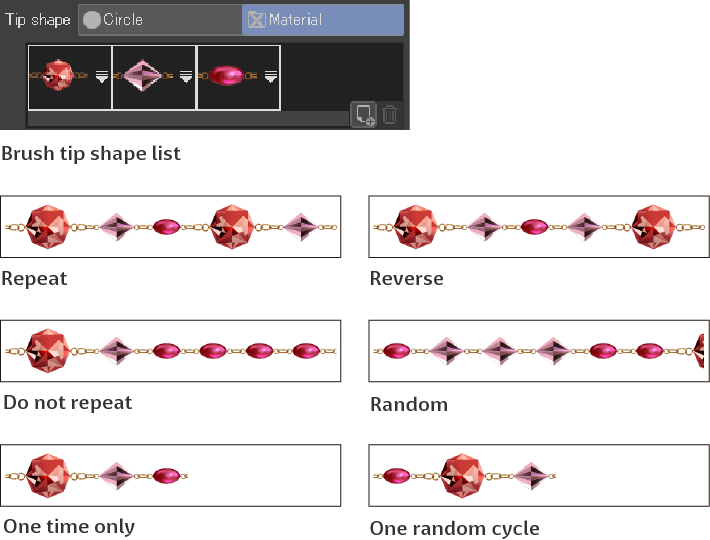
Repeat | Uses the series of brush tip shapes repeatedly in order from left to right. |
Reverse | Uses the series of brush tip shapes in alternate order from left to right and then from right to left. |
Do not repeat | Once the series of brush tip shapes is used in order from left to right, the stroke continues with the only last brush tip shape. |
Random | Uses the brush tip shapes in a random order. |
One time only | Uses the series of brush tip shapes in order from left to right. The brush tip shapes are drawn once in order, and nothing else is drawn after. |
One random cycle | Uses the brush tip shapes in a random order. The brush tip shapes are drawn once in order, and nothing else is drawn after. |
(6)Blend brush tips with Darken
Set how brush tips will overlap. When turned on, the darker color is reflected.