Using keyframes
Keyframes can record information such as the position of the camera angle and the volume of an audio file, as well as the appearance of cels and layers, on the timeline.
If two keyframes are set in two locations, the information registered in the first keyframe will change to become the information set in the second keyframe. For example, a 2D camera folder track can be keyframed to set up camera work that moves the camera from left to right.
Enable keyframe editing
This allows keyframes to be set for selected tracks.
To edit a keyframe, select it from the Timeline palette and either tap Enable keyframes on this layer on the Timeline palette or tap the Animation menu > Edit track > Enable keyframes on this layer.

This allows keyframes to be set for selected tracks.
If you use the Object sub tool to select a track, you will be able to edit it using keyframes, and the display of the Timeline and Layer palettes will change.
·The tracks in the Timeline palette will have additional keyframe-specific settings, such as Transform and Opacity. For tracks set with a mask, Mask will also be added. Tap the + icon in front of the track name to show more settings.
·For items that cannot be edited, an icon is displayed on the Layer palette to indicate that the timeline is locked. The cels in the animation folder will display a semi-transparent lock icon on them.

Memo | ·To draw on a layer with keyframes enabled, see "Edit a keyframe enabled layer". ·The 2D camera folder and audio tracks always have keyframe editing enabled. You do not need to use this setting. |
Depending on the track you have set to enable keyframes, the following restrictions may apply.
Layer folders
For layer folders, if you set Enable keyframes on this layer, the settings will be reflected on all the layers within the folder. Note that for layers in a layer folder, Enable keyframes on this layer cannot be turned off.
Animation folder (cel)
For cels inside the animation folder, if Enable keyframes on this layer is set, those settings will be reflected in the entirety of the animation folder.
For cels in animation folders with Enable keyframes on this layer set, if Enable light table is turned off for a cel in the animation folder, selecting a separate frame with an assigned cel in the Timeline palette will not switch it to the cel selected in the Layer palette. The same applies to cels without a light table layer set.
Disable keyframe editing
This disables keyframe settings for the selected track.
From the Timeline palette, select the layer or track that has keyframe editing enabled and either tap Enable keyframes on this layer on the Timeline palette or tap the Animation menu > Edit track > Enable keyframes on this layer.

Keyframes set for tracks in the Timeline palette will be hidden and keyframe settings will no longer be available. The canvas will not display the settings recorded for the keyframe and settings dedicated to keyframes will also be hidden from the Timeline palette. The lock icon in the Layer palette is also hidden.
Memo | The 2D camera folder and audio tracks always have keyframe editing enabled. You do not need to use this setting. |
When enabling keyframes again
When you turn off Enable keyframes on this layer and turn it back on again, the preserved settings from when you turned it off return, the keyframes will display in the Timeline palette and layer transformations will be restored.
If you change the opacity of a cel or layer while Enable keyframes on this layer is turned off, these will not be in effect if you turn the setting back on.
Keyframe settings
You can create keyframes and record settings to them. Depending on the type of track, different items can be set for keyframes.
2D camera folder track
Using 2D camera folders, you can add camera movement to your animation without transforming the images in the animation folders or layers. Transformations (Position, scale ratio, rotate, center of rotation), opacity, and keyframe interpolation can be all recorded with a keyframe.
Before setting up, create a 2D camera folder track and store cels and layers for which you want to set camera work in the 2D camera folder track.
The following will explain how to get the background to move along with the character.

1Select the Object sub tool.
2From the Timeline palette, select the frame from which you would like the camera work to begin.
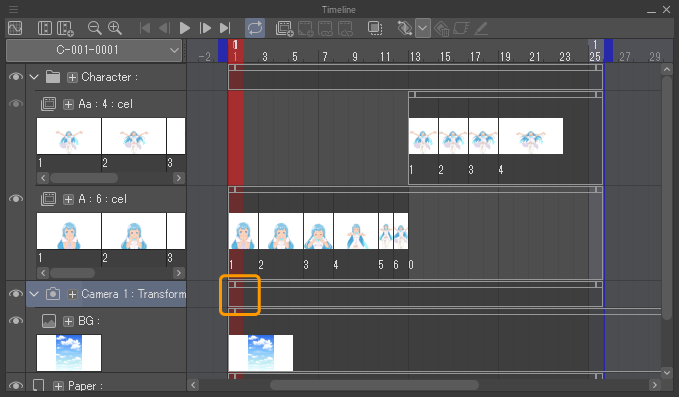
3Select an interpolation method from Keyframe interpolation on the Timeline palette.
For details, see "Change the keyframe interpolation".

4Drag the handles of the 2D camera frame shown on the canvas to set the camera work. You can select the Tool Property palette to place a 2D camera frame by entering numerical values. This is useful for making detailed adjustments.
When an animation frame is shown, a transformation box will display over the 2D camera frame.(Not available in Clip Studio Paint Debut.)
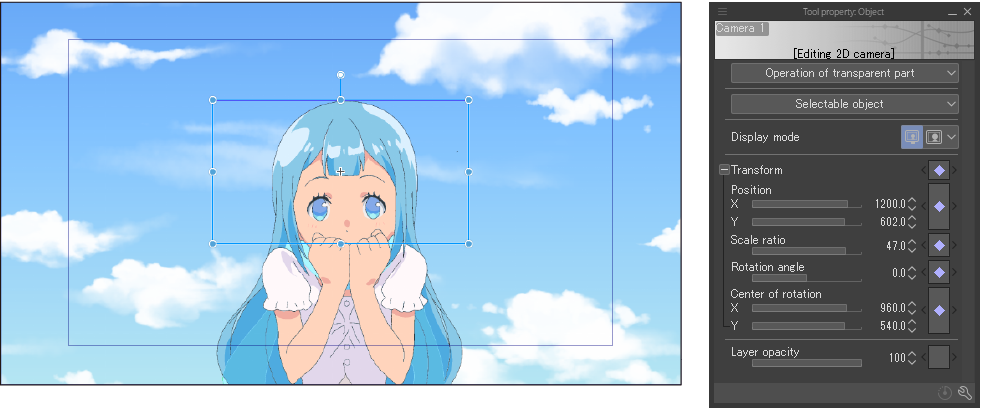
The 2D camera frame corresponds to the camera's viewfinder. When you export an animation, the frame becomes the output range.
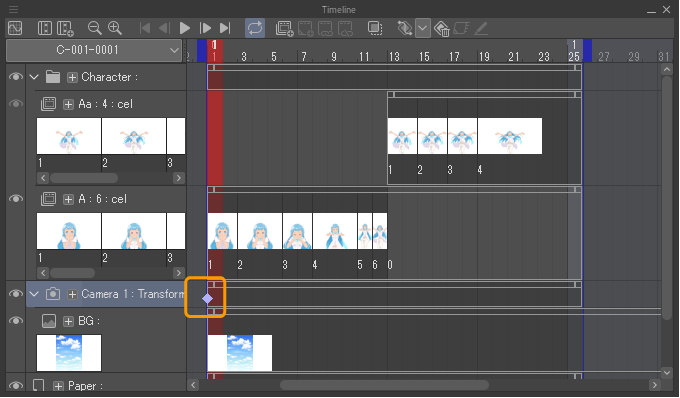
5A keyframe is created in the Timeline palette and its settings are recorded.
6To add movement, select the final frame for the camera movement.
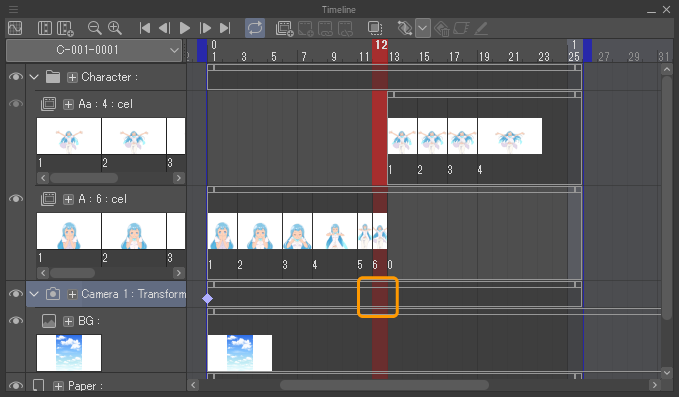
7Perform the same procedures from steps 3 - 4 to set the camera position.
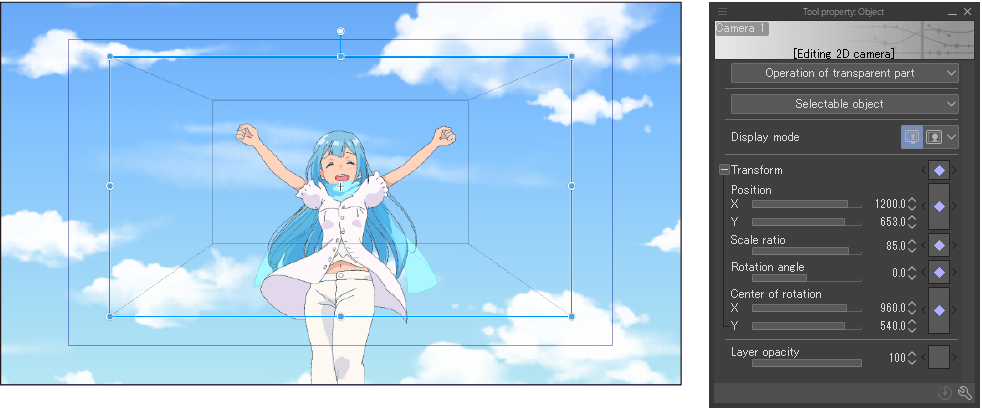
When the settings are made, a keyframe is created for the frame selected in step 6.

Play the timeline to see the 2D camera folder track in action.
You can access more settings from the Tool Property palette and the Sub Tool Detail palette.
You can set the placement and display method of the 2D camera folder track when selected with the Object sub tool from the Sub Tool Detail palette > "Operation", "Correction", "2D camera", "Transform image", and "Layer" categories.
Animation folders and layers
Animation folders with cels and normal layers on tracks can be edited using enabled keyframes. Enabled keyframes can record Transformations (Position, scale ratio, rotate, center of rotation), Opacity, and Keyframe interpolation.
1Select the Object sub tool.
2From the tracks in the Timeline palette, select the frame where the motion will begin.
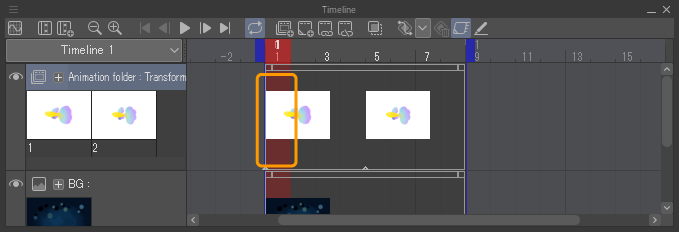
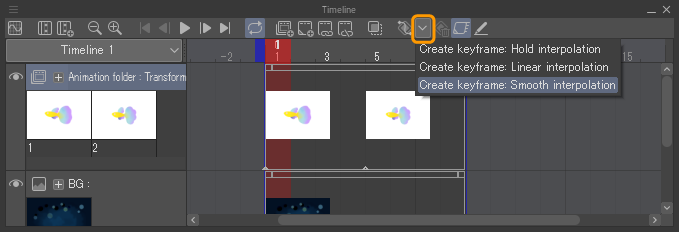
3Select an interpolation method from Keyframe interpolation on the Timeline palette.
For details, see "Change the keyframe interpolation".
4Frames and handles will appear on the canvas. Drag the handles and frames to adjust layer placement and angles. Selecting the Tool Property palette allows you to set the position and angle by entering numerical values. It also allows you to set opacity.
When an animation frame is displayed, a transformation box will show over the output frame.
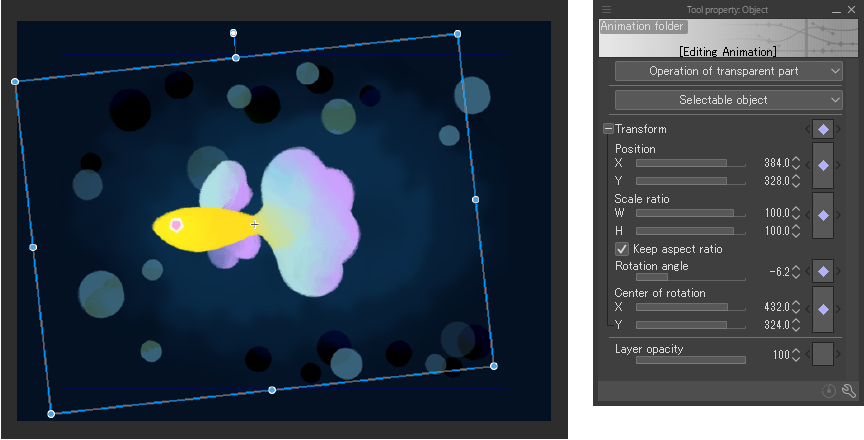
A keyframe is created in the Timeline palette and its settings are recorded.
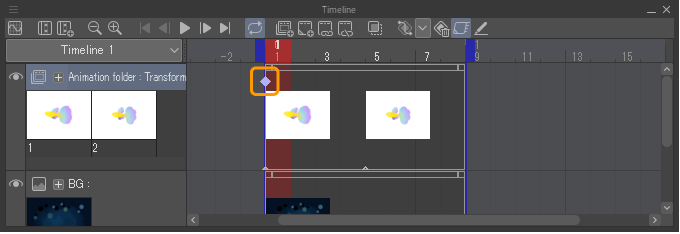
5To add movement, select another frame.
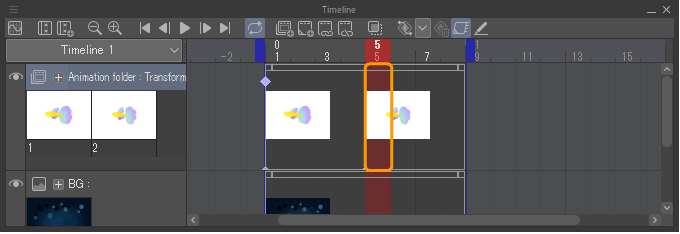
6Perform the same procedures from steps 3 - 4 to set the layer placement and angles.
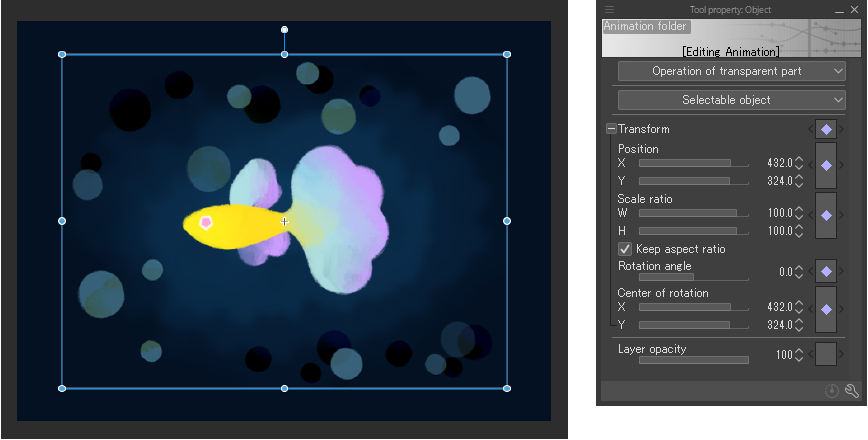
When the settings are made, a keyframe is created for the frame selected in step 6.
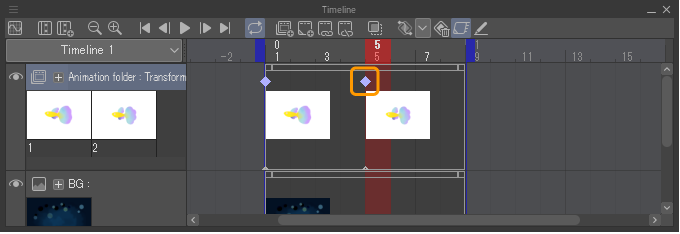
Playback the timeline to see the keyframe in action.
You can access more settings from the Tool Property palette and the Sub Tool Detail palette.
Use the Object sub tool to select a layer or animation folder with keyframe editing enabled, and you can set the image placement and display method from the Sub Tool Detail > "Operation", "Transform image", and "Layer" categories.
Layer Mask
When a track with a layer mask is set, only the layer mask can be transformed. The transformation (position, scale ratio, rotate) and keyframe interpolation can be recorded with a keyframe.
To select a keyframe with a layer mask, select the Object sub tool and tap Detail (+) on the track that has the mask applied on the Timeline palette. When the track name expands, tap Mask to select it. Alternatively, you can also tap the thumbnail of the layer mask in the Layer palette to select it.
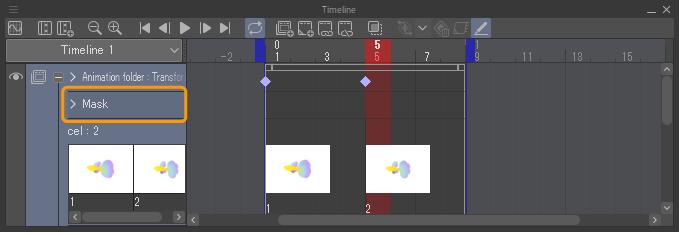
When a layer mask is selected, frames and handles appear on the canvas. The subsequent operations are the same as those described in "Animation folders and layers" from Step 2 onward.
You can access more settings from the Tool Property palette and the Sub Tool Detail palette
Use the Object sub tool to select a layer or animation folder with keyframe editing enabled, and you can set the image placement and display method from the Sub Tool Detail > "Operation" and "Transform image" categories.
Audio track
For audio tracks, keyframes can be used to record volume and frame interpolation settings to keyframes. This is useful when you want to change the volume of an audio file according to a scene.
1Select the Object sub tool, then from the audio track in the Timeline palette, select the frame for which you want to set the volume.

2Select an interpolation method from Keyframe interpolation on the Timeline palette.
For details, see "Change the keyframe interpolation".

3Adjust Volume in the Tool Property palette.
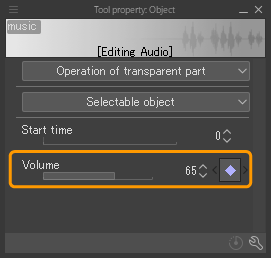
When set, the keyframe will be added to the Timeline palette.

4Select another frame and perform steps 2-3 to create a keyframe with the volume recorded on another frame.
The volume will now change between the keyframe set in step 1 and the keyframe set in step 4.
You can access more settings from the Tool Property palette and the Sub Tool Detail palette
When an audio track is selected with the Object tool, you can set the volume and playback start time of the audio file from the Sub Tool Detail palette > "Operation" and "Audio" categories.
Keyframe View
When a keyframe is set, the keyframe may appear small. If some setting items have not been changed from the previous keyframe or if the keyframe setting has been deleted, the display will look like this.
After tapping Details (+) on the track name, tap > on the left side of the layer name to further expand the detailed settings.
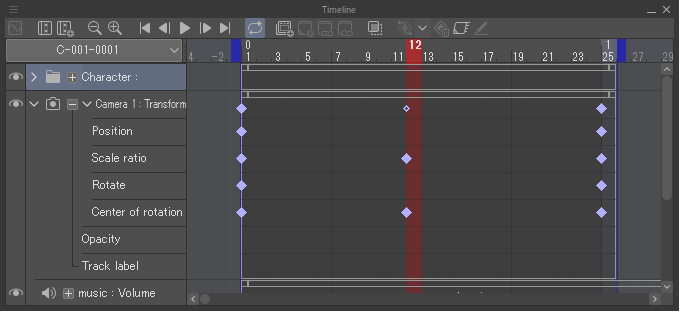
The color of the keyframe display also depends on the interpolation method settings. For more information on interpolation methods, see "Keyframe interpolation".
Select a keyframe
Tap a keyframe to select it. Selected keyframes are indicated by a red frame.
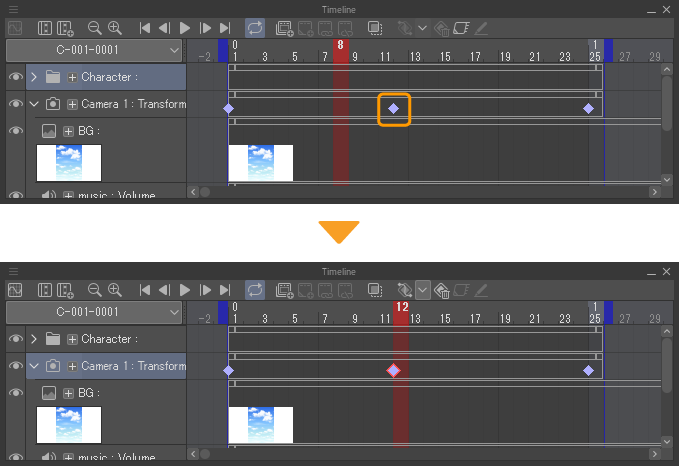
You can also select a keyframe by dragging around it.
Using this same method, you can select multiple keyframes at once. You can also select keyframes on different tracks at the same time.
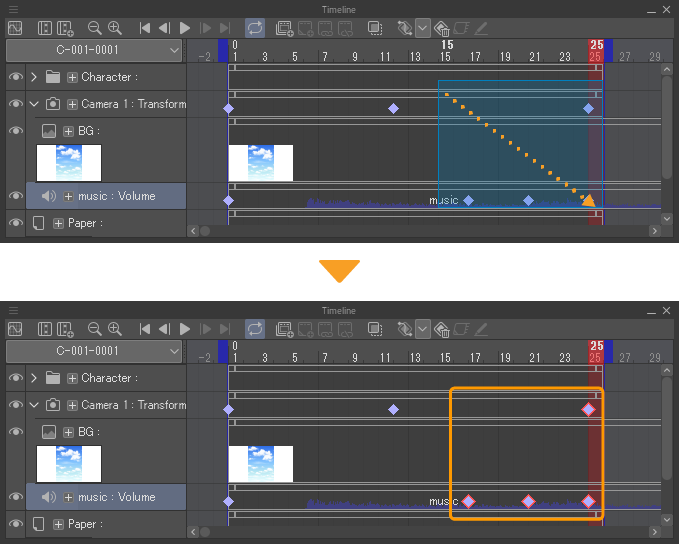
Once a keyframe is selected, a combination of modifier keys and dragging can be used to make selecting more convenient.
·Hold Shift and drag the timeline to select additional keyframes in the specified range.
·Hold Ctrl and drag the timeline to remove keyframes in the specified range from the selection.
Add keyframe
Keyframes can be created for each track in the timeline. This is useful when you want to make changes to settings later and only want to create keyframes first.
Select the track and frame for which you want to create a keyframe, and either tap Add keyframe on the Timeline palette, tap the Animation menu > Edit track > Add keyframe, or tap Add keyframe from the Timeline popup menu.
The keyframe is added with its settings intact.
Change the settings of a keyframe
Settings recorded in keyframes can be changed later on. Select the Object sub tool, and from the Timeline palette, select the keyframe whose settings you wish to change.
·When settings are changed in the Tool Property palette, the changes are shown in the keyframes.
·In the case of 2D camera folder tracks and layers, keyframe settings can be changed by manipulating handles and other objects on the canvas.
Changes to keyframe settings are made one at a time. Selecting multiple keyframes does not allow you to change settings for them all at once.
Change the keyframe interpolation
Select the keyframe you want to change the interpolation method for, and then select the interpolation method from Keyframe Interpolation in the Timeline palette.

Tap Add keyframe in the Timeline palette to change the interpolation method for keyframes.
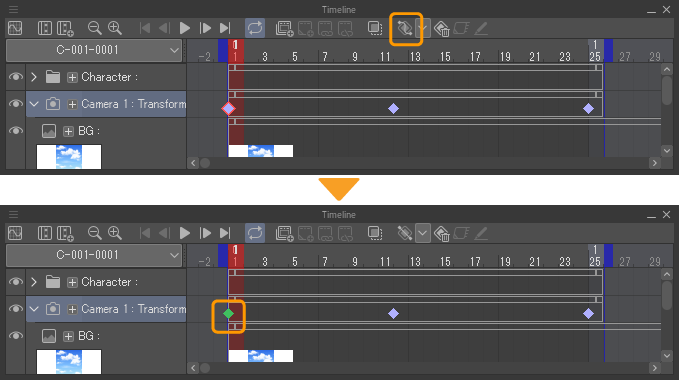
Changing the interpolation method of multiple keyframes
You can change the keyframe settings using menu commands. When using this method, multiple keyframe settings can be changed at once. You can select keyframes between different tracks and still change the interpolation method.
Select a keyframe to change its interpolation method and from the Timeline palette menu, tap Switch keyframe to hold interpolation, Switch keyframe to linear interpolation, or Switch keyframe to smooth interpolation. Alternatively, from the Animation menu > Edit track, you can tap Switch keyframe to hold interpolation, Switch keyframe to linear interpolation, or Switch keyframe to smooth interpolation.
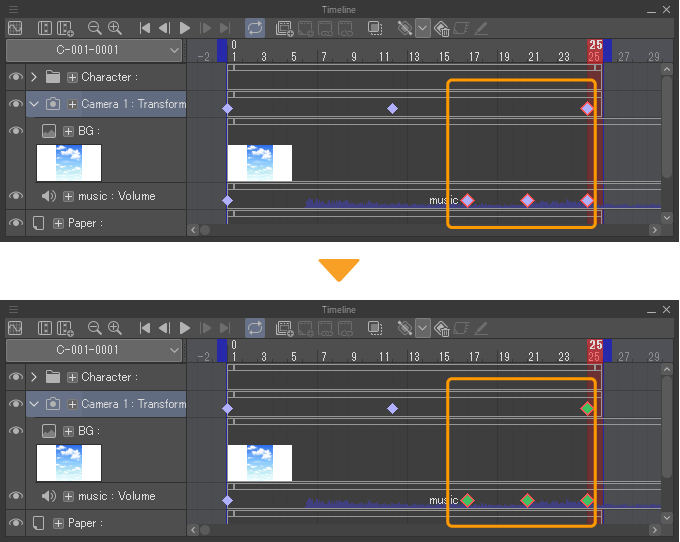
Keyframe interpolation
There are three types of keyframe interpolation methods. The color of the keyframe changes depending on the interpolation method you have set.
When the Timeline palette displays in the Graph Editor, the interpolation method can be viewed as a graph. For details, see "Using the Graph Editor".

Hold
The settings of the selected keyframe will be carried to the following keyframe at a fixed speed. The values are replaced when the next keyframe begins. The keyframe icon will be yellow.
In the Graph Editor, it looks like this:

Linear
The settings of the selected keyframe will be carried to the following keyframe at a fixed speed. The keyframe icon will be green.
In the Graph Editor, it looks like this:

Smooth
The speed will gradually increase after the selected keyframe and then slow down just before the next keyframe. The keyframe icon will be blue.
In the Graph Editor, it looks like this:

Move a keyframe
If you drag and drop a keyframe on the Timeline palette, you can change its position.
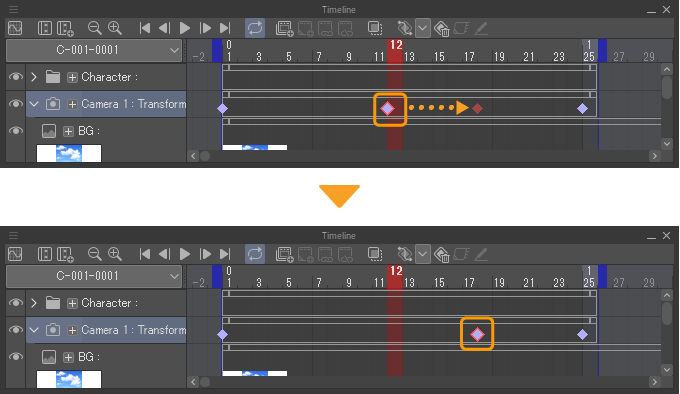
Keyframes can also be moved by selecting them and then tapping Cut and Paste from the popup menu of the Timeline palette. You can also use the Animation menu > Edit track > Cut and Paste.
Duplicate keyframe
You can duplicate keyframes by holding down Alt and dragging and dropping them on the Timeline palette.
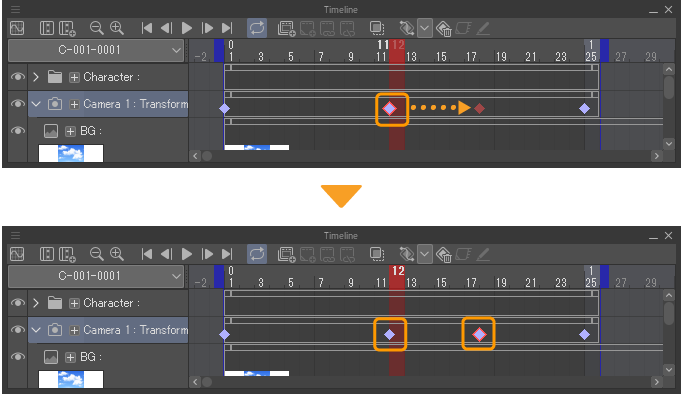
Keyframes can also be duplicated by selecting them and then using Copy and Paste in the popup menu of the Timeline palette. You can also use the Animation menu > Edit track > Copy and Paste.
If a keyframe is pasted onto a frame with no clips using the above method, an additional clip will be created for the entire area with no clips. However, audio and movie track keyframes cannot be pasted to frames that have no clips.
Delete keyframe
You can delete a keyframe by selecting it and tapping Delete keyframe on the Timeline palette.
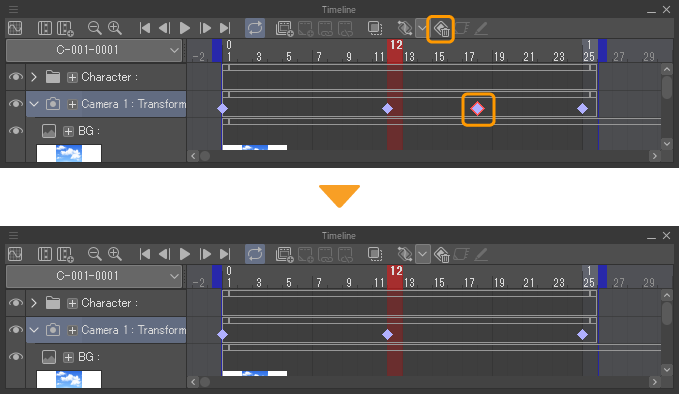
Keyframes can also be deleted by selecting them and then tapping Delete from the popup menu of the Timeline palette. You can also delete using the Animation menu > Edit track > Delete.
Delete all keyframes
This deletes all keyframes from the selected track.
Select the track for which you want to delete a keyframe, and either tap the Animation menu > Edit track > Delete all keyframes or tap Delete all keyframes from the Timeline context menu.
Edit a keyframe enabled layer
You can set up temporary drawing and editing for layers with Enable keyframes on this layer turned on.
From the Timeline palette, select the track containing the layer you wish to edit and either tap Edit layers with active keyframes on the Timeline palette or tap the Animation menu > Edit track > Edit layers with active keyframes.
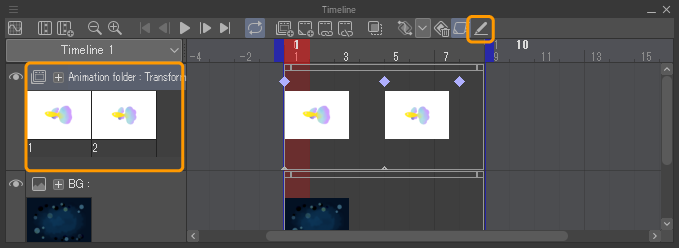
When edits recorded in the keyframe are removed, only the selected track and paper layer will display. Images on other tracks appear semi-transparent.
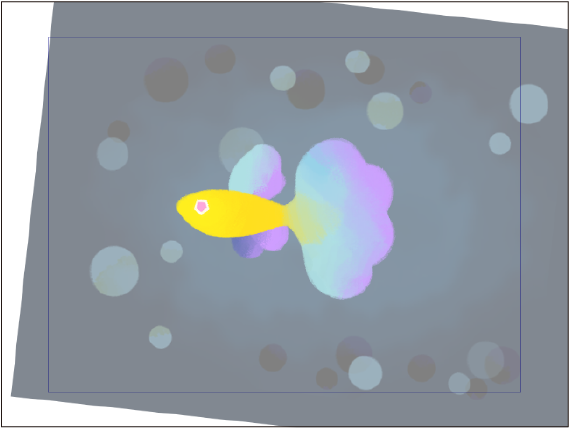
It you switch to another track, this setting will turn off automatically. The canvas display will also return to its original state.