A
Learn about Anti-Aliasing, Audio, and other setting categories starting with A in Clip Studio Paint.
Adjust line width
You can use the Adjust line width sub tool to change the line width of lines drawn on a vector layer. Some settings can be used on raster layers.
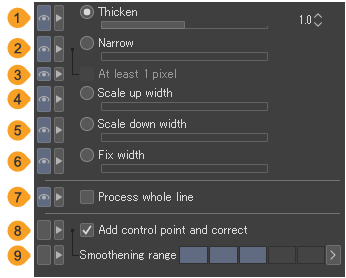
(1)Thicken
You can thicken the line width by the value specified with the slider. You can also use this setting when a raster layer is selected.
(2)Narrow
You can narrow the line width by the value specified with the slider. You can also use this setting when a raster layer is selected.
(3)At least 1 pixel
Allows you to leave 1 pixel in the center of the line when the line width is narrowed using the Adjust line width sub tool, so that the line is not broken. You can also use this setting on raster layers.
(4)Scale up width
You can thicken the line width by multiplying by the value specified with the slider.
(5)Scale down width
You can narrow the line width by multiplying by the value specified with the slider.
(6)Fix width
You can adjust the line width to the value specified with the slider. This is convenient when you want to make the line a uniform width.
(7)Process whole line
When turned on, tapping a point on the line applies Adjust line width to the entire line.
(8)Add control point and correct
When turned on, you can add control points when adjusting the line width. Adding control points makes the line smoother after adjusting the line. This setting is not available when Process whole line is turned on.
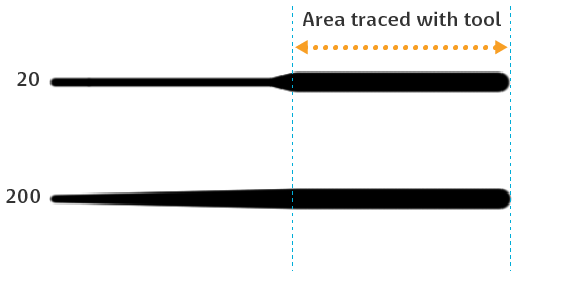
(9) Smoothening range
Allows you to set the range to smooth the line width when Add control point and correct is turned on.
Anti-aliasing
This setting adjusts the level of anti-aliasing for lines and borders. With anti-aliased lines, you can draw smoother outlines as jags are smoothed.
You can set the anti-aliasing strength to None, Weak, Middle or Strong. Choose None if you do not want to use anti-aliasing.
![]()
For some tools, there may only be the option to turn anti-aliasing on or off. You will see the following setting for the Fill or Gradient tools.
![]()
Anti-overflow
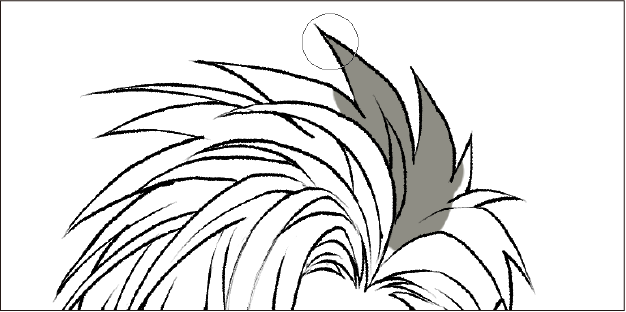
When using drawing tools such as the Brush tool, you can set it so that you cannot draw past lines on the reference layer.
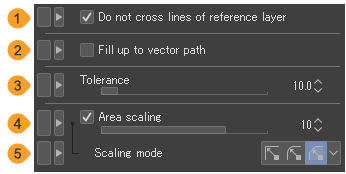
(1)Do not cross lines of reference layer
When turned on, you can draw without crossing over any lines drawn on the reference layers. When the brush passes over a line, it will only paint on the side that has the majority of the brush shape (the center of the brush tip).
(2)Fill up to vector path
When a vector layer is a reference layer, the center line of the vector is referred to.
(3)Color margin
Configures the color margin (tolerance) to recognize a color as the same as that of a line drawn on the reference layer. The larger the number, the more areas of different colors are included in the reference.
(4)Area scaling
When turned on, you can enlarge or shrink the area to paint by the amount of pixels specified by the slider.
(5)Scaling mode
When Area scaling is turned on, you can set the corner shape of the area to Round, Rectangle, or To darkest pixel. For details, see "Fill".
Audio
Specify settings for audio files imported into the Timeline or Layer palette.
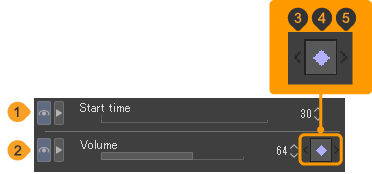
(1)Start time
You can adjust the start time of audio files. This is useful when you want to start playing part-way through an audio clip. Set the time by the frame value, using the same rate as the Timeline palette. Set the Start time to 0 to play the audio file from the beginning.
(2)Volume
You can adjust the playback volume of audio files. When you adjust the volume, a keyframe will be added to record the volume setting for the selected frame on the Timeline palette.
(3)Previous keyframe
Tap to move to the previous keyframe with the Volume setting.
(4)Add/delete volume keyframe
Tap to add a volume keyframe onto the selected frame on the Timeline palette. If a keyframe is already displayed, you can remove the keyframe from the current frame.
(5)Next keyframe
Tap to move to the next keyframe with the Volume setting.