R
Learn about Reading, Rotate, Ruler, and other setting categories starting with R in Clip Studio Paint.
Reading
This allows you to set a reading when text is selected with the Text tool.
Memo | You can set the font unit in Preferences > Ruler/Unit > Text unit. Reading is configured in the units set here. |
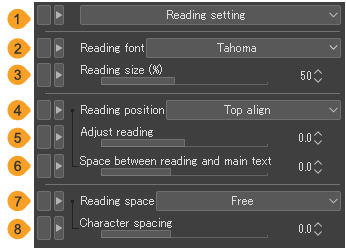
(1)Reading setting
Tap to open a popup where and you can add reading text to the text selected with the Text tool. You can also delete readings that have previously been entered.
(2)Reading font
Tap to display a font list where you can select the font to use for the reading.
(3)Reading size (%)
Sets the size of the letters to use for indicating the reading. Specify the reading size as a ratio (%) of the letter size.
(4)Reading position
Select the reading display position from Top align, Center align and End align.
(5)Adjust reading
This changes the position of the reading. It is adjusted based on the alignment setting in Reading position. You can set the space between reading letters in points or Q.
(6)Space between reading and main text
Adjusts the space between reading and main text by point or Q.
(7)Reading space
You can select from Even 1, Even 2, Even 3 and Free. Auto-arranges the space between the reading letters by distributing them evenly. Selecting Free allows you to set the spacing from Character spacing.
(8)Character space
This can be set when the Reading space is set to Free. You can set the space between reading letters in points or Q.
Redraw
Set how to redraw when using the Redraw vector line tool.
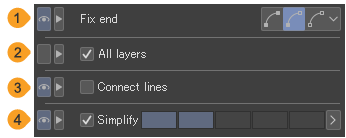
(1)Fix end
You can select Fix both ends, Fix either end, or Free both ends when editing a line.
Fix both ends will lock in the position of the line’s starting and ending points.Fix either end will lock in the position of the far end of the line.Free both ends allows both the start and end points of a line to be moved.
(2)All layers
Turn this on to control all vector layers, balloon layers, frame border folders, and ruler lines displayed on the canvas. Tap the line you wish to edit to switch to that layer.
Turn this off to have only the current layer remain editable.
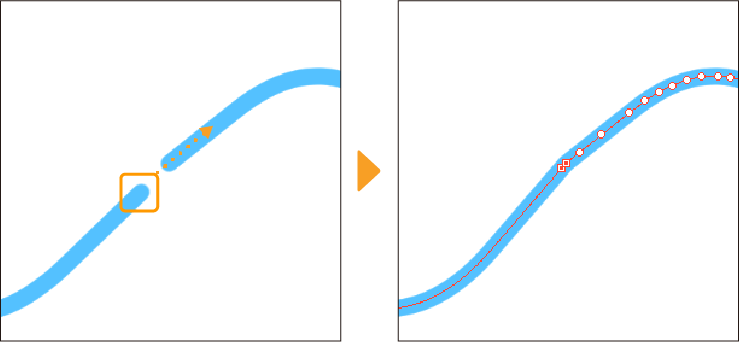
(3)Connect lines
Turn this on to connect touching lines with the same brush shape, angle, and color. When you redraw the line, drag it so that the ends of the line overlap to connect the two lines.
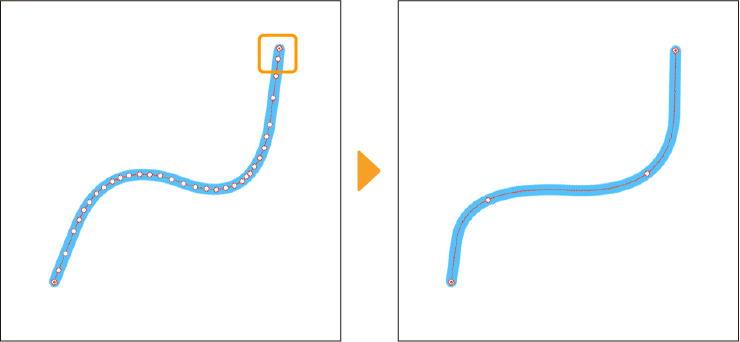
(4)Simplify
When turned on, you can simplify a line by reducing the number of control points. The slider allows you to configure the control point reduction level. The larger the value, the fewer control points you will have.
Redraw line width
For details on each setting, see "Redraw vector line width".
Reference
Select what to reference when using the Fill tool or Auto select tool.
If you have selected a file object or light table layer, see "When a file object layer or light table layer is selected".
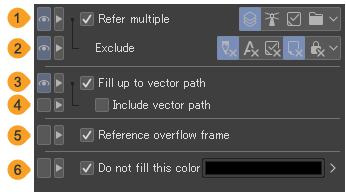
(1)Refer multiple
Turn this on to refer to specific layers when filling or selecting an area. When turned off, only the current layer will be referenced.
You can choose to refer to All layers, Reference layer, Select layer, or Layer in folder. Note that hidden layers will not be referenced regardless of these settings.
All layers | Refers to all layers visible on the canvas. |
Reference layer | Refers to only the reference layer. For details, see "Reference layers". |
Selected layer | Refers to the layer selected in the Layer palette. You can refer to multiple selected layers at once. |
Layer in folder | Refers to layers within the layer folder. If the layer being edited is not in a layer folder then only the edited later will be referred to. |
(2)Exclude from reference
When Refer multiple is turned on, you can select the layers you want to exclude from being referenced. Tap each setting button to show or hide the setting.
Exclude draft layers | Excludes the draft layer from reference. For details, see "Draft layers". |
Exclude text | Does not refer to text or balloon layers. |
Exclude editing layer | Excludes the layer being edited from the reference target. |
Exclude paper layer | Excludes the paper layer from reference. |
Exclude locked layers | Excludes locked layer(s) from the targets of reference. For details, see "Locking layers". |
(3)Fill up to vector path
Turn this on to fill up to the vector path when making a fill selection. This setting will be displayed when using a vector layer as a reference.
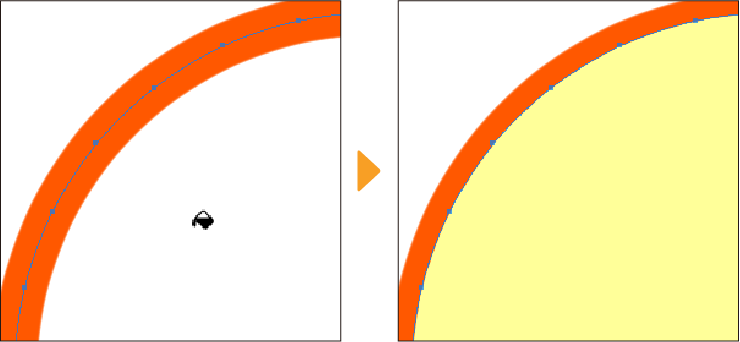
(4)Include vector path
This setting is available when Fill up to vector path is turned on. It will fill including the vector path when making a fill selection.
(5)Reference overflow frame
When turned on, the overflow frame is included in the border when creating an animation. If there is no overflow frame, the output frame is included as the border.
(6)Do not start filling for this color
When turned on, you cannot select or fill closed areas that are the same as the color indicator. Tap the color icon to set the current drawing color as the color. Tap the icon on the furthest right to open the Color settings dialog and set the color.
Memo | Fill up to vector path and Include vector path are not available in Clip Studio Paint DEBUT. |
When a file object layer or light table layer is selected
You can adjust the following settings in the Reference category when a file object layer is selected with the Object tool or when a light table layer is selected in the Animation cels palette. Some settings may not be available depending on the selected layer.
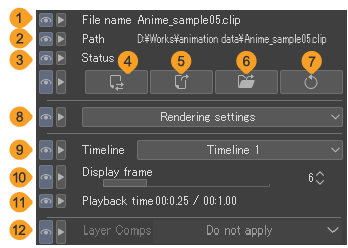
(1)File name/Layer name
Displays the referenced file name of the file object layer. This will be displayed as Layer name if you have the layer set as a light table layer on the canvas or if it is a file object layer made from copying and pasting a layer.
(2)Path
This shows the reference file path of the file object layer.
(3)Status
Displays the status of the file object layer or light table layer.
If something shows in Status, then the file or file path for the reference file for the file object layer may have been changed. Import the file again to fix this.
For light box layers we recommend importing the light box layer once again from the Animation cels palette.
(4)Change file
The Open dialog appears, and you can change the reference file for the file object layer. The content of the layer can be changed by changing the file. If the link to the reference file is broken, this issue can be resolved by re-specifying the file. This setting does not appear when a light table layer is selected.
(5)Open file
The application for the reference file of the file object layer is launched, and the file is opened in that application. If the file is in Clip Studio format (extension: clip), the reference file is displayed in another Canvas window, where you can edit the file. When the reference file is saved, the content on the file object layer is updated at the same time. If you edited it in another application, tap Update to import it once again.
(6)Open folder
Opens the folder where the file object layer reference file is saved. This is useful if you want to select what application you will edit it in.
(7)Update
Reloads the selected file object layer and you can update it with new drawings.
(8)Rendering settings
You can set the display method for cases where a file in Clip Studio format (extension: clip) is set as a file object layer. There are several settings you can use for the Rendering settings.
Fit to resolution of canvas | The file object layer will change to display in the resolution of the canvas if it is different. The display size of the file object layer will change to how large it becomes after this resolution change. |
Draw paper | You can display the paper layer of the referenced file on the file object layer. |
Draw tones in gray | Includes toned layers in the file object layer. |
(9)Timeline
Select the timeline you want to use if multiple timelines are set for a file object layer created from a Clip Studio format file (extension: clip).
(10)Display frame
Use the slider to select the frame you want to display from a movie or a Clip Studio format file (extension: clip) with a timeline set. The frame set will then be displayed on the canvas.
(11)Playback time
The frame (time) for the displayed frame and full playback time will be shown when you import a movie or a Clip Studio format file (extension: clip) with a timeline set.
(12)Layer comps
If the referenced file has a layer comp, you can select which layer comp to display.
Important | If a file object layer or light table layer is set to anything other than Do not apply, it will no longer be editable inn version 2 and earlier. You can set how the layer appears in Preferences > "File". |
Remove dust
Set how to remove and what size will be determined as dust when using the Remove dust tool.
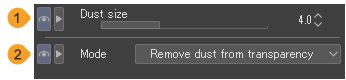
(1)Dust size
Specifies the maximum size for an object to be recognized as dust.
(2)Mode
You can choose how to replace dust. If you are removing dust with the Remove dust or Fill leftover tool, you will be able to select the following modes. The same settings will be available through the Filter menu > Correction > Remove dust.
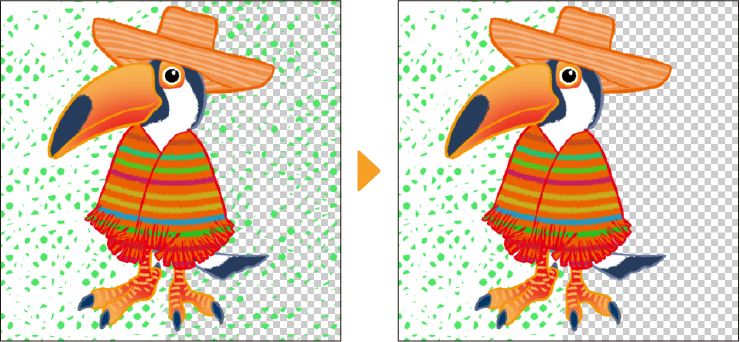
Remove dust from transparency
Small opaque or semi-transparent dust in transparent areas will be seen as dust and replaced with a clean transparent area.
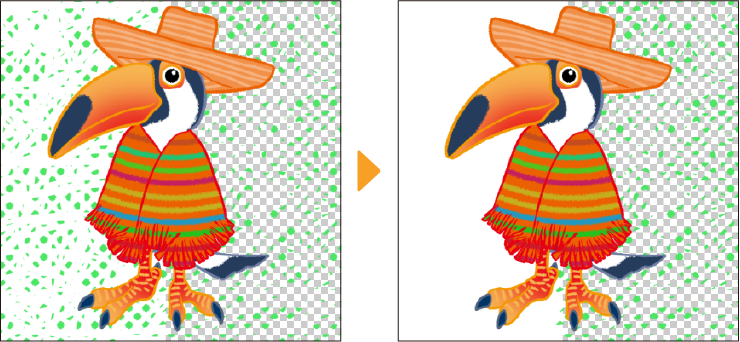
Remove dust from white background
Small non-white dust on white background areas will be seen as dust and replaced with white.
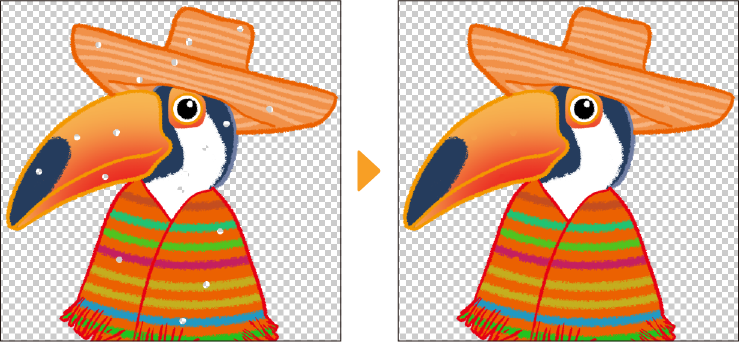
Fill transparent gaps with surrounding color
Small transparent and translucent spots in opaque areas are recognized as dust and filled with the surrounding color.
Fill transparent gaps with foreground color
Small transparent and translucent spots in opaque areas are recognized as dust and filled with the drawing color.
When converting dust to a selection with the Select dust tool, you can select the following from the list.
Select dust on transparency
Selects the small opaque or semi-translucent spots on transparent backgrounds.
Select dust on white background
Selects the small non-white spots on white backgrounds.
Select transparent gaps
Small transparent and translucent spots in opaque areas are selected.
Rotate
Set how to rotate with the Rotate tool.
(1)Snap angle
When turned on, you can rotate in specific increments. Tap the icon on the right side to select an angle from the list.
(2)Reset with double-click
When turned on, you can double-tap the canvas to reset it to the default rotation.
Ruler
When a ruler is selected with the Object tool, you can set the ruler snap and scale.
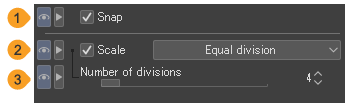
(1)Snap
You can toggle snapping on and off for the selected ruler. This is useful when you have multiple rulers in the same layer and want to change the snap settings for a specific ruler. For details, see "Snap to ruler".
(2)Scale
When turned on, a scale is displayed on the selected ruler. The scale unit can be set to px, cm, mm, in, pt, Q, as well as Equal division and Golden ratio.
Equal division shows the set number of divisions spaced equally along the length of the ruler.Golden ratio shows divisions according to the golden ratio along the length of the ruler.
(3)Number of divisions
When Scale is set to Equal division, you can set the number of divisions.