Using light table layers
You can register cels or layers that you want to use as a drawing reference as light table layers by registering them in the Animation cels palette.
Register cel to light table
Drag and drop a reference cel or layer by dragging and dropping it from the Layer palette to the cel-specific light table or general light table on the Animation cels palette.
Layers can also be dragged and dropped to the cel-specific light table or general light table. If a target cel is not set, you cannot drag and drop to a cel-specific light table.
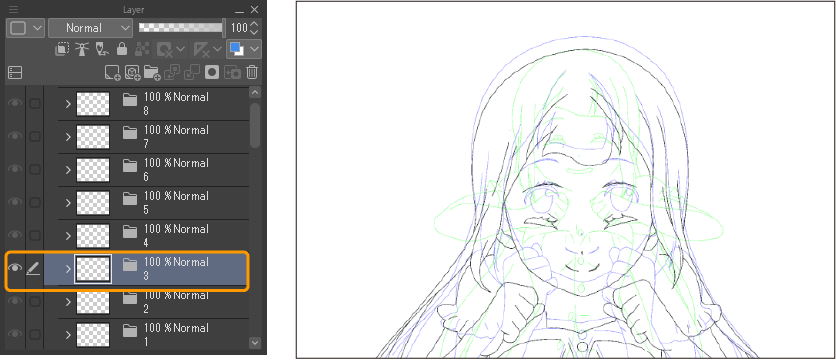
The layer will be registered as a light table layer on the Animation cels palette.
If registering a layer that contains a layer folder or layer mask, the folder or layer mask will be merged in the version of the layer that is registered to the Animation cels palette.
Memo | ·The display color and opacity for light table layers can be set in the Preferences dialog immediately after it is registered. ·If the target cel is switched when dragging and dropping a layer, this issue can be resolved by turning on Fix current animation cel as editing target before registering a light table layer so that the target cel will not be switched. ·Layers registered to the light table cannot be deleted from the Layer palette. Deactivate the light table layer and delete it. For details, see "Deleting a light table layer". |
Light table layers can be registered by dragging and dropping them onto the Animation cels palette, or by using menu commands or the command bar in the palette.
Register selected layer
Registers a layer selected on the Layer palette as a light table layer on the Animation cels palette.
If a cel appears in target cel, set Fix current cel as editing target before selecting the layer you want to register, then tap the Animation menu > Light table > Register selected layer or tap Register selected layer on the Animation cels palette.
The selected layer will be registered as a light table layer in the cel-specific light table on the Animation cels palette. If a target cel is not set on the Animation cels palette, the image is registered to the general light table.
Note that multiple layers can be registered at once if selected.
Select and register file
You can register other image files as light table layers on the Animation cels palette.
You can register the following file formats: Clip Studio format (extension: clip), BMP, JPEG, PNG, WebP, TIFF, Targa, Adobe Photoshop Document (extension: psd) and Adobe Photoshop Big Document (extension: psb).
You can do so by tapping Animation menu > Light table > Select and register file or tapping Select and register file on the Animation cels palette. Select a file from the Select File dialog. The selected file will then be registered as a light table layer in the cel-specific light table on the Animation cels palette.
If a target cel is not set on the Animation cels palette, the image is registered to the general light table.
If the file has multiple layers (Clip Studio format, Adobe Photoshop Document, or Adobe Photoshop Big Document), the layers will be merged and registered.
Memo | ·For Windows/macOS/iPad, you can drag and drop image files from the file explorer to the Animation cels palette to register them as light table layers. ·For files registered as light table layers, only the file destination is recorded on the canvas. Therefore, if you change the destination of either the registered file or canvas, the light table layer will be hidden. To display the light table layer, tap Select and register file again. |
Register a layer copied from another canvas
Layers copied from other open canvases in Clip Studio Paint can be registered as light table layers in the Animation cels palette.
Select a layer from another canvas and copy it to the clipboard via Edit menu > Copy. When copying a layer to the clipboard, do not create a selection. If a selection is created, Register layer copied from another canvas will no longer be available.
Select the Animation menu > Light table > Register layer copied from another canvas.
The copied layer will be registered to the general light table. If the selected layer is a light table layer from a cel-specific light table, it is registered to the cel-specific light table.
Memo | For files registered as light table layers, only the file destination of the source file is recorded on the canvas. Therefore, if you change the destination of either the source file or canvas, the light table layer will be hidden. To display the light table layer, re-register it in the Animation cels palette. |
Register onion skin images
When Onion Skin is active, the images of the cels before and after the onion skin can be registered as a light table layer in the Animation cels palette.
Select the Animation menu > Light table > Register onion skin images. The onion skin image will be registered in the cel-specific light table in the Animation cels palette. The onion skin layer color of the registered light table layers is kept, but the opacity is not.
Note that cels registered as light table layers cannot be displayed as onion skin.
Reorder light table layers
To change the order of light table layers, select the light table layer you want to move, then drag and drop it to the desired location. For tablets, hold the grip of the light table layer and drag and drop it.
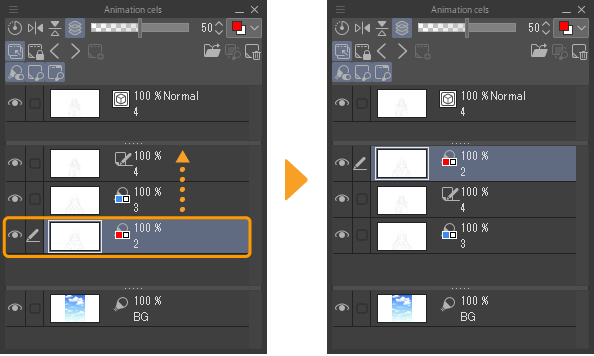
Light table layers can also be moved between cel-specific light table and general light table. However, light table layers in a cel-specific light table cannot be moved to the general light table if they are the same as the target cel.
Color mode for light table layers
Light table layers registered in the Animation cels palette can have their display color and opacity changed.
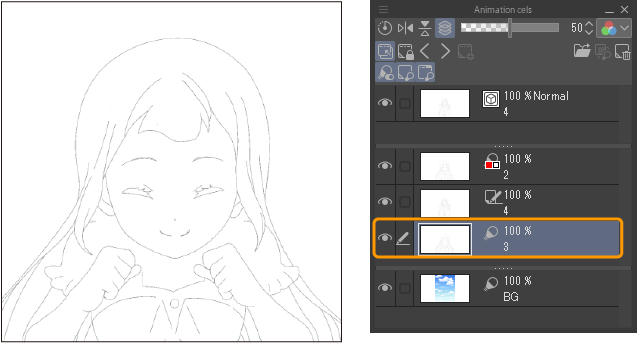
Select the light table layer you want to change, then tap the Animation cels palette and select Color, Half color, or Monochrome from the pull-down menu.
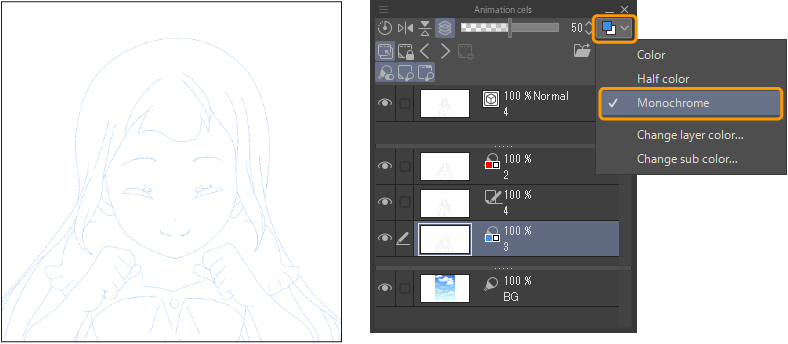
If you select Half color or Monochrome as the color mode, you can change the display color.
If you select Change layer color from the pull-down menu, you can select a display color from the Color settings dialog. The selected color is applied to the light table layer.
Light table layer opacity can be adjusted with the opacity slider in the Animation cels palette.
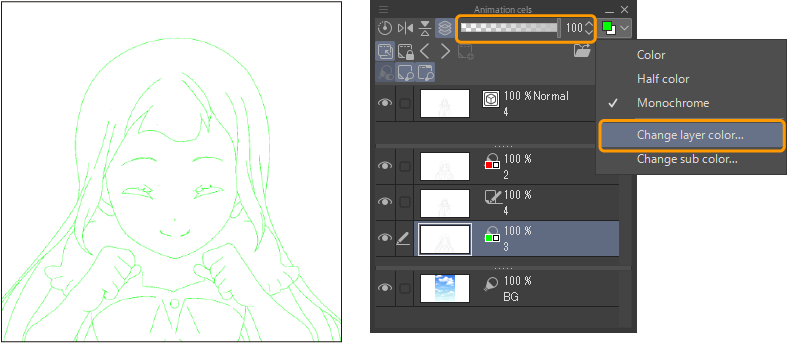
You can also set the color mode for the light table in the Layer Property palette.
Light table sub tool
Select the Operation tool > Light table sub tool to operate the light table layer on the canvas.
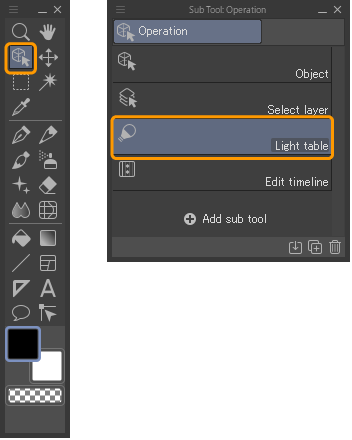
You can also select the Light table sub tool by tapping the Light table icon on the Animation cels palette.
Transforming a light table layer
You can change the position and angle of the light table layer and change the display size to fit the picture you want to draw. Editing a light table layer does not change the contents of the layer or file from which it is loaded.
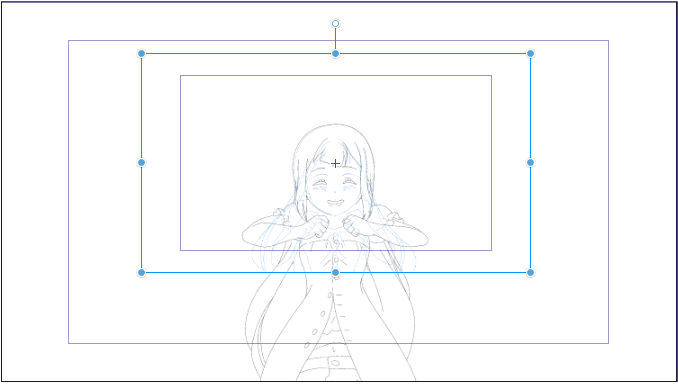
Scaling a light table layer
Drag a green handle to scale the light table layer up or down.
Changing the angle of a light table layer
For details, see Rotate under "Transforming vector lines".
Moving a light table layer
For details, see Move under "Transforming vector lines".
Reversing light table layers vertically or horizontally
Tap either Reverse layers vertically on light table or Reverse layers horizontally on light table on the Animation cels palette. The same operation can also be performed by tapping Flip Vertical or Flip Horizontal on the Tool Property palette.

Reset transformation
You can reset what you have edited with the Light Table sub tool. Select the light table layer and tap Reset position of layers on light table on the Timeline palette.
The same operation can also be performed by tapping Reset on the Tool Property palette.

Advanced settings for the Light Table sub tool
The Tool Property palette and Sub Tool Detail palette allow you to change the angle by specifying a numerical value, change the center of rotation, and perform various other settings
In the Sub Tool Detail palette of the Light Table sub tool, you can set how to transform an image from the "Light table", "Correction", "Reference", "Transformation settings", and "Image material" categories.
Move canvas to center
When multiple light table layers are registered in the cel-specific light table or two light table layers are selected, you can adjust the position and angle of the canvas based on the light table layers displayed on the canvas.

Select the Animation menu > Light table > Move canvas to center. In the dialog, use the slider to adjust the position or angle of the canvas.
·The light table layer names are displayed at both ends of the slider. You can move the canvas so that it is closer to the light table in the direction you drag.
·Setting the slider value to 50 places the canvas in the middle of the light table layer.
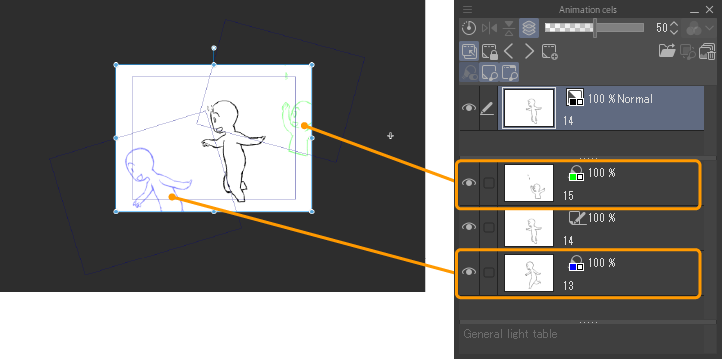
After adjusting the angle, tap OK to finalize the canvas position.
Deleting a light table layer
You can deregister light table layers registered in the Animation cels palette. The layer is removed from the Animation cels palette, but the referenced file or layer remains intact.
Deleting a specific light table layer
From the Animation cels palette, select the light table layer you wish to unregister and either tap the Deregister selected image from light table icon on the Animation cels palette or tap the Animation menu > Light table > Deregister selected image from light table.
Delete all light table layers
From the Animation cels palette, select the cel you want to edit, and either tap the Deregister all images from light table icon on the Animation cels palette or tap the Animation menu > Light table > Deregister all images from light table.
Only the light table layers linked to the selected Edited cel are removed. The light table layer in general light table, is also removed. Switching Edited cel will deactivate and hide the light table layer in the general light table.
Lock current animation cel as editing target
Fixes a displayed cel as an Edited cel. When this is set, the Edited cel on the Animation cels palette does not change when another cel is selected on the Layer palette or Timeline palette.
However, if you tap Select previous cel or Select next cel in the Animation cels palette, the edited cel will switch.