I
Learn about Image material, Image settings, Ink, and other setting categories starting with I in Clip Studio Paint.
Image material
Select the Image material layer with the Object sub tool to control Image material settings.
Settings are the same as the Image settings category. However, in the Image material category, you cannot select the interpolation method of Smooth (oversampling).
Image settings
Set how to transform an image from the Edit menu > Transform.
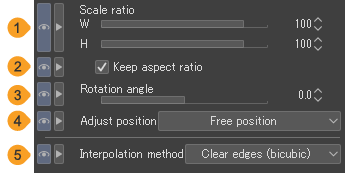
(1)Scale ratio
Specifies the width and height of an imported image as a percentage of the original image (%).
(2)Keep aspect ratio
When turned on, the image will keep its original aspect ratio (proportions) when scaling up or down. Use the handles to maintain the aspect ratio of the original image when scaling.
(3)Rotation angle
You can specify the image rotation angle with respect to the horizontal position.
(4)Adjust position
The image will scale up or down along the guidelines of the image being transformed. You can select Canvas or Free position. If crop marks or default borders are displayed, Bleed border, Cropped border, and Default border can also be selected.
Memo | When recording operations from the Edit menu > Transform to the Auto Action palette, the recording of the Adjust position setting will be prioritized. To have other settings recorded, first set Adjust position to Free position before recording. |
(5)Interpolation method
You can select the method for interpolating the colors of pixels when transforming images. The available settings may vary depending on what you are transforming.
Smooth edges (bilinear) | This method blends the colors of neighboring pixels to create smooth outlines (boundaries between colors). However, outlines may become blurred depending on the image. |
Hard edges (nearest neighbor) | The pixels in the image are duplicated and interpolated. Since the colors are not affected by neighboring pixels, outlines (boundaries between colors) remain sharp. However, outlines may become jagged depending on the image. |
Clear edges (bicubic) | This method blends the colors of neighboring pixels to create smooth outlines (boundaries between colors). This method results in stronger outlines than the Smooth outline (bilinear method) setting. However, white noise may appear around outlines depending on the image. |
High accuracy (average colors) | The average colors of the original pixels are strictly calculated for each pixel after the transformation. Scaling up makes the line sharper, and scaling down makes the line smoother. Thin lines will not be broken when thinning the line. However, this method can result in blurred outlines and can take a long time to process, depending on the image. |
Smooth (oversampling) | Each pixel is divided into multiple parts, and the colors are calculated as an average of the original pixel colors before transformation. This method makes outlines smoother but may take a long time to process. |
Ink
Set how colors blend or stretch when you use the Brush tool. You can set the drawing opacity for the tool as well.
For settings when the Gradient or Fill tool is selected, see "When using the Gradient or Fill tool".
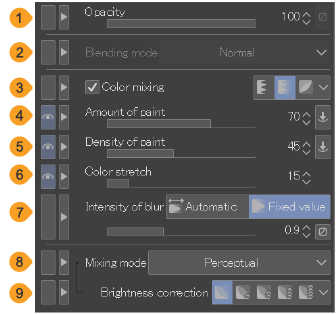
Memo | Some settings are not available on vector layers or when the expression color for the layer is set to Monochrome. |
(1)Opacity
Set the opacity when drawing. Tap the Dynamics icon to make the opacity reflect changes in the pen pressure and brushstroke speed. You cannot set Opacity in Dynamics if you turn on Color mixing and have Blend and Running color set.
(2)Blending mode
Set how to overlay new color added to existing colors on the same layer.
You cannot set a blending mode when Color mixing is turned on and set to Blend or Running color. You will not be able to set this when selecting a vector layer, but you can set it if you instead select a line on a vector layer with the Object sub tool.
(3)Color mixing
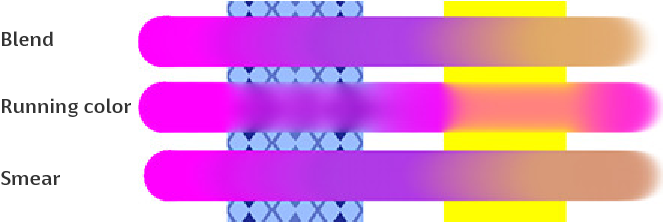
Turn this on to paint while mixing in existing colors on the same layer. There are three different ways in which you can mix colors.
Blend allows you to paint by mixing the drawing color with all the colors that the brush passes through.Running color allows you to paint by mixing just the drawing color and the color the brush passes through.Smear allows you to paint by mixing the drawing color with all the colors that the brush passes through. You can paint with transparency when using Blend or Running color.
(4)Amount of paint
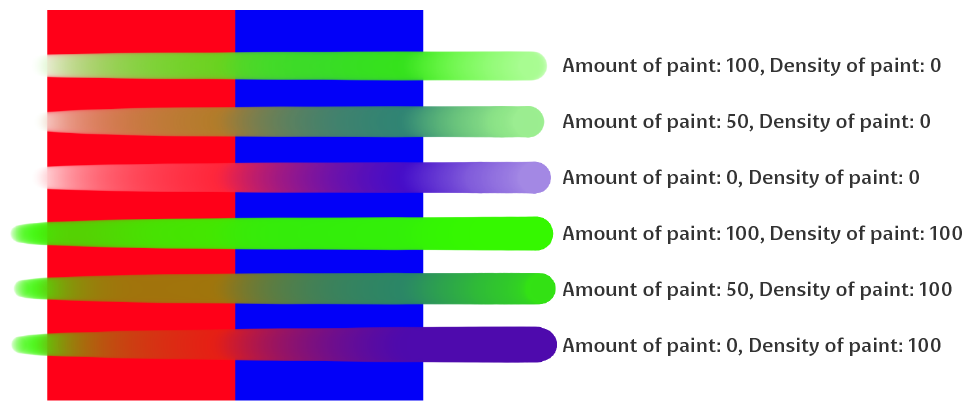
Set the mixing ratio of the RGB components when blending a color with an existing color. The larger the value, the higher the RGB mixing ratio. Tap the Dynamics icon to make the pen pressure and brushstroke speed reflect the amount of paint. This setting can be adjusted when Color mixing is turned on.
(5)Density of paint
Set the mixing ratio of the transparent components when blending a color with an existing color. The larger the value, the higher the transparent component mixing ratio. Tap the Dynamics icon to make the pen pressure and brushstroke speed reflect the density of paint. This setting can be adjusted when Color mixing is turned on and set to Blend or Running color.
(6)Color stretch
Set how long the color will be expressed as is from the start of a stroke. The higher the value, the longer the stroke distance to blend in with the surrounding colors. This setting can be adjusted when Color mixing is turned on.

(7)Intensity of blur
Set how much an existing color is blurred outwards.Automatic means that it will blur in accordance to the brush size. Select Fixed value to specify the width for blurring using the slider or a numerical value. This setting can be adjusted when Color mixing is turned on and set to Running color.
(8)Mixing mode
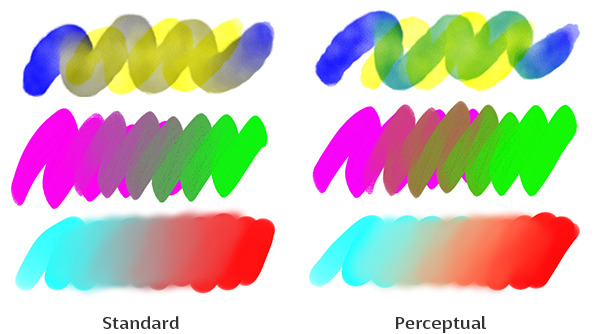
You can set the mixing mode to Standard or Perceptual when Color Mixing is turned on.
Standard is the color mixing method from Ver. 1. Perceptual is a color mixing method added after Ver. 2. The effect depends on the color combination, but colors typically are less dull when mixed and are rendered more realistically and vividly.
This setting also applies to "Color Jitter" > Change brush tip color and Randomize per stroke settings.
(9)Brightness correction
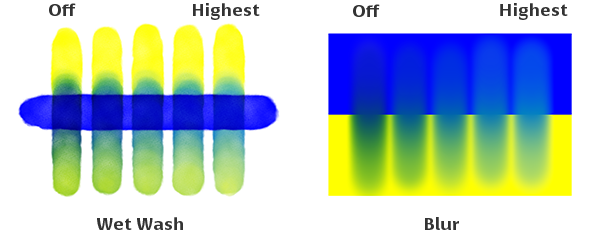
When using Perceptual mixing mode, you can then set Brightness correction. There are five brightness correction levels.
When using the Gradient or Fill tool
You can use the following settings when using a Gradient or Fill tool. The settings will be the same as when you have a gradient or fill layer selected with the Object sub tool.

(1)Where to create
When using the Gradient tool you can choose to Draw on editing layer or Create gradient layer. This setting does not appear when the Fill tool or the Object sub tool is selected.
(2)Opacity
You can set opacity for gradients and fills.
You will be able to change a gradient layer opacity when Draw on editing layer is selected under Where to create. You will be able to change the opacity of a currently selected gradient or fill layer.
(3)Blending mode
You can change the blending mode of a gradient layer when you have Create gradient layer selected under Where to create or are selecting a gradient layer with the Object sub tool.
You can change the blending mode for existing colors on the layer when you have Draw on editing layer selected under Where to create or are selecting the Fill tool.
Memo | Where to create is not available in Clip Studio Paint DEBUT. |