Exporting files
You can flatten your current file and export it in a different file format. To keep the layers you have created, please see "Save file".
Memo | In Clip Studio Paint EX, you can export all pages at once by using File > Batch export while the Page Manager window is open. |
Export (Single Layer)
Use Export (single layer) to merge the layers of the file on the canvas to export it as a standard file.
From the File menu, tap Export (Single Layer) and select the file format you want to export. You can select the following formats: BMP, JPEG, PNG, WebP, TIFF, Targa, Adobe Photoshop Document (extension: psd) and Adobe Photoshop Big Document (extension: psb).
Windows/macOS
A dialog box will appear for specifying the save location of the file. After you enter the file name and select the save destination, the Export Settings dialog box will open according to the selected file format. Set the export method and tap OK. When the Export Preview dialog appears, check the settings and tap OK. The file will be exported to the specified folder.
iPad
A dialog box will appear for specifying the file name. Select OK to open the Export Settings dialog box according to the selected file format. Set the export method and tap OK. When the Export Preview dialog appears, check the settings and tap OK. From the OS file management screen, choose a destination and tap Save.
Android
A dialog box will appear for specifying the file name. Select OK to open the Export Settings dialog box according to the selected file format. Set the export method and tap OK. When the Export Preview dialog appears, check the settings and tap OK. In the "File Picker dialog", choose a save destination and tap Save.
Export settings
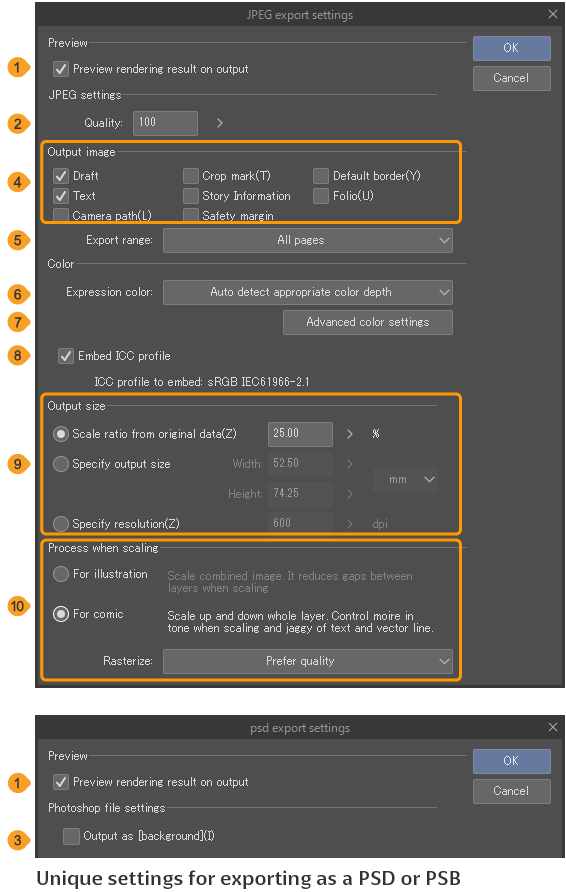
(1)Preset
Use the dropdown list to select from export presets. You can also save frequent settings as a new preset. For details, see "Export presets".
(2)Preview rendering result on output
When turned on, the Export preview dialog box will appear so you can confirm the export content.
(3)Quality
This option appears when the file format is JPEG. You can set the image quality. A larger value increases the image quality, but also increases the file size.
(4)Output as Background
This option appears when the save format is Adobe Photoshop document (extension: psd) or Adobe Photoshop big document (extension: psb). Turn this on to save as a merged background layer in Photoshop.
(5)WebP Settings
This option appears when the save format is WebP (extension: webp). Select Prioritize quality to save images in high quality. If set to Prioritize file size, you can set the quality of the image to be saved. The higher the number, the higher the quality of the image, but the larger the file size.
(6)Output image
When exporting images, you can select whether to include the drafts, crop marks, inner border, text, story information, folio, camera paths, and safety margins. The checked items will be exported.
(7)Export range
This allows you specify the area of the images to export. The available options are: Entire page, Crop to crop marks, Crop to bleed marks and Selection. Selection means that it will crop the image to a rectangle using the selection’s width and height.
(8)Expression color
Set the expression color of the image to output. You can select from Auto detect appropriate color depth, Duotone (Threshold), Duotone (Toning), Gray, RGB color and CMYK.
In Clip Studio Paint DEBUT, you cannot select Duotone (Threshold), Duotone (Toning), or CMYK.
(9)Advanced color settings
Tap to open the Advanced color settings dialog box.
(10)Embed ICC profile
This is shown when you select RGB or CMYK as the Expression color. Turn this on to embed the ICC profile the file.
You can set the ICC profile to embed from the Color profile preview or the Preferences dialog box.
(11)Export transparency
This option appears when the save format is PNG or WebP. When turned on, the opacity (alpha channel) of the image will be reflected in the output file. When turned off, transparent areas will be exported as white.
(12)Output size
You can choose Scale ratio from original data, Specify output size, or Specify resolution to set output size. The size will be set based on this selection.
Choose Scale ratio from original data to specify the scale based on the canvas aspect ratio.
Choose Specify output size to specify the size of the image to export with width and height parameters. You can select a unit for the width and height as well.
Choose Specify resolution to change the image resolution for exporting. You can choose any value from 72—1200 dpi for resolution.
Memo | When exporting as WebP, the resolution is fixed to 72 dpi. When set to Scale ratio from original data or Specify output size, the image will be exported at the specified size at a resolution of 72 dpi. When set to Specify resolution, even if you enter a different resolution, the output image will be 72 dpi. |
(13)Process when scaling
Change how to process the image when scaling. You can select from For illustration and For comic.
When you select For comic, you can choose Rasterize mode. When exporting an image, you can select the quality to Fast or Prefer quality. When reducing an image, we recommend selecting Prefer quality.
Memo | Output image, Advanced color settings, Embed ICC profile, and Process when scaling are not available in Clip Studio Paint DEBUT.Export range is not available in Clip Studio Paint PRO or DEBUT. |
(14)Watermark
Check this box to add a watermark to your timelapse.
(15)Noise pattern
Check this box to add a noise pattern to your timelapse.
(16)Watermark settings
Tap Watermark settings to open a dialog where you can upload a watermark file and arrange the opacity and tiling. You can also adjust the strength of the noise pattern. See "Watermark settings"for details.
Expression color for exporting
The types of expression color you can choose when exporting are below. Some of the items may not display depending on the selected file format or printing method.
Auto detect appropriate color depth
The expression colors will be set depending on each layer’s expression color.CMYK appears when the save format is JPEG, TIFF, Adobe Photoshop document (extension: psd) or Adobe Photoshop big document (extension: psb).
Duotone (Threshold)
Exports the canvas in monochrome. When exported, the brightness of the canvas is set to 50% as a threshold and converted to a binarized state.
Duotone (Toning)
Exports the canvas in monochrome. When exported, the file will be expressed in screentones according to the Default frequency of the canvas. Set the Default frequency from the New dialog box, Canvas Properties, or Change project settings.
Gray
Exports the canvas in gray. When exported, the file is configured as a 256-step gradient from black to white.
RGB Color
Exports the canvas in RGB colors. Turn Embed ICC profile on to use the color profile set in the New dialog box or similar canvas setting dialogs. For more information on where you can set color profiles, please refer to "Set color profile". If no color profile has been set, the profile specified under "Color conversion" in Preferences will be used.
CMYK Color
Exports the canvas in CMYK colors. Turn Embed ICC profile on to use the color profile set in the New dialog box or similar canvas setting dialogs. For more information on where you can set color profiles, please refer to "Set color profile". If no color profile has been set, the profile specified under "Color conversion" in Preferences will be used.
You can select CYMK Color when saving in the following formats: JPEG, TIFF, Adobe Photoshop Document (.psd), and Adobe Photoshop Big Document (.psb).
For EX users, this option is also available when exporting in PDF format using Export multiple pages > Batch Export or PDF format.
Memo | Duotone (Threshold), Duotone (Toning), and CMYK Color are not available in Clip Studio Paint DEBUT. |
Flatten and save to device storage (Android)
Images edited in Clip Studio Paint can be exported to the device's storage. Here you can save in BMP, JPEG, PNG, WebP and TIFF file formats.
From the File menu, tap Flatten and save to device storage and select the file format you want to export.
The Flatten and save to device storage dialog box will appear. Select OK to open the Export Settings dialog box according to the selected file format. Set the export method and tap OK. When the Export Preview dialog appears, check the content and tap OK.
From the "File Picker dialog", choose a destination and tap Save.
Memo | For details on the Export Settings dialog, see "Export settings". |
Export to photo library (tablet)
Select the File menu > Export to photo library to save the image you edited in Clip Studio Paint to your device’s photo library as a PNG file.
Memo | When saving to the photo library for the first time, a message may appear asking for access permissions. Please grant access permissions in order to save your image to the photo library. |
Export presets
You can save your frequent settings as an export preset. Export presets are available with the following dialogs.
·The Export settings dialog that appears after the Export (Single layer) dialog
·The Export settings dialog that appears after the Batch Export dialog
·The Export settings dialog that appears after the Export as PDF dialog
·The Export settings dialog that appears after the Save as Duplicate dialog
·The Export settings dialog that appears after the Export layer comp dialog
·The Export image sequence dialog
·The Export animation cels dialog
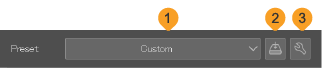
(1)Preset
You can select a preset from the pull-down menu to reflect the preset settings to the current dialog. Available presets depend on the Project type you have chosen and your device. If you change the settings after choosing a preset, then the name will change to Custom.
(2)Register to preset
You can register the settings in the current dialog as a preset. Tap to open the Add to presets dialog box. Enter a preset name and select the settings you want to include in the preset using the checkboxes under Items to be included in preset. Finalize your settings with OK and the new preset will appear in the Preset drop-down menu.
Registered presets are shared across all instances of the Export settings dialog. However, export presets for the Export image sequence and Export animation cels dialogs are only saved to that export type.
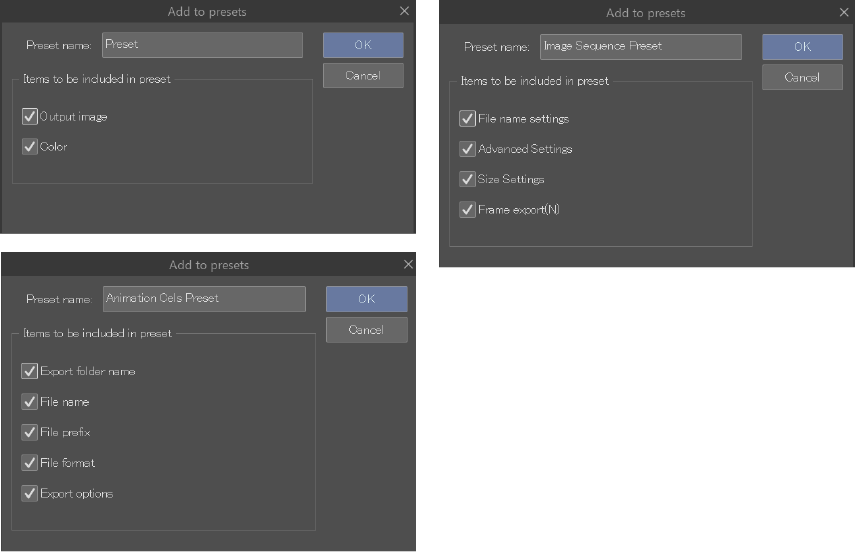
Memo | ·Items to be included in preset will differ depending on what Clip Studio Paint grade you are using and what project type you have selected. ·If the chosen Preset name is the same as an existing preset, a confirmation dialog will appear. To overwrite the previous preset, tap Save. To keep the existing preset, tap Change name to rename the new preset. ·The content of the Export settings dialog can differ depending on the file type being exported. If you save a preset with settings specific to a certain file type, you can still use the preset for other file types, but the file type-specific settings will not be applied. |
(3)Edit preset
Tap to open the Edit preset dialog, where you can edit and manage your presets. See "Edit presets" for details.
Edit presets
You can use the Edit preset dialog to manage your presets.
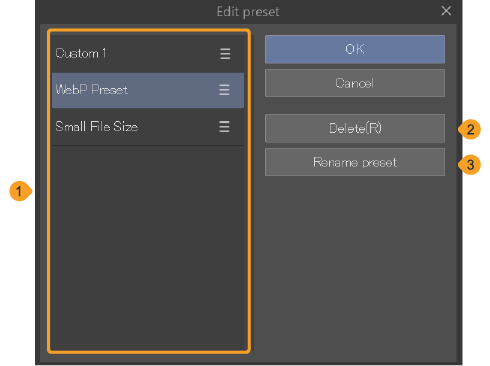
(1)Preset list
A list of saved presets. You can use the handle to the right of the preset names to drag and change the order of the list. Double tap a preset name to rename it.
(2)Delete
Tap to delete the selected preset from the list.
(3)Rename preset
Tap to rename the selected preset.
Watermark settings
You can add a watermark to your artwork. The Watermark settings dialog can be accessed from the Export settings dialog and the Export timelapse dialog.
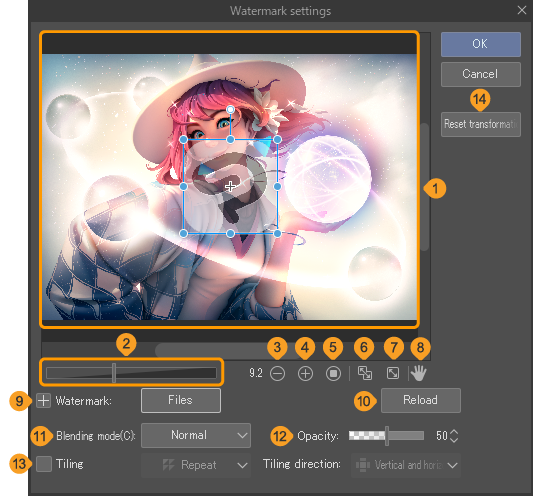
(1)Image preview
This shows a preview of the watermark on the canvas. You can adjust the display position and angle of the watermark by using the handles on the bounding box.
When exporting a timelapse, you can pause or play the timelapse in the preview. You cannot change the size of the image preview, so settings (2) to (8) will not appear in the dialog.
(2)Scaling slider
Drag the slider to change how large the image is shown in the image preview. Tap the number to input the scale.
(3)Zoom out
(4)Zoom in
(5)100%
(6)Fit to navigator
You can toggle Fit to Navigator on and off. Fits the size to match the Watermark settings dialog box to show the full image in the image preview. When you change the size of the Watermark settings dialog box, the size will change accordingly to continue to display the full image in the image preview.
(7)Fit to Screen
Fits the size to match the Watermark settings dialog box to show the full image in the image preview.
(8)Move
When turned on, you can move the canvas in the image preview. While turned on, you cannot move the watermark position. Turn the move setting off again to control the watermark’s bounding box.
(9)Preview page
This setting appears when you use "Batch export". Use the dropdown to select which page to preview the watermark on.
(10)Watermark
Turn this on to add a watermark to your image. These settings will be applied to the "Export timelapse" and "Export settings" dialogs.
(11)Image
Tap Files to open a dialog to select the watermark image file. Tap the file you want to use as the watermark to display it in the image preview. You can display the file directory by tapping the plus icon.
On Android, Storage appears as an option to choose an image. If you tap Storage, you can choose an image from your OS Files app.
(12)Reload
If you edit the watermark file in another canvas or application after loading it to the preview, you can tap the Reload button to update the preview with the changes.
(13)Blending mode
You can apply a blending mode to the watermark image. See "Blending modes" for details.
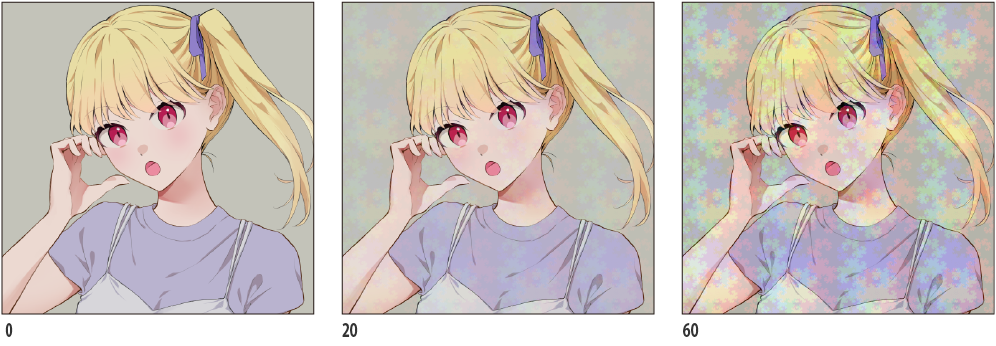
(14)Opacity
Use the slider to adjust the opacity of the watermark.
(15)Tiling
You can apply tiling settings to the watermark. See "Tiling" for details on the tiling methods.
(16)Set as cover page/back cover page
This setting appears when you use "Batch export". Turn this on to apply the watermark to the front and back cover pages as well.
(17)Noise pattern
Turn this on to add a noise pattern to your image. These settings will be applied to the "Export timelapse" and "Export settings" dialogs.
(18)Strength
Adjust the strength of the noise pattern. A larger value creates a stronger noise pattern.
(19)Reset transformation
Resets the watermark to the default position.
Export preview
The Export preview dialog box appears when you have Preview rendering result on output turned on in the Settings dialog box and then press OK.
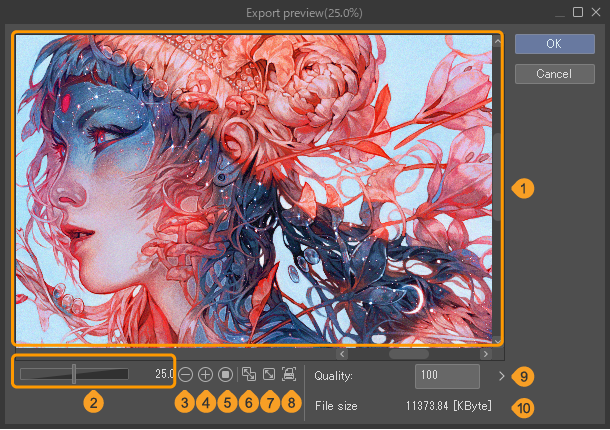
(1)Image preview
This shows a preview of the exported image. You can adjust the display position of the previewed image by manipulating the image preview directly.
(2)Scaling slider
Drag the slider to change how large the image is shown in the image preview. Tap the number to input the scale.
(3)Zoom out
(4)Zoom in
(5)100%
(6)Fit to navigator
You can toggle Fit to Navigator on and off. Fits the size to match the Export preview dialog box to show the full image in the image preview.
When you change the size of the Export preview dialog box the size will change accordingly to continue to display the full image in the image preview.
(7)Fit to Screen
Fits the size to match the Export preview dialog box to show the full image in the image preview.
(8)Print size
Tap to view the image in the image preview with the dimensions when printing.
If you have not set a print size, then a message will appear. Tap OK to open the Display resolution settings dialog box.
(9)Quality
When you save as a JPEG you can set the quality of the image to save. The larger the value, the higher the image quality. This option does not appear for save formats other than JPEG. You can check the quality when reflected in the image preview before exporting.
(10)File size
When you save as a JPEG you can set the export size of the image to save. This option does not appear for save formats other than JPEG.
Advanced color settings
In the Settings dialog box, tap Advanced color settings to see this dialog box. You can change the color of crop marks/inner border/safety margins and the frequency of screentones when using comic settings. If you are making an animation, you can change the colors for the camera and transformed camera paths when exporting.
Memo | Advanced color settings are not available in Clip Studio Paint DEBUT. |

(1)Crop marks/Inner border/Safety margins
Choose color for the crop marks, inner border and safety margins by selecting Export in displayed colors, Export in cyan, or Export in black. Export in displayed colors will export the color as you see on the canvas currently. The color of these can be adjusted in Preferences > Ruler/unit.
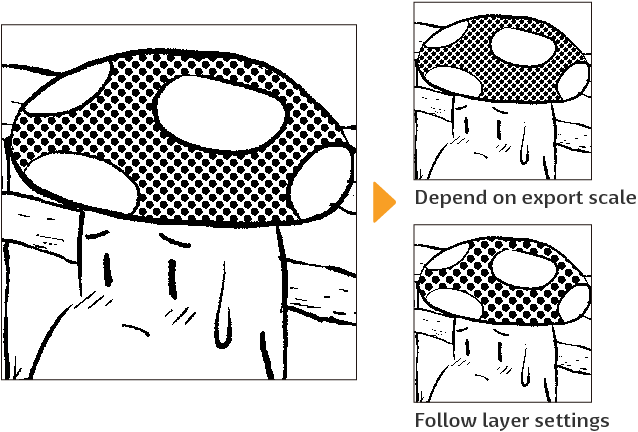
(2)Frequency
The options for choosing how to export tone frequency are Depend on export scale and Follow layer settings.
Depend on export scale will change the tone frequency depending on the export size in the Settings dialog box.Follow layer settings will export the tone frequency as it is on the canvas.
(3)Enable tone effect for layer
When you export the settings in the Layer Properties palette > Effect > Tone will be reflected.
(4)Camera path
Choose color for the camera and transformed camera paths by selecting Export in displayed colors, Export field guides in different colors, or Export in black.
Export in displayed colors will export the color as you see on the canvas currently. The color of these can be adjusted in Preferences > Camera path/Camera.
You can also turn on the option to export field guides in different colors, even if Display in different colors is turned off in Preferences > Camera path/Camera.
(5)Draw with opacity
Sets the opacity of the camera path. If turned on, the opacity will be 100%. If turned off, the camera path opacity will be the same as set in the Preferences dialog box > Camera path/Camera > Opacity.