Save file
The canvas edited in Clip Studio Paint will be saved. You can save files in the following formats: Clip Studio format (extension: clip), Clip Studio Paint format (extension: lip), BMP, JPEG, PNG, TIFF, Targa, Adobe Photoshop Document (extension: psd) and Adobe Photoshop Big Document (extension: psb).
·To keep the layers you have created, please save in the Clip Studio Format (extension: clip).
·If you want to keep your layers intact and use the data in another application use Save Duplicate and save as a .psd (Photoshop Document) or .psb (Photoshop Big Document).
·We recommend choosing Export (Single Layer) or Export to photo library if you would like to flatten the layers and export it for use online. For details, see "Exporting files".
|
Important |
ibisPaint files (extension: ipv) cannot be saved in the same format in Clip Studio Paint. You can save these as a new file in Clip Studio format (extension: clip). |
Saving the current file
Select the File menu > Save to save the current file. You can also save by tapping the Save icon on the command bar. After a file has been saved once, choosing Save will overwrite the previous data.

If you have a keyboard connected, you can also press Ctrl + S to save the file.
|
Important |
When saving in BMP, JPEG, PNG, TIFF or Targa format, the image will be saved with the layers flattened. LZW compression will be applied when saving in TIFF format. Clip Studio Paint format files (extension: lip) can be saved in Ver. 1.5.0 and later without changing the extension. However, these files cannot be opened in versions earlier than 1.5.0. |
Set the file name and file location the first time you save a file. However, how you save a file will differ based on your OS and how you created the file.
Windows/macOS
The Save dialog box will appear. Select the save folder and the file format, then tap Save. The file will be saved in the specified folder.
iPad
If the canvas was created from the New dialog it will appear in the OS Files app. Select the save location, then tap Save. The file will be saved in the specified folder as a Clip Studio format (extension: clip).
If you edited an image from your photo library, then the Save as dialog will appear. Set the file name and file format, then tap OK.
Android
If the canvas was created from the New dialog it will be saved as a Clip Studio format (extension: clip). Check your saved files from the File operation/Share dialog and continue working on it by opening it up from the Manage works screen. The file name will be what you entered in File name in the New dialog box.
If you edited an image from your photo library, then the Save dialog will appear. Set the file name and file format, then tap Save.
Save As New
Select File menu > Save as to save the file as a new file under a different name. After saving, you can continue to edit the file under the new name.
Windows/macOS
The Save as dialog box will appear. Select the save folder and the file format, then tap Save. The file will be saved in the specified folder.
iPad
The Save as dialog box will appear. Set the File name and Type: (file format) and tap OK. The OS file management screen will appear. Select the save location, then tap Save. The file will be saved in the specified folder.
Android
The Save as dialog box will appear. Set the File name and Type: (file format) and tap OK. Check your saved files from the File operation/Share dialog and continue working on it by opening it up from the Manage works screen.
Saving a multiple page project
In EX saving with Save as will cause the entire project to be saved in a separate folder. Select your save location and enter a name in Folder name (Management file name) in the Create story folder dialog box.
Save Duplicate
Save Duplicate will save a copy of the file you are currently editing, separate from the file you currently have open. It will be a completely different file so you can edit anything that was saved up until the point of creation.
Go to the File menu >Save Duplicate and select the file format you want to export. You can select the following formats: BMP, JPEG, PNG, WebP, TIFF, Targa, Adobe Photoshop Document (extension: psd) and Adobe Photoshop Big document (extension: psb).
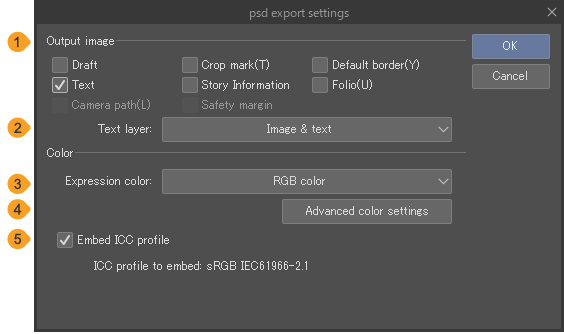
When saving as a Photoshop document or Photoshop Big document, an Export dialog box will appear after you choose the file name. Here, you can adjust settings for the expression color, exported layers, and embedded ICC profile.
(1)Preset
Use the dropdown list to select from export presets. You can also save frequent settings as a new preset. For details, see "Export presets".
(2)Output image
When exporting images, you can select whether to include the drafts, crop marks, inner border, text, story information, folio, camera paths, and safety margins. The checked items will be exported.
(3)Expression color
You can choose Grayscale, RGB Color, or CMYK as the expression color for the image you are exporting. For DEBUT, CMYK cannot be selected.
(4)Advanced color settings
Tap to open the Advanced color settings dialog box. You cannot use Export settings for tone in this Advanced color settings dialog box.
(5)Embed ICC profile
This is shown when you select RGB or CMYK as the expression color. Turn this on to embed the ICC profile when exporting the file.
You can set the ICC profile to embed from the Color profile preview or the Preferences dialog box.
|
Memo |
Output image, Advanced color settings, and Embed ICC profile are not available in Clip Studio Paint DEBUT. |