Exporting multi-page projects
You can export multiple page projects and set which types of layers to include. You can also use batch export to apply export settings to several pages.
Batch export
You can use batch export to save multi-page projects created in Clip Studio Paint as one file.
File formats that can be exported are BMP, JPEG, PNG, WebP, TIFF, Targa, Adobe Photoshop Document (extension: psd), Adobe Photoshop Big Document (extension: psb), PDF format (extension: pdf).
1Select the File menu > Export multiple pages > Batch export.
2When the Batch export dialog appears, specify the Export folder, File format, and Page range and then tap OK.
3The Export settings dialog may then appear where you can control export settings.
If the Export settings dialog appears after the Batch export dialog, then the Export preview dialog will not appear. You will also not be able to set the export range.
4Tap OK in the Export Settings dialog. The file will be exported to the folder you chose.
Windows/macOS users will see the images exported into the folder specified in the Batch export dialog. iPad users will see the Files app. Select the save location, then tap Save. Android users will see the "File Picker dialog" upon export.
The Batch export settings are as follows:
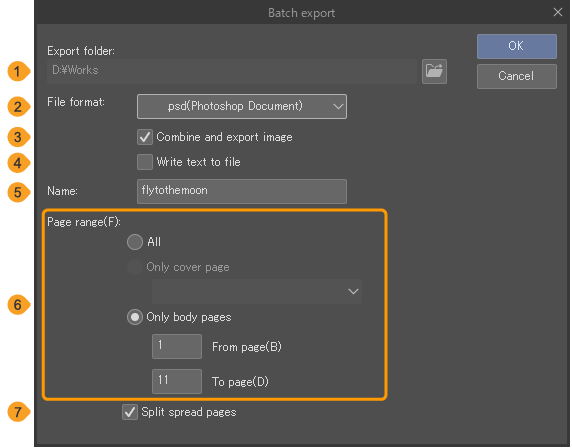
(1)Export folder (Windows/macOS)
Tap Browse (the folder icon) to specify the export folder.
(2)File format
(3)Combine and export image
This option is available if you choose to export as an Adobe Photoshop document or a Photoshop Big Document. Turn it on to merge layers when exporting.
(4)Write text to file
Turn this on to export the text in balloon layers and text layers as a combined text file (extension: txt). Hidden layers containing text will not be included in the text file. The file name will be whatever was entered in Name with “_export” added after it.
Check the Story Editor to see what order the text will be exported in for the text file.
(5)File name
A sample of the exported file name.
(6)File prefix
Exported files will be named with what is entered here along with sequential numbers. The export folder will have the same name. A sample of the final format is displayed beside File name above.
(7)Export layer comps
Turn this checkbox on to apply layer comp settings when exporting.
(8)Layer comp
Tap here to display a pull-down menu where you can select the layer comps you wish to export. Multiple layer comps can be selected at once.
When exporting files, a folder will be created using the name of each selected layer comp. If multiple layer comps are selected, a separate folder will be created for each, and the files will be exported into their respective folders.
(9)Pages without layer comps
You can choose how to export pages that do not have any of the selected layer comps applied to them.Export in current state will export those pages to a file as they currently appear.Do not export will exclude those pages from the export process.
(10)Include layer comp in file names
Turn this on to include the layer comp names in the exported file names. When turned on, you can decide where to add the layer comp name with the File name format setting.
(11)Page range
Page range options are All, Only cover page, and Only body pages. Choosing Only cover page or Only body pages allows you to select a specific page range to export.
If you have pages selected in the Page Manager before trying to export files, the selection will be preselected in the Only body pages option.
(12)Split spread pages
Turn this on to divide the spread pages into two individual files when exporting. If you have Combine and export image turned off, you will not be able to select this option.
PDF format
You can export your project in PDF format (extension: .pdf) from File > Export multiple pages > .pdf (PDF format). The method and settings are identical to Batch export.
Memo | When exporting a PDF, you can use color profile settings. See "Export settings" and "Expression Colors and Drawing Colors"for details. |
When exporting a PDF, adjust the settings in the Batch export dialog, tap OK, and then the PDF export settings dialog will appear.
In the PDF export settings dialog, you can set what information you would like to be exported and how the file will be compressed. Select OK to export the PDF file. The file name will be whatever was entered in the Name field of the Batch export dialog.
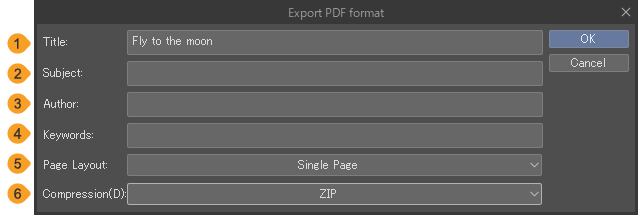
(1)Title
(2)Subtitle
(3)Author
(4)Keyword
(5)Page layout
You can select how the pages will appear in Acrobat Reader or other PDF readers. The options are Single Page, Single Page Continuous, Two-Up, and Two-Up Continuous.
(6)Compression
The PDF compression options are ZIP, JPEG (Highest), JPEG (High), JPEG (Medium), and JPEG (Low). ZIP offers less compression but allows you to export in high quality.JPEG offers four levels of image quality.JPEG (Highest) prioritizes image quality and JPEG (Low) prioritizes keeping file size small. Making the file size smaller will make the image quality lower.
3D Preview for Binding
You can preview your artwork bound in 3D by going to File > Export multiple pages > 3D Preview for Binding.
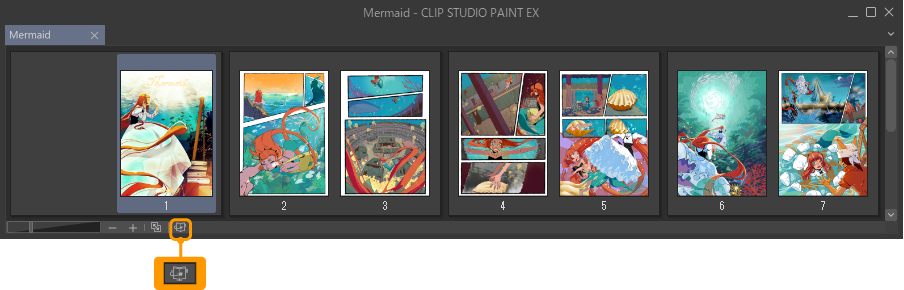
You can also tap the icon for 3D Preview for Binding in the Page Manager to bring up the dialog box.
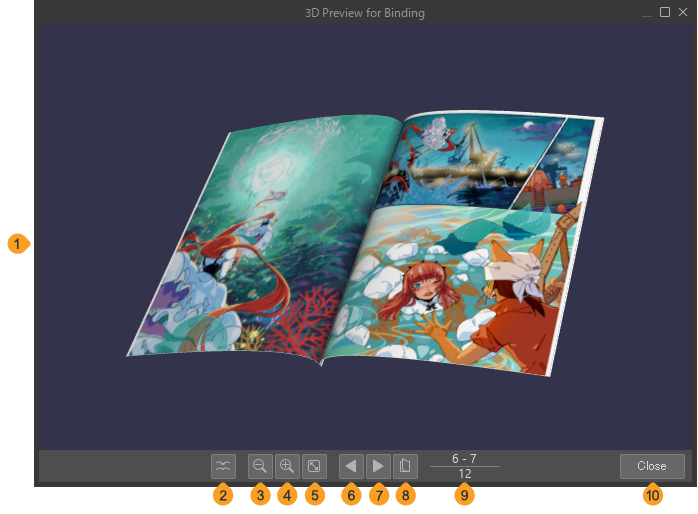
(1)Preview window
This window shows the bound sample. You can change how to view the bound book with your mouse or through touch gestures.
Turn page | Tap the edges of the page on the left or right. |
Change angle | Hold and drag inside the preview window. Swipe with your finger if using touch. You cannot use the pen for this command. |
Open/close sample | Double tap the book to open/close. |
Zoom in/Zoom out | You can also scroll using the mouse wheel. You cannot zoom with touch commands or with your pen. Please use the buttons in the 3D Preview for Binding dialog. |
(2)Saddle Stitch/Side Stitch Binding
Tap to change the preview binding stitch between saddle stitch and side stitch.
(3)Zoom out
(4)Zoom in
(5)Zoom Reset
(6)Go forward one page (Left binding: Go back one page)
(7)Go back one page (Left binding: Go forward one page)
(8)Open/Close
Opens/closes the bound sample. This resets the sample to the default size.
(9)Number of pages
The number of the current page is shown at the top. The total number of pages is shown at the bottom. You can enter a different page number to switch to that page.
(10)Close
Memo | You will not be able to use 3D Preview for Binding if you chose Webtoon as the project type. |
Fanzine printing data
You can ready your comic to send to a fanzine printing vendor. You can export files as a Photoshop document (extension: psd). The comments made for each page will also be exported.
1Go to File > Export multiple pages > Export fanzine printing data.
If there is a problem with the data, an error message will pop up and your data might not be exported properly. Please see "Error messages" for more information about error messages and how to resolve them.
You can also change your Page Manager to Show binding list view and check for any issues in the Confirm column.
2When the Export fanzine printing data dialog appears, input settings and tap OK.
The settings from the New dialog and the Change project settings dialog will be reflected here.
3The 3D binding preview will display so you can preview how it will look bound. Tap 3D Preview for Binding to check it out.
Select Export without 3D Preview to just export the files. Skip to step 5.
4Check the finished product preview in 3D Preview for Binding. If everything looks okay, tap Output.
5What you do after the data is converted differs depending on your OS.
·Windows/macOS users can tap the Check exported data button and Clip Studio will open where you can review the data.
·iPad users will see the Files app. Select the save folder, then tap Save. Open the selected folder to check the exported fanzine printing data.
·Android users will see the "File Picker dialog"upon export. Check if the data was exported correctly.
The Export fanzine printing data dialog settings are as follows:
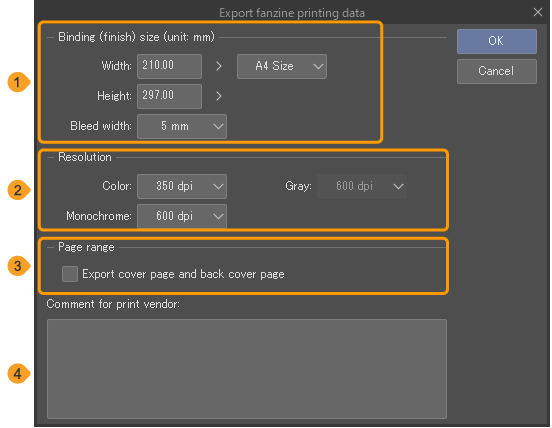
(1)Binding (finish) size
You can set Width and Height. You can also select sizes from the pulldown menu. Data for fanzine printing will be the size specified here. Changing the size will affect the size of the images when exporting data for fanzine printing. You can also change Bleed width here.
(2)Resolution
You can set the resolution for each expression color.
(3)Page range
If you have Export cover page and back cover page turned on, then the cover (inside) and back cover (inside) will also be exported.
(4)Comment for print vendor
Enter any comments for the print vendor. The comments will be in a text file along with the data for the print vendor.
Open the exported data
Windows/macOS
Go to File > Export multiple pages > Open exporting destination of fanzine printing data to open the folder where the data was exported.
iPad
The files will be in the folder you selected from the Files app when exporting.
Android
Open the Files app on your device. The files will be in the folder you selected in the "File Picker dialog"when exporting.
Error messages
Message | Solution |
|---|---|
Turn on the trim size and set the size for the trim border. | Crop marks or inner border have not been set and the data cannot be exported for printing. Use the Story menu > Change project settings dialog to change the settings, or export the file from Batch export. |
Bleed width is commonly set between 3.0 mm - 5.0 mm. | The bleed width is set to a value not normally used for fanzine printing vendors. Adjust the bleed width setting in the Story menu > Change project settings dialog as necessary. |
Turn on folio or blind folio and set folio. | The project does not have a folio. Please set the folio with the Story menu > Change project settings dialog. |
Set the starting number of the folio to 1. | The starting number of the folio is not 1. Adjust the page start number with the Story menu > Change project settings dialog as necessary. |
Turn on the setting of cover page and provide cover page. | This means there is nothing set as a cover. Add a cover as outlined in the Change project settings dialog. If you only want to export the body pages, use Batch export. |
Either of the following is generally recommended for the binding (finish) size. | Not set to a regular binding (finish) size. If necessary, adjust it to the recommended size in the Change project settings dialog. |
A folio is generally required. Turn on the folio setting. | The project does not have a folio. Please set the folio with the Story menu > Change project settings dialog. |
Draft with the setting to be exported with color is included in main text. | There are body pages that have the Basic expression color set to Color. Adjust the expression color settings in the Change project settings or Change page settings dialog as necessary. |
Multiple resolutions are set for single basic expression color. It is scaled up and down when exported, so moire or something may occur in tone. | Pages with the same Basic expression color have different Resolution settings. Change the Resolution to be the same for each Basic expression color with the Story menu > Change project settings or Change page settings dialogs. |
EPUB data
Projects created for e-books can be exported as EPUB data. You can also export EPUB data to use for Kindle.
Export settings for EPUB data
Go to File > Export multiple pages > Export settings for EPUB data to bring up the dialog where you can set the output size and quality.
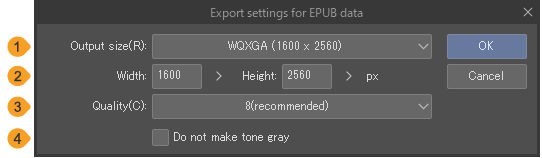
(1)Output size
Select what output size you want from the pulldown menu. A larger value is better for displaying on high-resolution devices, but also increases the file size.
(2)Width/Height
Enter in values for the width and height for the output image. Enter in the shorter side as your Width and the longer side as Height regardless of how your final product will be bound.
(3)Quality
You can choose between ten different levels of quality for your EPUB data. A larger value improves the image quality, but also increases the file size.
(4)Do not make tone gray
Turn this on to keep the halftone dots intact in your EPUB data. Be aware that depending on the environment that this data is viewed in it could result in moiré patterns.
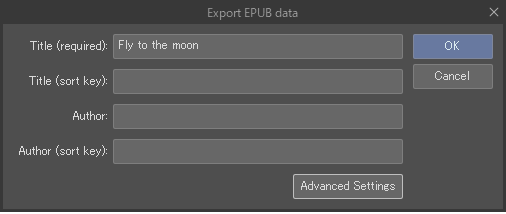
Export EPUB data
Select the File menu > Export multiple pages > Export EPUB data. Set the title, author, metatags, etc. in this dialog and then tap OK to export the EPUB data.
·Windows/macOS users can tap the Check exported data button and Clip Studio will open where you can review the EPUB data. Go to File > Export multiple pages > Open exporting destination of EPUB data to open the folder where the data was exported.
·iPad/iPhone users will see the Files app. Select a save folder, then tap Save. The files will be in the folder you selected from the Files app when exporting.
·Android users will see the "File Picker dialog"upon export. Select a save folder, then tap Save. The files will be in the folder you selected in the Files app when exporting.
Important | ·Window/macOS/Android users: if you export EPUB data more than twice you will overwrite exported data when you export for the third time. ·In Windows/macOS, adding unrelated files to the folder where the EPUB data is exported may cause a third export attempt to result in file deletion. |
You can set metadata like a title and author for the EPUB data. You must set a title for the file. This data will be used to sort works by title and author name in PDF readers.
Tap Advanced Settings and the EPUB advanced settings will pop up with settings for Kindle and other advanced settings.
You can set metadata like publisher, date modified, value of identifier, etc.Value of identifier is an ID automatically assigned to the EPUB data. You do not need to set this yourself. In Export options you can control certain export options for your EPUB data.
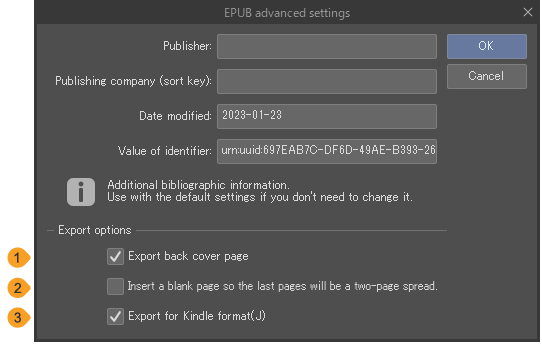
(1)Export back cover page
If you have a cover set and you turn this option on, then the back cover page will be exported as well.
(2)Insert a blank page so the last pages will be a two-page spread
When your pages as displayed as a two-page spread in your EPUB data there will be a blank page added at the end so that your file does not end with one single page.
(3)Export for Kindle format
Turn this option on to optimize your EPUB data for the Kindle format.