E
Learn about Edit settings, Erase, Eyedropper, and other setting categories starting with E in Clip Studio Paint.
Edit line
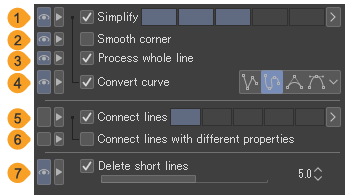
You can adjust these settings to edit lines drawn on vector layers with the Simplify vector line sub tool and Connect vector lines sub tool.

(1)Simplify
When turned on, you can simplify a line by reducing the number of control points. You can use the indicator to adjust how many control points to reduce. The larger the value, the more control points will be removed.
(2)Smooth corner
Allows you to configure the shape of angles and corners in the line. When turned on, corners in the line are smoothed. When turned off, the shape of the corners remain as they are.
(3)Process whole line
When turned on, tapping a point on the line applies the effect to the entire line.
(4)Convert curve
You can change the curve type when you simplify a line. You can select from Straight line, Spline, Quadratic Bezier, and Cubic Bezier. This setting can be adjusted when Simplify and Process whole line are turned on. For details on each type of curve, refer to "Curved lines".
(5)Connect lines
When turned on, you can connect separate lines. Set the strength of the effect with the indicator. When the value is larger, you can connect lines with a larger gap.
(6)Connect lines with different properties
When turned on, you can connect lines with drawn with different colors or brush tip shapes, etc. After connecting, the line color and brush tip shape will be that of the longer line.
(7)Delete short lines
When turned on, you can erase short lines within the area. Use the slider to set the length of lines to erase.
Edit settings
When using the Text tool, you can set the text color and how a Text layer is added.

(1)Text color
You can set the text color to Main color, Sub color, User color, or Select user color.
Main color | Tap to use the current main drawing color. |
Sub color | Tap to use the sub drawing color. |
User color | Tap to use the specified color. Tap again to use the current main drawing color as the specified color. Unlike Main color, the specified color will be used even if the main drawing color is changed with a color palette. |
Select user color | You can specify the user color from the Color settings dialog. You can select this from the menu that appears when you tap the rightmost button. |
(2)How to add
You can configure how text layers are added when entering text.
Create layer always | Creates a new Text layer when adding text. |
Add to selected text | If a text layer or balloon layer is selected, the text is added to the selected layer. If any other layer type is selected, a new text layer will be created. |
Auto detect where to insert | Auto detect depends on the input position of the text. If you enter text within a balloon or near selected text, you can add text to an existing Text or Balloon layer. |
Edit timeline
For details on these settings, see "Edit Timeline sub tool".

Editing Properties
This category appears when using the Text tool. Under Apply to, you can select which text is changed when you adjust settings in the Tool Property palette or Sub Tool Detail palette.
Select New Only to apply the settings to newly entered text. Set to Selected text to apply the settings to all text currently selected with the Text tool.
Erase
With these settings, you can adjust setting such as how to erase lines on vector layers.

(1)Vector eraser
For details, see "Snap to control points".
(2)Refer all layers
When turned on, lines drawn on other vector layers are also referred to when the Vector eraser is set to Erase up to intersection. Vector layers in frame border folders will also be referenced.
(3)Erase on all layers
You can erase on all layers in the erased area, regardless of the layer type. This setting also applies when using a brush tool with the Blending mode set to Erase.
For layer types that cannot be erased with Eraser tools, such as image material layers and balloon layers, a new layer mask is created to hide the erased area. Frame border folders cannot be erased.
Eyedropper
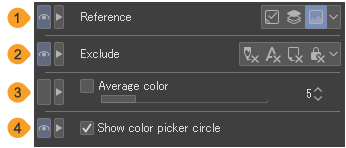
Set how the Eyedropper tool samples color.

(1)Reference
You can set the reference layer for color sampling for the Eyedropper tool.
Current layer | Refers to the layer selected in the Layer palette. |
Top layer | Refers to the top layer of the position that is drawn on. If the area is transparent then it will not be sampled. |
Image | Picks the color shown on the canvas as it is. |
(2)Exclude
When Refer multiple is turned on, you can select the layers you want to exclude from being referenced. Tap each setting button to show or hide the setting.
Exclude draft layers | Excludes the draft layer from reference. For details on draft layers, see "Draft layers". |
Exclude text | Excludes text layers and balloon layers. |
Exclude paper layer | Excludes the paper layer from being referenced. |
Exclude locked layers | Excludes locked layers from being referenced. For details on locking layers, see "Locking layers". |
(3)Average color
When turned on, you can get the average of colors including the surrounding area. The slider allows you to configure the size of the surrounding area.
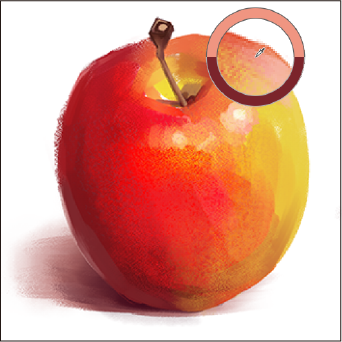
(4)Show color picker circle
When turned on, a circle appears with the Eyedropper tool when using a pen or mouse. The drawing around the hovered area is enlarged within the circle, and the drawing colors are shown around it. The top half is the color of the hovered pixel, and the bottom half is the current drawing color.
