Export animation
You can export your information as an image sequence, movie file, or GIF.
Image sequence
You can export the frames of your animation as an image sequence. You can export the following file formats: BMP, JPEG, PNG, WebP, TIFF, and Targa.
Select the File menu > Export animation > Image sequence to open the Image sequence export settings dialog. In the Image sequence export settings dialog, set the file name, file format, etc., and tap OK to export the sequentially numbered images.
·For Windows and macOS, images are exported to the folder you set in the Image sequence export settings dialog.
·On iPad/iPhone, the Files app will open. Select the save location, then tap Save.
·For Android, the File Picker dialog will appear when the file is exported, and you can save the file here.
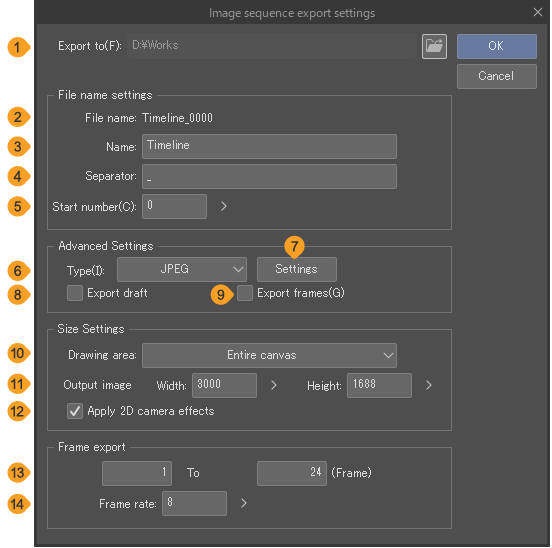
(1)Preset
Use the dropdown list to select from export presets. You can also save frequent settings as a new preset. For details, see "Export presets".
(2)Export to (Windows/macOS)
Specify the location to export the image sequence. Tap Browse to specify the export location.
(3)File name
You can check the file name with the File prefix, File suffix, Separator, and Start number settings applied.
(4)File prefix
You can add a prefix that will appear at the beginning of each file name.
(5)File suffix
You can add a suffix that will appear at the end of each file name.
(6)Separator
You can add a separator to appear between the prefix, sequence number, and suffix. If you do not enter anything, spaces will be added between the prefix, sequence number, and suffix.
(7)Start number
Enter the starting number for the sequence.
(8)Type
Choose the file format for the image sequence.
(9)Settings
This can be set by selecting JPEG from Type. Tap to open the JPEG settings dialog, where you can set the quality of the saved image. The larger the value, the higher the image quality.
(10)Export draft
Turn this on to include draft layers when exporting as an image.
(11)Export frames
Turning this on exports the overflow frame, output frame and title-safe area frame as an image. The color of each frame cannot be set. The overflow frame and output frame will be exported in black, and the Title-safe area is displayed in gray.
If a canvas has crop marks, default border, or safety margins, these can be exported in the image.
(12)Embed ICC profile
Turn this on to embed the ICC profile in the exported image sequence. This setting is not available if the selected file type does not support the color profile.
Memo | The color profile set up in Preferences > "Color conversion" will be exported, unless you have set up a color profile in the View menu ( "Set color profile"). In this case, the color profile set up in the View menu will be embedded. |
(13)Drawing area
For the output range, you can select from Output frame, Overflow frame, Entire canvas, or Selection area. Selection area exports a rectangular image with the width and height of the current selection area.
(14)Output image
Set the height and width of the exported images. The aspect ratio of the width and height is fixed.
(15) Apply 2D camera effects
When turned on, images will be exported with the camera movement set in the 2D camera folder.
(16) Frame export
You can designate the start frame and the end frame when exporting an image sequence. The Frame export settings are different depending on the frame display method selected in Playback time in the New dialog box or the New timeline dialog box.
(17)Frame rate
Specify how many images to export for each second of animation.
Memo | You cannot use Export drafts, Export frames, Embed ICC profile, or Drawing area in Clip Studio Paint DEBUT. |
Animated GIF
You can export your animation as an animated GIF. If camera movement has been added with 2D camera folders, these effects will be exported in the animated GIF.
Select the File menu > Export animation > Animated GIF, the procedure differs for each OS.
Windows/macOS
After you specify a save location and file name, the Animated GIF export settings dialog box will open. Set the export method and tap OK to export as an animated GIF.
iPad
After you enter the file name in the dialog, the Animated GIF Export Settings dialog box will open. Set the output method and tap OK. The Files app will open. Select a save destination, then tap OK to export the animated GIF.
Android
After you enter the file name in the dialog, the Animated GIF Export Settings dialog box will open. Set the output method and tap OK. The "File Picker dialog" will open. Select a save destination, then tap Save to export the animated GIF.
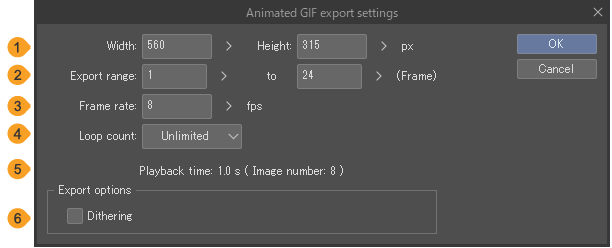
(1)Width/Height
Sets the height and width of the animated GIFs. The aspect ratio of the width and height is fixed.
(2)Export range
You can designate the start and end frames for exporting. In PRO and EX, the Frame export settings are different depending on the frame display method selected in Playback time in the New dialog box or the New timeline dialog box.
(3)Frame rate
Sets the number of cels to be displayed per second of animation. A larger value increases the image quality, but also increases the file size. The animation playback time remains the same regardless of the numerical value.
(4)Loop count
This specifies the number of times that playback is looped. You can specify a number of playback loops by selecting Number of loops or create an endless loop by selecting Unlimited.
(5)Playback time
Displays the playback time and the number of images in the animated GIF.
(6)Dithering
Turn this on to apply dithering to the exported GIF. Dithering simulates a larger range of color expression with a small amount of colors, but may also increase the file size.
(7)Export transparency
Turn this on to maintain transparency of transparent parts of the canvas in the exported file.
Animated sticker (APNG)
APNG is a PNG format file that can be played as an animation. This file format is used for LINE Stickers and for some browsers.
Tap File menu > Export animation > Animated sticker (APNG) to export an animated PNG (APNG). The export method for animated PNGs (APNGs) is the same as for animated GIFs.
For details, see "Animated GIF". However, the Export options settings differ from the Animated GIF export settings dialog.
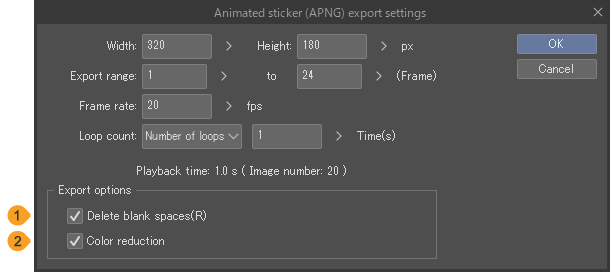
(1)Delete blank spaces
If turned on, this deletes all areas that are not drawn before exporting the sticker but the file size Width and Height will be smaller.
(2)Color reduction
Turn this on to reduce the range to 256 colors + transparency before exporting the file. Since the number of colors is reduced, the file size is also reduced, but the display quality may deteriorate.
Animated WebP
Animated WebP is a WebP format file that can be played as an animation. This file format can be used for uploading to browsers.
Tap File menu > Export animation > Animated WebP to export an animated WebP. The export method for animated WebP files is the same as for animated GIFs.
For details, see "Animated GIF". However, the Export options settings differ from the Animated GIF export settings dialog.
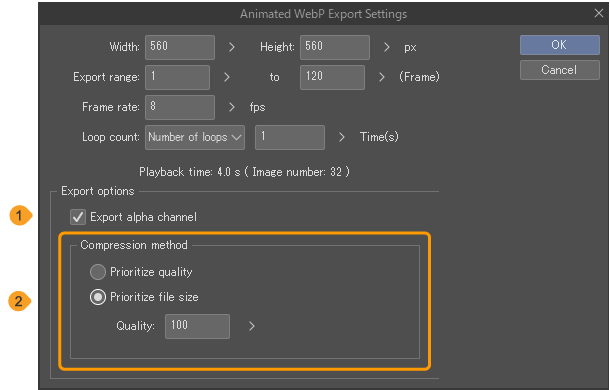
(1)Export transparency
If turned on, the opacity (alpha channel) of each pixel will be maintained in the exported image. When off, transparent areas are replaced by a white background.
(2)Compression method
You can choose between Prioritize quality and Prioritize file size. If you select Prioritize file size, you can set the image quality with the Quality setting. The higher the number, the higher the quality of the image, but the larger the file size.
Movie
You can export your animation as a movie file. Select the File menu > Export animation > Movie, the procedure differs for each OS. The file formats that can be exported also vary for each OS.
Windows/macOS
In the dialog box, set the file name, save location, and file format. Movie files can be exported as AVI files (extension: avi) or MP4 files (extension: mp4) with Windows, or as MP4 files (extension: mp4) or QuickTime files (extension: mov) in the macOS version.
When the Movie export settings dialog box appears, check the settings, and tap OK to export the file.
iPad
In the dialog box, set the file name and format. You can export files in MP4 (ext: mp4) and QuickTime (ext: mov) formats. When the Movie export settings dialog box appears, check the settings, and tap OK to export the file. The Files app will open. Select a save destination, then tap OK to export the file.
Android
You can export files in MP4 format (ext: mp4). In the dialog box that appears, enter the file name. When the Movie export settings dialog box appears, check the settings, and tap OK to export the file. The "File Picker dialog" will open. Select a save destination, then tap OK to export the file.
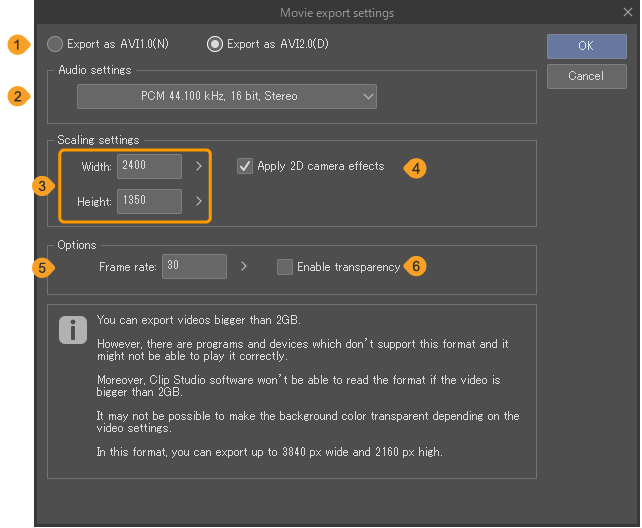
(1)Export version (Windows)
This option appears when exporting a file in AVI format. You can set the AVI version as well. For differences between versions, see the description below the Movie export settings dialog.
(2)Audio settings
Select options for the sampling frequency, bit number, mono/stereo from the drop-down menu. The available selections vary depending on the file format to be exported.
(3)Width/Height
Set the height and width of the exported images. The aspect ratio of the width and height is fixed.
(4)Apply 2D camera effects
When turned on, videos will be exported with the camera movement set in the 2D camera folder.
(5)Frame rate
Sets the number of cels to be displayed per second of animation.
(6)Enable transparency (Windows)
This option appears when exporting a file in AVI format. Keeps the transparent areas of the canvas transparent when exporting.
Export animation cels (EX)
You can export the animation cels in the animation folder corresponding to the current animation as BMP, JPEG, PNG, WebP, TIFF, or Targa images.
Select the File menu > Export animation > Export animation cels. When the Export animation cels dialog appears, check the settings, and tap OK.
·For Windows and macOS, images are exported to the folder you set in the Export animation cels dialog.
·On iPad, the Files app will open. Select a save location, then tap Save.
·For Android, the "File Picker dialog" will open. Select a save location, then tap Save.
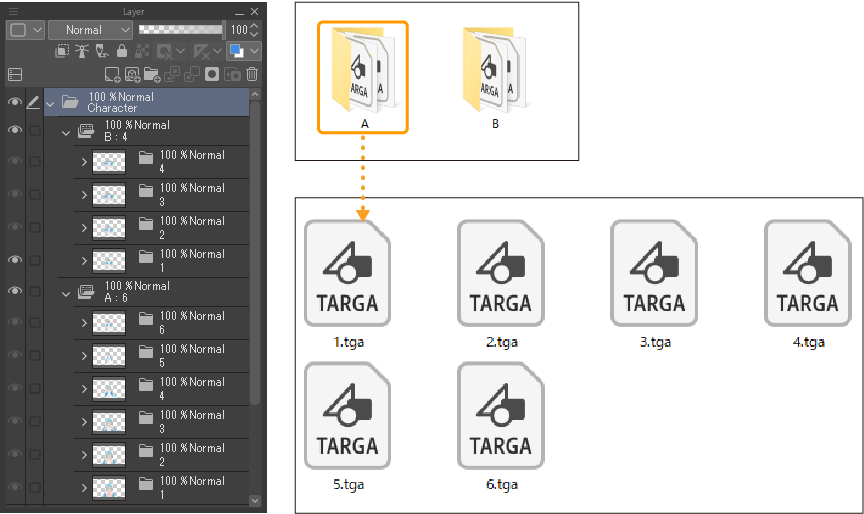
Folder structure of exported cels
A folder will be created for each animation folder in the folder with the name set in the Export folder name field of the Export animation cels dialog. Each folder contains the image files of the cels in the animation folder.
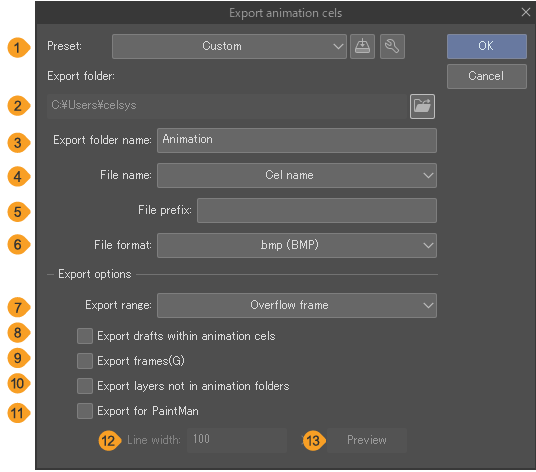
(1)Preset
Use the dropdown list to select from export presets. You can also save frequent settings as a new preset. For details, see "Export presets".
(2)Export folder (Windows/macOS)
This is where animation cels are exported. Tap the folder icon to specify the export location.
(3)Export folder name
You can set the name of the folder where cels will be exported. For Windows or macOS, a folder with the name set here will be created in the location set in Export folder.
(4)File name
You can check the file name with the file name settings applied.
(5)File name format
Select a format for the file names. You can choose from the Cel name, Sequence number, Animation folder name + cel name, or Animation folder name + number. For Cel name, the cel (layer) names in the animation folder will be used as the file names.
(6)File prefix
You can add a prefix that will appear at the beginning of each file name.
(7)File suffix
You can add a suffix that will appear at the end of each file name.
(8)Separator
You can add a separator to appear between the prefix, file name format, and suffix. If you do not enter anything, there will be no spaces between the prefix, file name format, and suffix.
(9)File format
The file format for exporting cels can be selected from BMP, JPEG, PNG, TIFF, and Targa.
(10)Export for PaintMan
Turn this on to export animation cels processed for PaintMan. Cels will be separated into binary “main lines” and “color lines”. When you import the cel to PaintMan, it will be separated into main line planes and color planes.
If you specify the fill on draft layers, PaintMan will reduce the colors and import the layers as shadow planes.
Tap Settings to open the "Export settings for PaintMan"dialog.
(11)Line colors
These are the colors of the main lines and auxiliary lines when reducing colors for PaintMan. If you have set a line width in "Export settings for PaintMan" for each color, the value will be shown beside each color thumbnail. If General line width has been turned on, the line width will be shown to the right.
(12)Export range
For the output range, you can select from Overflow frame or Entire canvas.
(13)Export drafts within animation cels
Turning this on merges the draft layers when exporting images. When Export for PaintMan is turned on, you can export the draft layers as shadow planes.
Note that even if Export layers not in animation folders is turned on, you cannot export draft layers stored in 2D camera folders or layer folders that are not inside an animation folder.
(14)Export frames
When on, the drawing frame can be exported to a cel. The color of the frame cannot be set.
(15)Export layers not in animation folders
Turning this on merges and exports layers that are not contained in animation folders. This can be used for exporting anything outside of the animation folder such as notes.
This method cannot export draft layers, selection layers, quick masks, or paper layers. It also cannot export any hidden layers. You also cannot export animation folders stored in 2D camera folders or layer folders that are not inside an animation folder.
Export settings for PaintMan
You can set up the main line and auxiliary line colors and line widths when exporting animation cels for PaintMan. These settings will apply to all cels exported.
The dialog has the same settings as the Advanced export settings for OpenToonz scene file dialog.
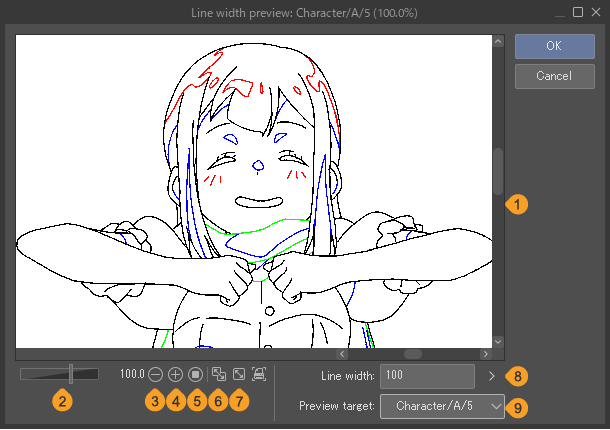
(1)Image preview
This shows a preview of the exported image to check line width settings and reduced colors for PaintMan. You can adjust the display position of the previewed image by manipulating the image preview directly. Note that shadows on the draft layer will not be shown.
(2)Scaling slider
(3)Zoom out
(4)Zoom in
(5)100%
(6)Fit to navigator
(7)Fit to Screen
(8)Print size
(9) Preview target
You can select the cel you wish to preview from the pull-down menu.
(10) Preview
Turn on to preview a cel with the line thickness and color settings. Shadow planes are not shown in the preview image.
(11) Line colors
These are the colors that will be shown in PaintMan. The top left icon indicates the color of the main lines. With the other icons, you can set up to seven auxiliary line colors. Tap a color icon to select it and change settings such as the color or line thickness.
(12) Main lines
Use this checkbox to display or hide the selected line color. When a color is hidden, the icon will be indicated with an X.
(13) Color bar
This tile shows the color of the selected line. Double tap the color tile to open the "Color Settings dialog" and change the color.
(14) Eyedropper
Tap the eyedropper icon to revert the preview to the original colors. You can then tap within the preview window to eyedrop a color and apply it to the current line. Tap again to return to the preview.
(15) RGB/HSV
Shows the RGB or HSV values of the selected line. Tap the RGB values to switch them to HSV values, or vice versa.
(16)Line width
Allows you to set the line width of the selected line. Changes to the line width are shown in the preview.
If Enable anti-aliasing is turned on in the "OpenToonz Scene File (Windows/macOS)" dialog, Line width will not appear in the Advanced export settings for OpenToonz scene file dialog.
(17) General line width
Set a line width that applies to all lines. When turned on, individual line width settings for lines will be disabled.
If Enable anti-aliasing is turned on in the "OpenToonz Scene File (Windows/macOS)" dialog, General line width will not appear in the Advanced export settings for OpenToonz scene file dialog.
Important | To create a file for exporting to PaintMan, we recommend that you arrange the layers in the same way as described in the following section "Preparing a file for OpenToonz or PaintMan". Anti-aliasing should be turned off for lineart. |
Preparing a file for OpenToonz or PaintMan
Creating cels with the following layer structure and drawing colors will make it easier to separate them into line drawings, colored lines, and shadow planes when imported into OpenToonz or PaintMan.
Memo | This creation method is an example. If you are producing a commercial animated film or other work, please conform to the rules for the production of your work. |
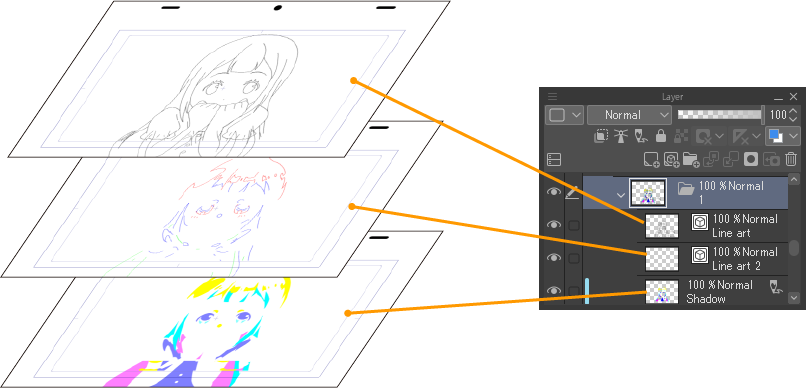
·Create a layer of line art with the lines of the drawing or original artwork and draw them in black.
·Create a layer for colored lines and draw in red (R: 255, G: 0, B: 0), green (R: 0, G: 255, B: 0), and blue (R: 0, G: 0, B: 255).
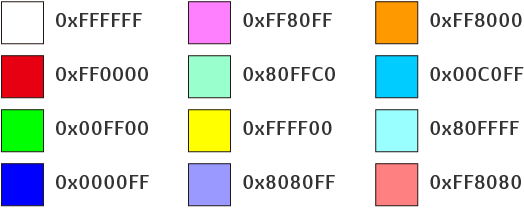
·Create a layer for shadows and fill them in. The layer for shadows is set to the draft layer. To create a layer for shadows, use the following colors, which will be displayed in the same color in the OpenToonz/PaintMan shadow levels. Note, however, that red, blue, and green are difficult to distinguish from colored lines.
OpenToonz Scene File (Windows/macOS)
Tap File menu > Export animation > OpenToonz Scene File to export the animation you are editing as a file for OpenToonz.
·If you are creating data for OpenToonz, you do not need to disable anti-aliasing for lines.
·The animation folder cannot be imported into OpenToonz if the folder name contains the following symbols: \ / : * ? “ < > | Please correct the animation folder name before using OpenToonz Scene File.
Important | OpenToonz must be installed on the same device as Clip Studio Paint to use the OpenToonz Scene File command (website). Please install OpenToonz before using the OpenToonz Scene File command. For details, see Clip Studio Tips. |
Selecting OpenToonz scene file allows you to export the file as converted in the following way.
·Cels (layer folders) in the animation folder of Clip Studio Paint are converted to Toonz raster level files (ext: tlv). Line drawings and shadows are exported in a merged state for each cel.
·The drawing colors of the cels in Clip Studio Paint's animation folder are converted to a palette file (ext: tpl). Only the specific colors used in Clip Studio Paint will be exported to the palette.
·The information in the Timeline palette in Clip Studio Paint is converted to a scene file (ext: tnz).
OpenToonz scene file export settings
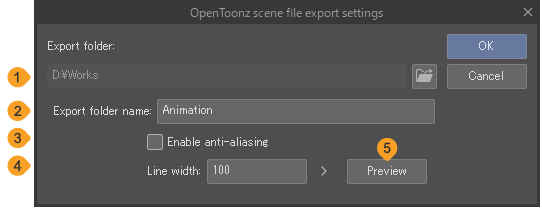
(1)Export folder
(2)Export folder name
You can set the name of the folder where OpenToonz scene files will be exported. A folder with the name set here will be created in the location set in Export folder.
(3)Enable anti-aliasing
Turning this on enables you to export to OpenToonz with anti-aliasing enabled on the drawing lines. When anti-aliasing is enabled, the image is exported with only high opacity colors remaining to prevent colors from mixing.
When turned off, you can set up the line width or general line width in the Advanced export settings for OpenToonz scene file dialog.
(4)Line colors
These are the colors of the main lines and auxiliary lines when reducing colors for OpenToonz. If you have set a line width in the Advanced export settings for OpenToonz scene file dialog for each color, the value will be shown beside each color thumbnail. If General line width has been turned on, the line width will be shown to the right.
If Enable anti-aliasing is on, the line width values will not be shown.
(5)Settings
Tap this to open the Advanced export settings for OpenToonz scene file dialog and preview how the cels will look when exported for OpenToonz. The settings are the same as "Export settings for PaintMan".
Exposure sheet (EX)
The content of the Timeline palette of the current animation can be exported as timeline information. You can export in CSV format or the Digital Exposure Sheet Information format (extension: xdts).
Select File menu > Export animation > Exposure sheet.
·For Windows and macOS, a dialog will appear for specifying the save location of the file. In the dialog box, set the save location, file name, and file format, then export the exposure sheet information.
·On iPad/iPhone, the Exposure sheet dialog box will appear. Set the file name and format, then tap OK. The Files app will open. Select a save destination, then tap OK to export the exposure sheet.
·On Android, the Exposure sheet dialog box will appear. Set the file name and format in the "File Picker dialog", then tap Save to export the exposure sheet.
Files that can be exported from Exposure Sheet have the following characteristics.
CSV Format
When exported as a CSV file, it can be viewed and edited with a text editor or spreadsheet software. However, exported CSV files cannot be opened in Clip Studio Paint or RETAS STUDIO.
·The first line displays the parent name of the animation folder. If the parent folder is nested, the folder names are joined by "/".
·The second line displays the animation folder names.
·The third line onward display the frame name and information corresponding to each frame, such as the cel name and track label. Inbetween track labels are marked with 〇 or ● symbols.The frame numbers start from 1 regardless of the display settings on the Timeline palette.
Digital exposure sheet format
Digital exposure sheet format files (extension: xdts) can be opened with the Toei Animation Digital Exposure Sheet program.
·Layers arranged from bottom to top in the Timeline palette are aligned from left to right in the Toei Animation Digital Exposure Sheet.
·This format only exports information for visible animation folders and 2D camera folders.
·Layers with animation folder names S0 to S9 are output as sound field data for the Toei Animation Digital Exposure Sheet.
·2D camera folder information is output as data in the Camera field of the Toei Animation Digital Exposure Sheet.
Audio
If there is an audio layer in the Timeline palette and an audio file is imported, the audio layer of the animation being edited can be exported as an audio file in Wav (ext: wav) or Ogg format (ext: ogg).
Select the File menu > Export animation > Audio. The audio file quality and export range can be set in the Audio export settings dialog box.
·For Windows and macOS, the Audio export settings dialog box is displayed after the file save location is specified.
·When using an iPad, specify the file save location in the Files app after the Audio export settings dialog appears.
·When using Android, specify the file save location in the "File Picker dialog".
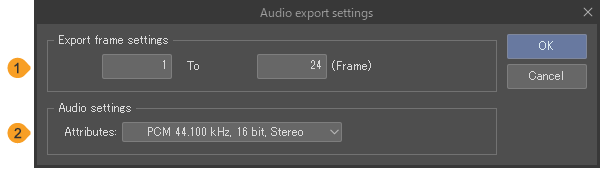
(1)Export frame settings
Set the export range for audio files by specifying the number of frames in the Timeline palette. The Frame export settings are different depending on the frame display method selected in Playback time in the New dialog box or the New timeline dialog box.(Not available in Clip Studio Paint Debut.)
(2)Audio settings
Available settings depend on the selected file format. For Wav format, Attributes and selected options for the sampling frequency, bit number, and mono/stereo will show in the drop-down menu.For the Ogg format, Quality settings will appear, allowing you to set the quality of the audio file.