B
Learn about Balloon, Brush shape, Brush size, and other setting categories starting with B in Clip Studio Paint.
Balloon
You can adjust the outline and fill color when a balloon layer is selected with the Object sub tool.
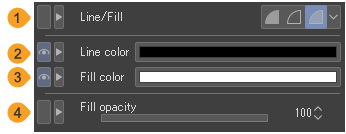
(1)Line/Fill
You can set the color of Balloons from Create fill, Create line, and Create both line and fill.
·Create fill fills the balloon with Fill color. Its outline is hidden.
·Create line draws the outline of the balloon with Line color. The inside of the balloon will be transparent.
·Create both line and fill draws the outline of the balloon with Line Color and fills the inside of the balloon with Fill color.
(2)Line color
Tap the color icon to open the Color settings dialog where you can set the color of the balloon outline. You can also change the color of the balloon outline by changing the main color from the Tool or Color Wheel palettes.
(3)Fill color
Tap the color icon to open the Color settings dialog where you can set the color of the balloon fill.
You can also change the color of the balloon outline by changing the sub color from the Tool or Color Wheel palettes.
(4)Fill opacity
Sets the balloon’s fill opacity. Note that Fill opacity cannot be set if the expression color of the balloon layer is set to monochrome.
Balloon tail
The Balloon and Balloon tail sub tools in the Balloon tool allow you to set the shape and bend of the tail when adding it to a balloon.
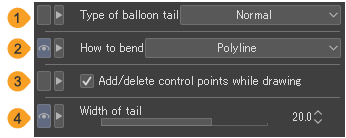
(1)Type of balloon tail
You can choose from Normal or Rounded tails.

(2)How to bend
You can choose how to bend the tail from Straight line, Polyline, and Spline. How the tail is drawn depends on the How to bend setting. For details, see "Adding a balloon tail".
(3)Add/delete control points while drawing
This can be set when How to bend is set to Polyline or Spline. Turn this on to edit control points before finalizing the tail. Tap a control point to delete it. Tap the line to add a control point at that position.
(4)Width of tail
Using the slider, sets the width of the tail at its base.
Brush shape
When using a drawing tool, you can select from a preset of frequently used brush tip shapes.
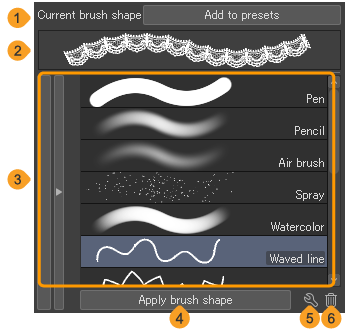
(1)Add to presets
Settings made in Brush tip, Spraying effect, Stroke, and Texture can be registered as brush shape presets.
(2)Brush shape preview
This shows a stroke preview of the brush shape for the selected sub tool.
(3)Brush shape
This is a list of brush shape presets. Tap to select a preset.
(4)Apply brush shape
Tap to apply the selected brush shape preset from the preset list. When a preset is applied, the settings of the sub tools are replaced with those registered in the preset.
(5)Change name of selected brush shape
Tap this to open the Preset of brush shape settings dialog and change the name of the selected brush shape.
(6)Delete selected brush shape
Tap to delete the selected brush shape preset from the preset list.
Brush size
This sets the brush size when drawing with the Pen or other drawing tools, or with the Figure tool.
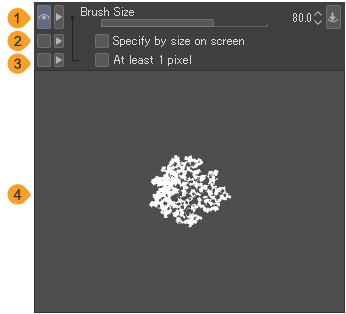
Memo | The brush size can also be set when drawing with the Figure tool > Speed lines or Focus lines sub tools, or with the Balloon > Flash sub tool. The only settings that can be set are Brush Size and Disarray. The same applies if you have selected a Speed lines or Focus lines layer with the Object sub tool. |
(1)Brush size
You can set the size of the line to be drawn with a slider. Tap the Dynamics icon to make the brush size reflect changes in the pen pressure and stroke speed.
(2)Specify by size on screen
When on, the brush size will change according to the scale of the canvas. The tool appears at the same size as 100% view even when the canvas is scaled up or down.
(3)At least 1 pixel
When turned on, a line of at least one pixel can be drawn when drawing thin lines, for example, when using Starting and Ending.
(4)Brush preview
Previews the brush size and brush tip shape set in the other categories.
(5)Disarray (for focus lines/speed lines only)
When a Focus lines or Speed lines tool is selected, you can add variation to the size of each of the lines. The indicator allows you to configure the degree of variation. When setting with a numerical value or slider, you can set it in percentage units.
Brush tip
When using a drawing tool such as the Pen tool, you can set the shape of the brush tip. Some brush shapes allow you to combine multiple tip shapes to create a multi-brush.
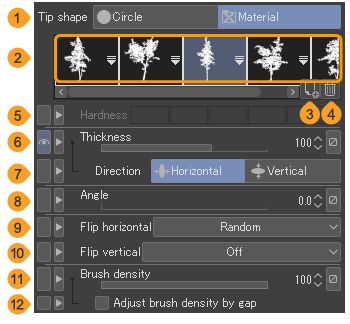
(1)Tip shape
You can select the brush tip shape from Circle and Material. If you select Material, you can use an image material for the brush tip shape. You can change the brush tip shape and create brushes that combine multiple tip shapes.
(2)Brush tip icon
Shows the brush tip shapes set to the selected sub tool. You can select this when Tip shape is set to Material.
Tap the arrow to open the Select brush tip shape dialog and select and add a brush tip shape.
When multiple brush tip shapes are shown, they can be rearranged by dragging and dropping.
(3)Add brush tip shape
Adds a brush tip shape to the brush tip. Tap to open the Select Material dialog, where you can select and add a brush tip shape.
(4)Delete selected brush tip shape
Tap to delete the selected brush tip shape from the brush.
(5)Hardness
You can use the indicator to adjust the hardness of circular brush tip shapes. The lower the value, the more blurred the brush tip becomes. This can be set when Tip shape is set to Circle.
(6)Thickness
You can set the thickness of the brush tip shape with the slider. The thickness changes in the direction set under Direction. Tap the Dynamics icon to make the thickness reflect changes in the pen pressure and stroke speed.
(7)Direction
Sets whether the Thickness setting is applied horizontally or vertically.

(8)Angle
Allows you to set the angle of the brush tip. Moving the slider changes the direction of the brush tip from 0 to 360 degrees. Tap the Dynamics icon to make the brush reflect changes in the pen and stroke direction.
(9)Flip horizontal
You can select how to flip the brush tip shape from Off, Flip, Random, or Invert on reversed strokes. Flip on reversed strokes can be used when the Repeat method for the stroke is set to Reverse. This can be set when Material is selected for Tip shape.
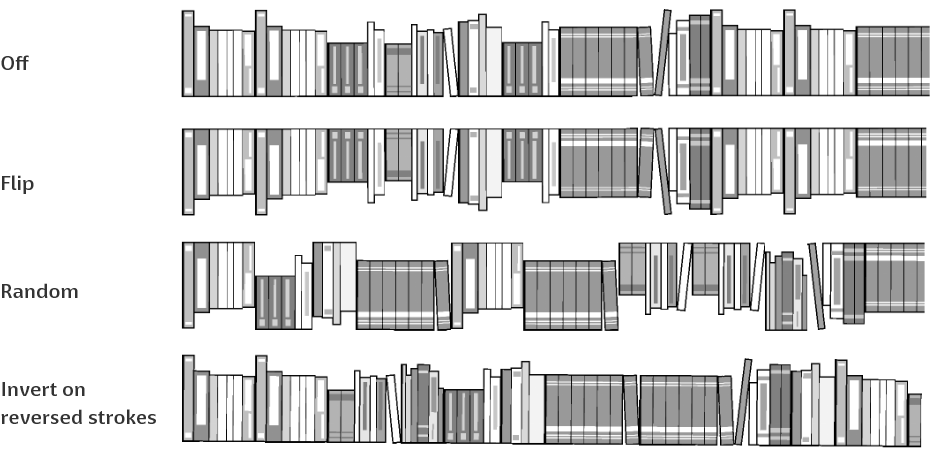
(10)Flip vertical
You can select how to flip the brush tip shape up and down. The settings are the same as those for Flip Horizontal. This can be set when Material is selected for Tip shape.
(11)Brush density
Sets the opacity of each selected brush tip shape. Tap the Dynamics icon to make the brush density reflect changes in the pen pressure and stroke speed.
(12)Adjust brush density by gap
When turned on, the brush density will be reduced if the brush tip shape spacing is set to Narrow in Gap under Stroke. The density is automatically adjusted so that the opacity is approximately constant.
Angle dynamics
This screen appears when you click the Dynamics icon under Angle, which can be set in the Brush Tip and 2 - Brush Tip categories in the Sub Tool Detail palette. You can set pen operations, such as pen tilt, that will affect Angle.
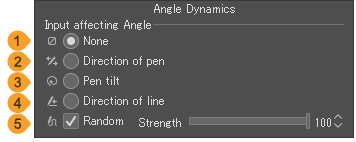
(1)None
Keeps the direction constant regardless of pen operation.
(2)Direction of pen
Makes the brush tip tilt in the direction the pen stylus is tilted. If you are using a pen that does not detect pen orientation, this setting will not apply.
(3)Pen tilt
Changes the brush tip rotation angle in accordance with the rotation (twist) of the pen stylus. If you are using a pen that does not detect the rotation of the pen shaft, this setting will not apply.
(4)Direction of line
The direction of the brush tip changes according to the direction in which the line is drawn.
(5)Random
The orientation of the pen will change randomly. You can adjust the strength of the effect. You can set this even if you have selected other settings.