Timeline Palette
The Timeline palette is used to determine cel order and when they should appear in the progress of an animation. It also allows you to edit animations using keyframes and manage your timelines. You can show or hide the Timeline palette from the Window menu > Timeline.

(1)Command Bar
(2)Current frame/Start frame/End frame
Shows the positions of the current frame, the start frame and the end frame.
(3)Timeline list
Shows the name of the timeline being edited. If multiple timelines have been set up, you can switch between timelines.
(4)Number of frames
The number of frames on a track. Frames are displayed differently depending on the method set in Playback time when creating a new animation file.
(5)Tracks and timelines
Command Bar
You can see how the Timeline palette is displayed and execute various commands to edit it.

(1)Graph Editor
Tap this to switch the Timeline palette to the Graph Editor. For details, see "Using the Graph Editor".
(2)Edit timeline
You can select the Edit Timeline sub tool.
(3)New timeline
This can be used to create a new timeline on the canvas.
(4)Zoom out / zoom in
(5)Go to start
Moves to the first frame.
(6)Go to previous frame
Selects the frame before the selected frame.
(7)Play/Stop
(8)Go to next frame
Selects the frame after the selected frame.
(9)Go to end
Moves to the last frame.
(10)Loop play
When turned on, after the animation playback is finished, it returns to the beginning and plays the animation on loop.
(11) New animation folder
(12)New animation cel
(13)Assign cel to frame
(14)Remove assigned cel
(15)Enable onion skin
(16)Add keyframe
(17)Keyframe interpolation
(18)Delete keyframe
(19)Enable keyframes on this layer
(20)Edit layers with active keyframes
Tracks and Timelines
The track displays the animation folder with layer names on the left and an animation timeline on the right. You can assign cels and edit clips in the timeline section of a track. When playing an animation, each second on the timeline highlights as it is played.
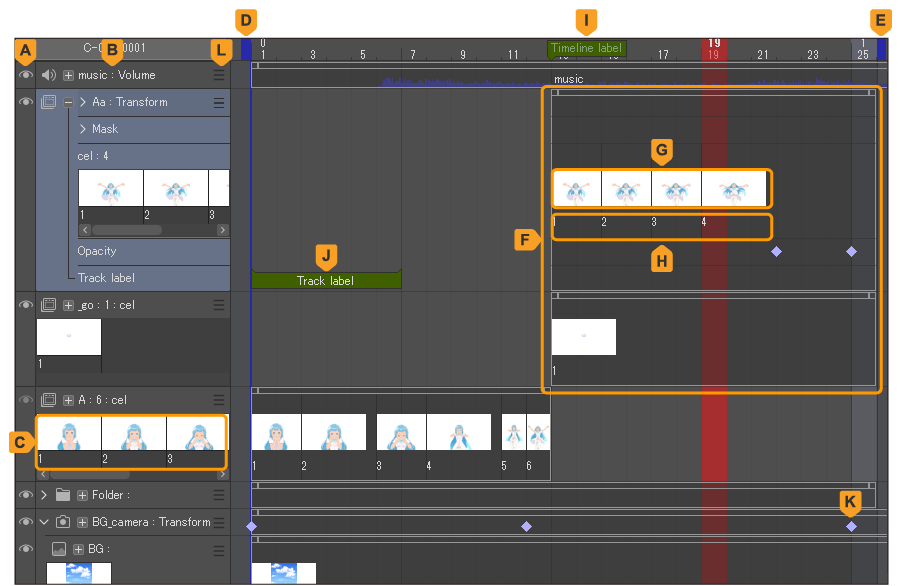
A.Show/hide track
Tap the eye icon or the space next to the track name to show and hide each track.
B.Track details
This is the area for editing the assigned cels, keyframes, and track labels. The available settings differ according to the track type and settings.
Tracks are linked to the layer structure in the Layer palette. Tracks can be created for layer folders, layers, audio layers, and camera work.
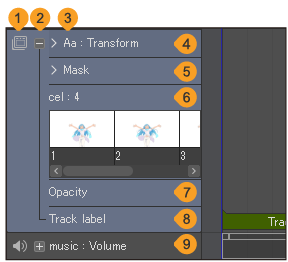
(1)Track icon
This icon indicates the track (layer) type. If it is a layer folder or a 2D camera folder, you can open and close the folder by clicking to the left of the track icon.
(2)Details
Tap this icon to show or hide the track label area. Turning on Enable keyframes on this layer shows a keyframe editing area on the track.
(3)Track name
This area displays track labels. The settings you can edit depend on the track layer type and settings. Double tap to change the track name. The changed track names are applied to the Layer palette.
(4)Transform area
This area displays the keyframes of layer transformations.
Turning on Enable keyframes on this layer switches to a transformation box and adds an icon to the left of the track name to indicate that it is showing detailed transformation settings. Tapping it will display the Position, Scale ratio, Rotate and Center of rotation area.
(5)Mask area
This area displays the keyframes of a mask transformation. For tracks with a layer mask, tap Detail to show this setting.
Clicking Detail on layers set with a layer mask or animation folders will display it. Turning on Enable keyframes on this layer switches the track name area with the transformation area. An arrow icon is added to the left of the track name to show transformations of the layer mask. You can open the drop-down arrow to show the keyframes for the position, scale ratio, rotation, and center of rotation.
(6)Cel specification area
This assigns cels to frames. If Enable keyframes on this layer is turned off, the track name area will be the cel specification area. It will also be shown in the animation folder.
(7)Opacity area
This area displays the keyframes of a layer’s opacity. Tap Detail on a track that has Enable keyframes on this layer turned on to display it.
(8)Track label area
This area displays track labels.
(9)Volume area
This area displays the keyframes of an audio file’s volume.
C.Thumbnail list
These are the thumbnail images of a cel or layer. Thumbnails for all of the cels are displayed for the animation folder. When you tap a thumbnail, the frame in which the cel is specified is also selected in addition to the tapped cel.
Double tap the cel name below the thumbnail to change the cel name. The changed cel names are applied to both the Timeline and the Layer palette. The palette colors set in the Layer palette is also reflected in the thumbnails.
D.Start frame
This lets you set the first frame for animation playback. Drag the blue square to the left or right to adjust the Start frame position. Note that in the case of DEBUT, the start frame cannot be moved to a frame before 0.
E.End frame
This lets you set the end frame for animation playback. Drag the blue square to the left or right to adjust the End frame position. Note that in the case of DEBUT/PRO, the end frame cannot be moved to a frame later than 24.
F.Clips
This is the unit for editing animations. You can display cels and layers only where clips are placed. For details, see "Using clips".
G.Clip thumbnail
These are thumbnails of cels specified for clips. The thumbnail display settings are linked to the thumbnail size in the thumbnail list.
H.Specify cel
Indicates the position in which to display cels in an animation folder. When a cel display position is specified, the cel name will appear on the timeline. It displays even if the thumbnail is hidden.
I.Timeline label
J.Track label
K.Keyframes
L.Grip (Tablet)
Hold and drag the grip up and down to change the track stacking order. When multiple tracks are selected, all selected tracks are subject to changes of the stacking order.
Customizing the Timeline palette
Zoom in/Zoom out
You can enlarge or shrink the scale of the Timeline by tapping the Zoom in and Zoom out icons.
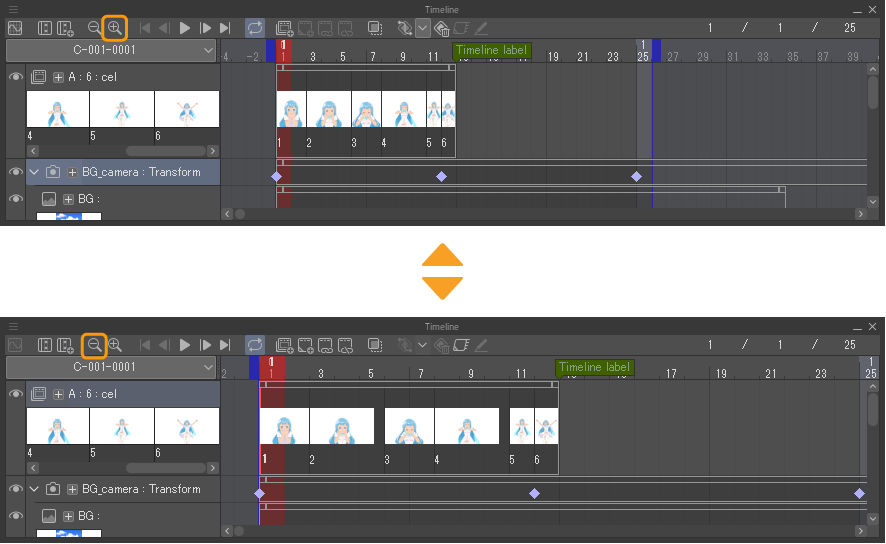
For tablets, pinch in and out on the Timeline palette to zoom in and out.
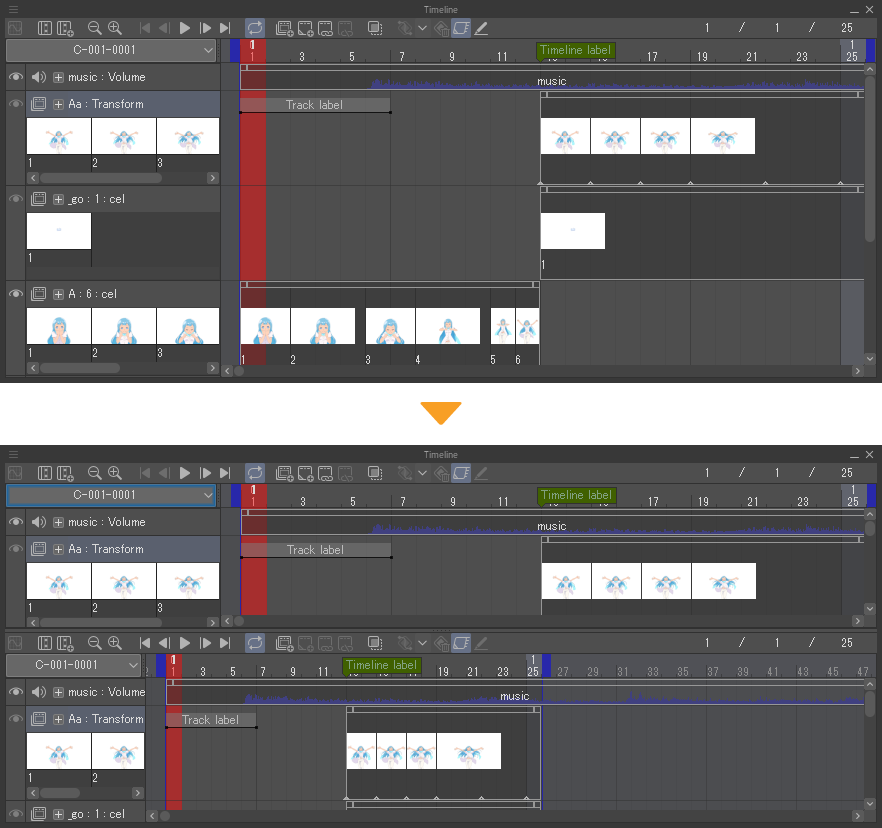
Show split view
The Timeline palette can be split into two views by selecting Show split view from the Timeline palette menu.
Thumbnail view settings can be changed for each view. For canvases with multiple timelines, a different timeline can be displayed in each view.
Thumbnail size
You can change the size of thumbnails and clip thumbnails in the thumbnail list from Thumbnail size in the Timeline palette menu. You can select a size from the following options: None, Smallest, Small, Medium, Large, and Largest.
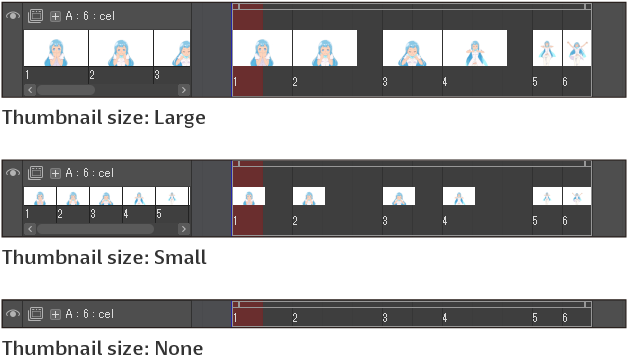
Thumbnail display settings
You can set how thumbnails are displayed in the Timeline palette menu > Thumbnail display settings. If you select Show only animation folder and turn it on, you can show thumbnails only for the animation folder and hide thumbnails for other layers.
When Display transparent area is turned on, the transparent areas of cels and layers are shown with a checkerboard pattern. When turned off, the transparent area is shown as a white background.
Show palette color
You can make the "Palette color" selected on the Layer palette appear on clips or cels in the timeline.
From the Timeline palette menu, select Show palette color > Show palette color on clips or Show palette color on cels to show the palette color on clips or cels in the Timeline palette.
Managing the timeline
You can toggle the timeline on and off for a canvas by tapping the Animation menu > Timeline > Enable Timeline. Enabling the timeline allows you to create animations.
When the timeline is enabled, you can edit the Timeline palette. The canvas only shows cels and layers assigned to the selected frame on the Timeline palette. When the timeline is disabled, the Timeline palette cannot be edited, but all cels in the animation folder are displayed on the canvas. Cels can be edited regardless of whether they are assigned to the timeline.
If there are multiple timelines on the canvas, you can switch between them by tapping the timeline list in the Timelines palette and selecting the timeline from the pull-down menu.
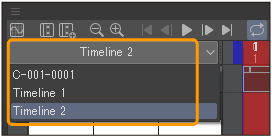
If Enable Timeline cannot be turned on, this means that no timeline has been created on the canvas.
Creating a timeline
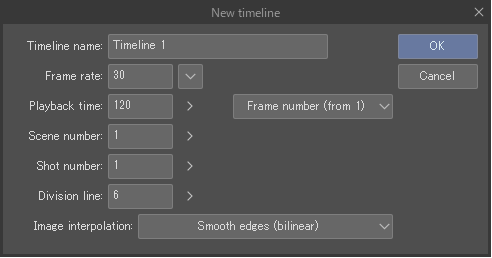
You can create a new timeline on the canvas by tapping New timeline on the Timeline palette or from the Animation menu > Timeline > New timeline.

Check the settings in the New Timeline dialog and tap OK. If the canvas already has a timeline, a new timeline will be added.
The settings in the New timeline dialog are the same as those under the Timeline category when creating a animation file from the New dialog.
Changing timeline settings
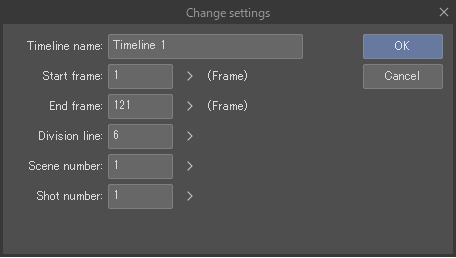
You can adjust the order of the timeline list from the Animation menu > Timeline > Change settings.
The settings in the New timeline dialog are the same as those under the Timeline category when creating a animation file from the New dialog, however, some settings cannot be changed.
You can designate the start and end frames in the Change settings dialog. In PRO and EX, frames are displayed differently depending on the frame display method selected in Playback time in the New dialog box.
Changing the frame rate
You can change the frame rate by selecting Animation menu > Timeline > Change frame rate.

Frame rate: Change the frame rate for the timeline. The frame rate (fps) is the number of images (cels) that can be displayed in one second to run the animation.
Change total number of frames (EX only): When this is turned on, the number of frames on the timeline will change to fit the playback time that was originally specified. The position of the specified cels also changes. For example, if a project at 8fps is set to 24fps, the number of frames in the timeline will increase three times. The playback time of movie tracks, audio tracks, or dialog tracks cannot be changed according to the frame rates. This means that the clip position and length may not match those of the other tracks.
Managing the timeline
Select Animation menu > Timeline > Manage Timeline to manage timelines. This includes adding, deleting, and duplicating timelines.
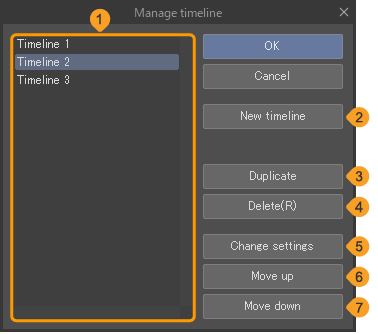
(1)Timeline list
A list of timelines on the canvas. Select a timeline to change the settings.
(2)New timeline
Tapping this opens the New timeline dialog.
(3)Duplicate
Duplicates the timeline selected from the timeline list. This opens the Duplicate timeline dialog box, where you can enter the timeline name, scene number, and cut number.
(4)Delete
Deletes the selected timeline.
(5)Change settings
Opens the Change settings dialog to edit the settings of the selected timeline.
(6)Move up
Moves the selected timeline one place up in the timeline list. Changing the order also changes the order in the Timeline palette.
(7)Move down
Moves the selected timeline selected one place down in the timeline list and in the Timeline palette.