G
Learn about Gradient settings in the G setting category in Clip Studio Paint.
Gradient
Set gradient shades and shape when drawing with the Gradient tool.
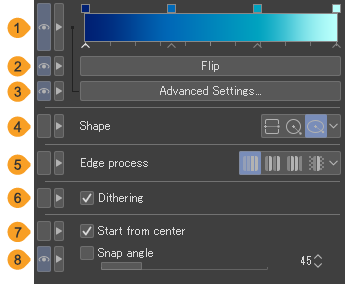
(1)Color bar
This is a preview of the gradient. Tap the color bar to open the Edit gradient dialog where you will be able to edit the gradient in detail.
Change the gradient color by tapping on the square above the color bar. Drag the nodes on the color bar to change the gradient shades. For details, see "Gradient Tool".
(2)Flip
Tap to invert the gradient.
(3)Advanced Settings
Tap to open the Edit gradient dialog where you will be able to set the gradient in detail.
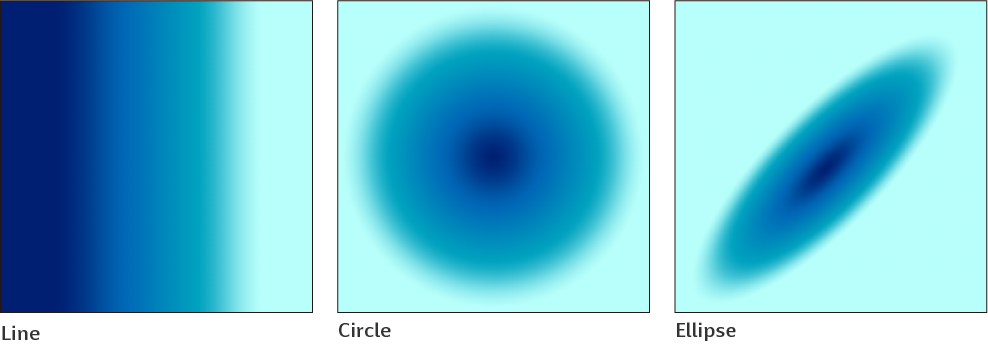
(4)Shape
You can set the shape of the gradient to Line, Circle, or Ellipse. With Straight line, you can draw a linear gradient according to the line you draw. With Circle, you can draw a gradient in the shape of the circle created by dragging the tool. With Ellipse, you can draw a gradient in the shape of the ellipse created by dragging the tool.
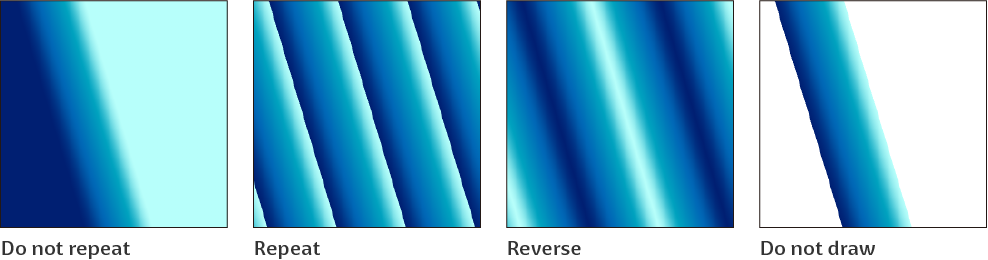
(5)Edge process
You can set how gradients are drawn outside the dragged area when creating a new gradient by dragging. The available settings are Do not repeat, Repeat, Reverse, and Do not draw.
(6)Dithering
When turned on, fine noise is added to the gradient to obscure the color boundaries. This makes the gradient look smooth.
(7)Start from center
When the shape is set to Circle or Ellipse, you can turn this on to create the gradient centered on the point you start dragging from.
(8)Snap angle
Turn this on to change the angle of the gradient being created. Make gradients at the angle increments set with the slider.
Gradient dialog
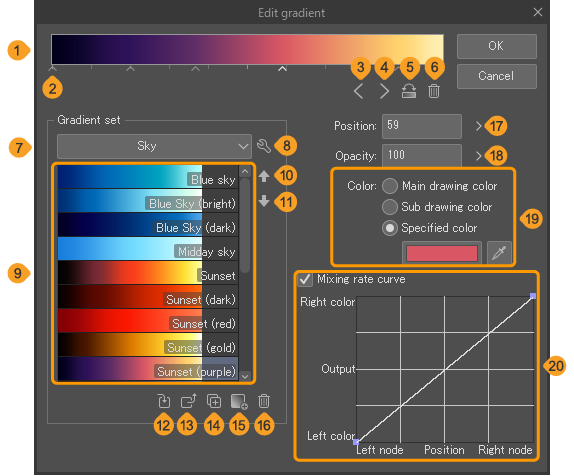
(1)Color bar
This is the preview of the gradient.
(2)Node
The nodes mark each color of the gradient as well as the transition points. You can edit the gradient with the nodes by dragging and dropping horizontally. Drag the node vertically to delete the selected node. Tap the area under the color bar to add a new node.
To change the node color and other settings, tap the node and set the Position, Opacity, Color, and Mixing rate curve.
(3)Select left node
(4)Select right node
(5)Reverse gradient
(6)Delete node
(7)Mixing mode
You can set the color mixing mode to Standard, Perceptual, Perceptual (Photoshop compatible), or Linear (Photoshop compatible).
Standard is the mixing mode from Ver. 2.2 and earlier.Perceptual results in more realistic and vibrant color mixing.
Perceptual (Photoshop compatible), or Linear (Photoshop compatible) are mixing modes for compatibility with the Linear and Perceptual interpolation methods of Adobe Photoshop gradients.
Memo | If a Correction layer has a Mixing mode set to anything other than Standard, the layer will no longer be editable in Ver. 2.2 and earlier. |
(8)Brightness correction
When the mixing mode is set to Perceptual, you can adjust the Brightness correction. There are five brightness levels for color mixing that you can choose from.
(9)Gradient set list
Tap to open a drop-down list of gradient sets. Select a gradient set and the gradient list will change.
(10)Settings menu
Tap to show a menu related to gradient sets. For details, see "Gradient set menu".
(11)Gradient List
Gradients registered in the current gradient set are shown in the gradient list. Tap to select a gradient and double-tap to apply the gradient to the color bar.
(12)Up/Down
Moves the selected gradient in the gradient list up or down one position.
(13)Replace Gradient
Replaces the gradient settings selected in the gradient list with the settings shown in the color bar.
(14)Apply to Gradient Settings
Applies the gradient settings selected in the gradient list with the settings shown in the color bar.
(15)Duplicate Gradient
Duplicates the gradient settings selected in the gradient list.
(16)Add Gradient
Adds the gradient settings in the color bar as a gradient in the list. The added gradient settings are shown at the bottom of the list.
(17)Delete Gradient
Deletes the gradient settings selected in the gradient list.
(18)Position
Specify the position of the selected node with a value.
(19)Opacity
Specify the opacity of the selected node with a value.
(20)Color
You can change the color of the selected node to Main color, Sub color, or Specified color.
When set to Specified color, you can tap the color icon to open the Color settings dialog and choose a color. Windows/macOS users: Tap Pick screen color to use the Eyedropper to sample a color on your screen.
(21) Mixing rate curve
Change how the colors change between the selected node and the node to its right.
The vertical axis shows the color mixing ratio with the node on the right. The higher it is, the closer it will be to the node color to the right. The horizontal axis indicates the position between nodes. Set it to the right to control the node color to the right.
To adjust the graph, tap on the graph to add points. You can adjust the curve of the graph by dragging the points. You can drag a point out of the graph to delete it.
Gradient set menu
Manage and set the gradient sets and gradients selected in the gradient list.
Create new set
Enter a set name in the Create new set dialog and tap OK to create a new gradient set.
Delete set
Deletes the selected gradient set.
Duplicate set
Duplicates the selected gradient set.
Settings of set
Set the name of the selected gradient set in the Settings of set dialog.
Register set as material
Register the selected gradient set as a material. For details, see the "Materials" chapter.
Add gradient set
Gradient set materials registered in the Material palette can be registered in the Edit gradient dialog from the Add gradient material dialog. For details on how to import a gradient set material, see "Gradient set materials".
Add Gradient
Adds the gradient settings in the color bar as a gradient in the list.
Delete Gradient
Deletes the selected gradient set.
Duplicate Gradient
Duplicates the selected gradient setting.
Change Gradient Name
Set the name of the selected gradient set in the Change Gradient Name dialog.
Replace Gradient
Replaces the gradient settings selected in the gradient list with the settings shown in the color bar.
Apply to Gradient Settings
Applies the current gradient set to the color bar.
Import Gradient
Imports gradient setting. Supported file formats are color gradient files (extension: cgs) and Photoshop gradient files (extension: grd).
Memo | You cannot import or register gradient sets in Clip Studio Paint DEBUT. |