All Sides View palette
The All Sides View palette shows 3D materials on 3D layers from four different directions at once. This is convenient when you have multiple materials as you can see them from various angles at the same time.
You can show or hide the All sides view palette from the Window menu > All sides view.
When using the All Sides View palette, the camera position and focal point position of the 3D layer can also be changed. When the camera position is changed in the All Sides View palette, the new position is reflected on the canvas. Likewise, the camera position can also be changed on the canvas and applied to the All Sides View palette.
Memo | The All Sides View palette is not available in Clip Studio Paint PRO or DEBUT. The All Sides View palette cannot be used for 3D layers compatible with Ver. 1.5. |
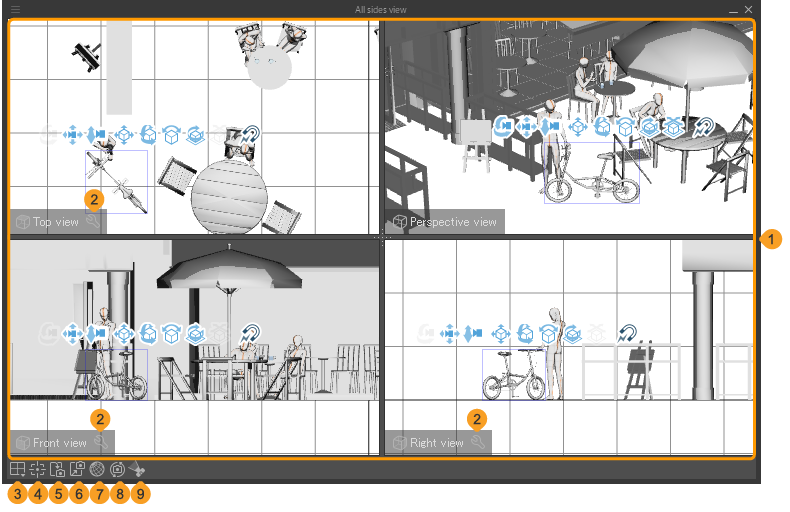
(1)All views
Shows four views including three flat-plane views in addition to a perspective view. The flat-plane views include Top view, Bottom view, Left view, Right view, Front view and Back view. These do not include Panorama materials.
You can use View window layout to change which flat-plane views are shown and in which order.
(2)Preview Settings
Tapping the wrench icon shows the slider. Turning on Hide foreground allows you to change what area is displayed using the slider.
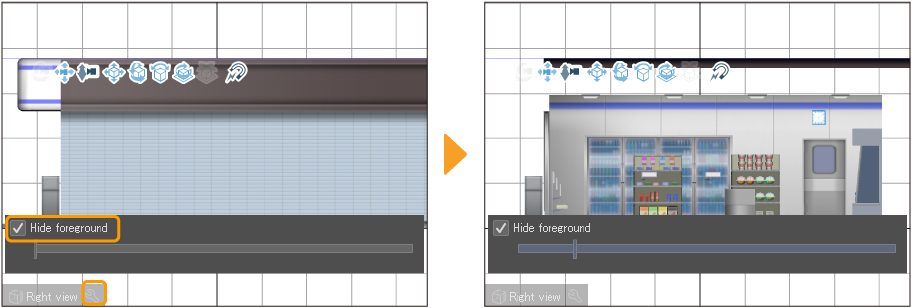
(3)Select view
Tap to display a list of view layouts. You can select a flat-plane view window layout and the views you want to be displayed.
(4)Adapt view to editing target
Adjusts the camera position of the views so that the selected 3D material is at the center. This setting cannot be used when Sync perspective view and canvas is turned on.
(5)Make canvas camera reflect perspective view
The camera position, direction and angle of the canvas is reflected in the perspective view. The Roll setting on the Tool Property palette is not applied. This setting cannot be used when Sync perspective view and canvas is turned on.
(6)Make perspective view camera reflect canvas
The camera position, direction and angle of the perspective view is reflected in the canvas. The Roll setting on the Tool Property palette is set to 0. This setting cannot be used when Sync perspective view and canvas is turned on.
(7)Show face border edge (Windows/macOS)
When turned on, the outlines of the 3D materials on the All Sides View palette are displayed. Tap to show or hide these. The appearance of the 3D material on the canvas does not change.
(8)Sync perspective view and canvas
When turned on, the camera settings of the perspective view with those of the canvas are synced. Changes made to the settings of one camera are applied to the other cameras, and the settings of the canvas camera are applied to the perspective view camera.
When turned off, the camera settings of the perspective view and canvas can be adjusted separately.
(9)Always show camera and visible area
For details on this setting, see "Changing the appearance of the All Sides View palette".
Changing the appearance of the All Sides View palette
Moving the divisions
You can drag the border of a view window to change the size of the view.

·To set the same size for all view windows, either double tap the center of the palette window where the vertical and horizontal lines intersect or use the All Sides View palette menu > Revert dividing position to default.
·To set the same height for all view windows, double tap the horizontal division line.
·To set the same width for all view windows, double tap the vertical division line.
Changing the appearance of flat-plane views
You can use the movement manipulators on the 3D materials shown in the flat-plane views to change the view. When the display of a flat-plane view is changed, the changes are applied to the other flat-plane views. These changes do not affect the canvas or perspective view.
The use of the movement manipulators is the same as that of the movement manipulators on the canvas. For details, see "Movement Manipulator".
Changing the Perspective View
The camera angle of the perspective view can be changed with the movement manipulator in the same way as the camera angle on the canvas. For details on the movement manipulator, see "Movement Manipulator".
If Sync perspective view and canvas is turned on, changing the camera angle on the canvas will also change the perspective view.
Show command bar
From the All sides view palette menu, tap Show command bar to show or hide the command bar buttons.
Setting camera angles in the All Sides View palette
You can use camera and focal point objects in the All Sides View palette to change the position and angle of the camera on the canvas.
Displaying the camera object
To use camera and focal point objects, select the Object sub tool and check Always show camera and visible area in the All sides view palette.
When turned on, a camera icon and the camera display range appear in the All Sides View palette. The camera icon will not appear in the perspective view when Sync perspective view and canvas is turned on.
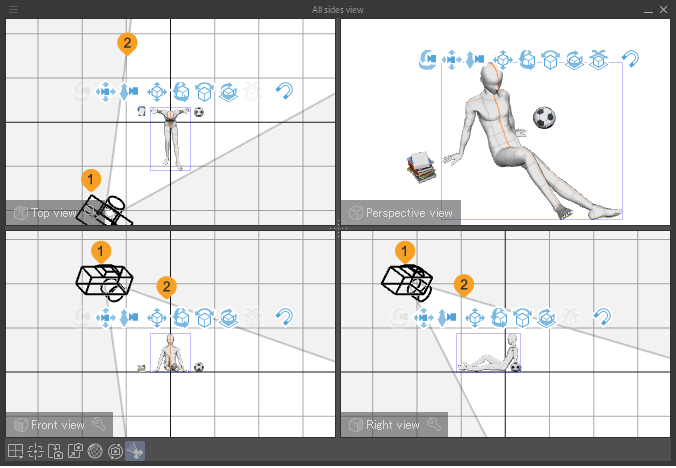
(1)Camera icon
This shows the camera position and angle on the canvas. You can move the camera position by displaying and dragging the camera icon.
(2)Camera Display Range
This shows the range seen by the camera. The area displayed in white on the All Sides View palette is the area visible on the canvas.
Memo | The camera icon and camera display range can also be displayed from the Tool Property and Sub Tool Detail palette > Object List > Camera. |
Operating the camera
You can tap the camera icon to show the camera manipulator and focal point indicator.

Drag the camera manipulator in the direction you want to move the camera.
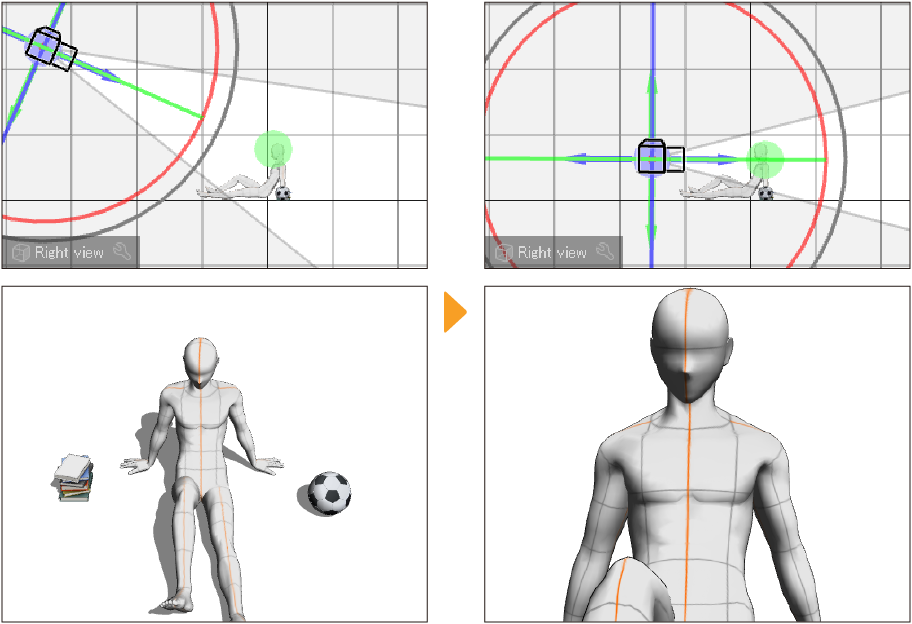
Moving the camera icon changes the position and angle of the camera, but does not move the focal point. The camera continues to point in the direction of the focal point.
You can adjust the camera in the following ways with the manipulator.
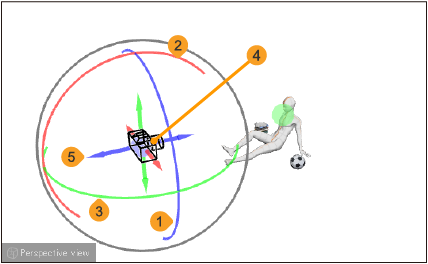
(1)Scroll
Drag along the blue ring to rotate the camera in that direction, without changing the camera position and focal point. This changes the Roll setting in the Tool Property palette.
(2)Rotate Vertically
Drag along the red ring to rotate the camera in that direction and move the focal point. This changes the Focal point position setting in the Sub Tool Detail palette.
(3)Rotate Horizontally
Drag along the green ring to rotate the camera in that direction and move the focal point. This changes the Focal point position setting in the Sub Tool Detail palette.
(4)Controller
Drag the controller (blue circle) to move the camera in the dragged direction without moving the focal point. This changes the Camera position setting in the Tool Property palette.
(5)Move forward/back, left/right, or up/down
Drag in the direction of the blue, red, or green arrows to move the camera without moving the focal point. This changes the Camera position setting in the Tool Property palette.
Memo | For details on the camera settings in the Tool Property and Sub Tool Detail palettes, see "Camera". |
Moving the focal point
The focal point is the point where the camera is looking. The focal point indicator can be used to move the focal point. The camera angle changes at the same time the focal point position is changed.
When you tap the focal point indicator, arrows appear around it.

You can use the arrows or drag the focal point to move it. The camera angle adjusts to follow the focal point.
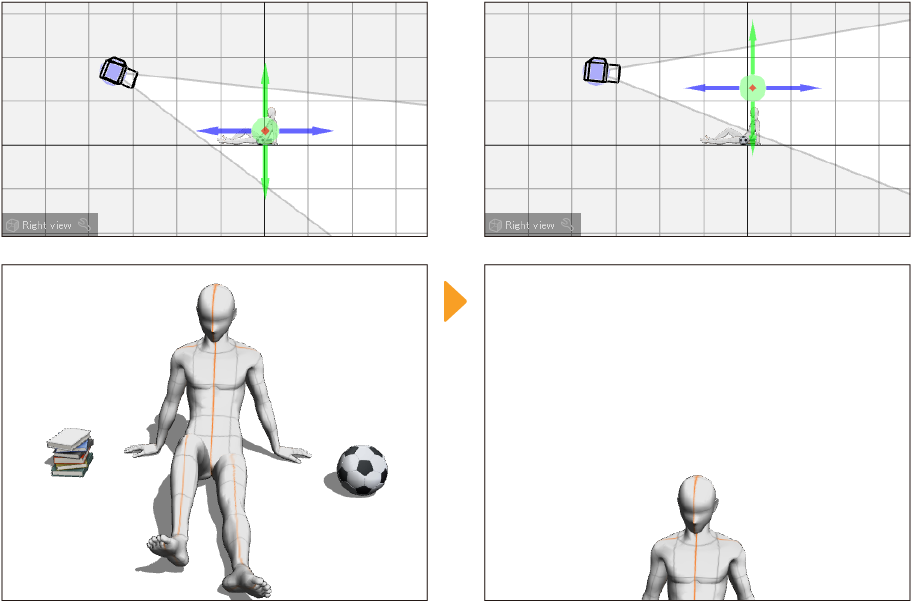
When you move the focal point, the Focal Point Position value on the Sub Tool Detail palette will change accordingly.
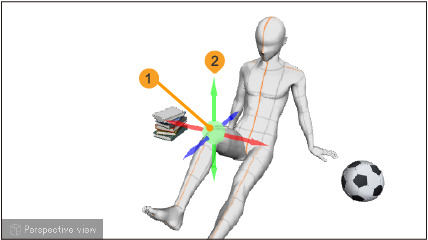
(1)Focal point indicator
When dragged, the focal point moves in the dragged direction.
(2)Move forward/back, left/right, or up/down
Drag in the direction of the red, green, or blue arrows to move the focal point. This changes the X, Y, and Z values of the Focal point position setting in the Tool Property palette.
Memo | For details on the focal point settings in the Tool Property and Sub Tool Detail palettes, see "Camera". |