Filters
You can use filters in Clip Studio Paint to apply various effects to a selected raster layer. Filters are broadly categorized into "Blur", "Sharpen", "Effect", "Distort", and "Correction" categories.
You can use "Quick Filters" and "Quick Effects" to apply filters to a selected layer or over all displayed layers.
·You can create a selection area to limit the effect of the filter to only that area.
·Depending on the expression color of the selected raster layer, it may not be possible to apply certain filters.
·You cannot use filters if you are selecting multiple layers.
Quick Filters
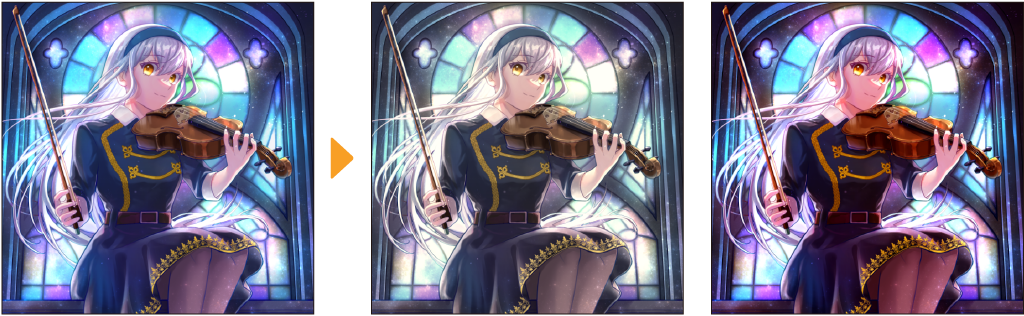
Quick Filters adjust the colors of the image on the canvas. You can use Quick Filters from the Filter menu > Quick Filters dialog.
Apply to selected layer
Select the Filter menu > Quick Filters > Apply to selected layer to apply the filter only to the selected layer. Quick Filters can only be applied to raster layers with the expression color set to Color. In other cases, the following will happen.
·If you are selecting a layer type other than raster, a message will appear asking if you wish to rasterize the layer. After the layer is rasterized, you can apply Quick Filters.
·If the expression color is set to Gray or Monochrome, a message will appear asking you to confirm the change of expression color to Color. If you change the expression color, you can apply Quick Filters.
·If you are selecting a layer mask or selection layer, you cannot select a Quick Filter in the dialog. You can adjust some of the settings.
Apply to all
Select the Filter menu > Quick Filters > Apply to all (create merged layer) to apply the filter to all layers visible on the canvas. After you confirm the chosen filter and settings, a new merged copy of all layers will be added to the top of the Layer palette with the filter applied. The existing layers will remain unchanged.
Quick Filters dialog
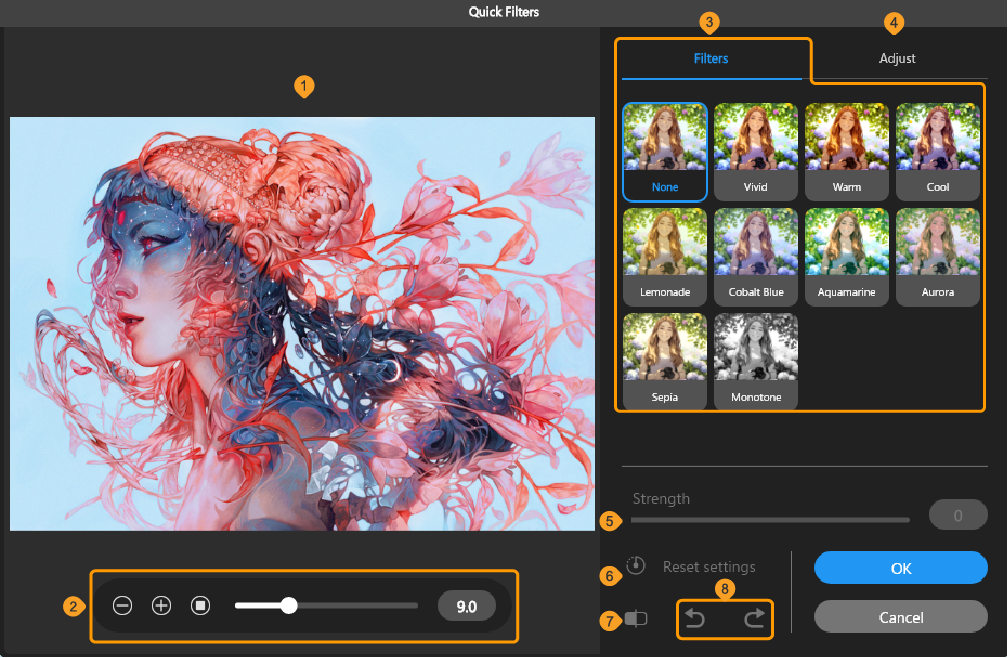
(1)Image preview
Previews the effect of the selected filter.
(2)Preview editor
Use the buttons and slider to adjust the zoom of the preview. On tablets, you can also use touch gestures to zoom in or out of the preview.
(3)Filter gallery
The filter list is shown here with thumbnails. You can select the following filters: Vivid, Warm, Cool, Lemonade, Cobalt Blue, Aquamarine, Aurora, Sepia, and Monotone. Select a filter thumbnail to preview the result and adjust the settings.
Memo | If you cannot see all the filters, you can scroll to view more or use three-line grip at the bottom of the thumbnails to extend the thumbnail area. |
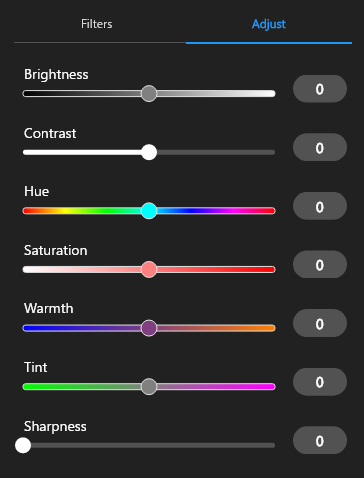
(4) Adjust
Tap Adjust to see a list of detailed color settings for the selected filter. You can use the sliders to adjust the various settings relative to the selected filter.
(5)Strength
Use the slider or enter a value to adjust the strength of the filter. When the value is higher, the filter effect will be stronger.

(6)Reset settings
Tap to reset the Adjust and Strength settings to default.
(7)Preview on/off
Use the toggle to compare the original image and the filter preview.
(8)Undo/Redo
Quick Effects
Quick Effects add effects like blur, chromatic aberration, and noise to an image on the canvas. You can use Quick Effects from the Filter menu > Quick Effects dialog.
Apply to selected layer
Select the Filter menu > Quick Effects > Apply to selected layer to apply the filter only to the selected layer. Quick Effects can only be applied to raster layers with the expression color set to Color. In other cases, the following will happen.
·If you are selecting a layer type other than raster, a message will appear asking if you wish to rasterize the layer. After the layer is rasterized, you can apply Quick Effects.
·If the expression color is set to Gray or Monochrome, a message will appear asking you to confirm the change of expression color to Color. If you change the expression color, you can apply Quick Effects.
·If you are selecting a layer mask or selection layer, you can only apply some effects.
Apply to all
Select the Filter menu > Quick Effects > Apply to all (create merged layer) to apply the filter to all layers visible on the canvas. After you confirm the chosen filter and settings, a new merged copy of all layers will be added to the top of the Layer palette with the filter applied. The existing layers will remain unchanged.
Quick Effects dialog
Settings for the image preview are the same as the "Quick Filters dialog".
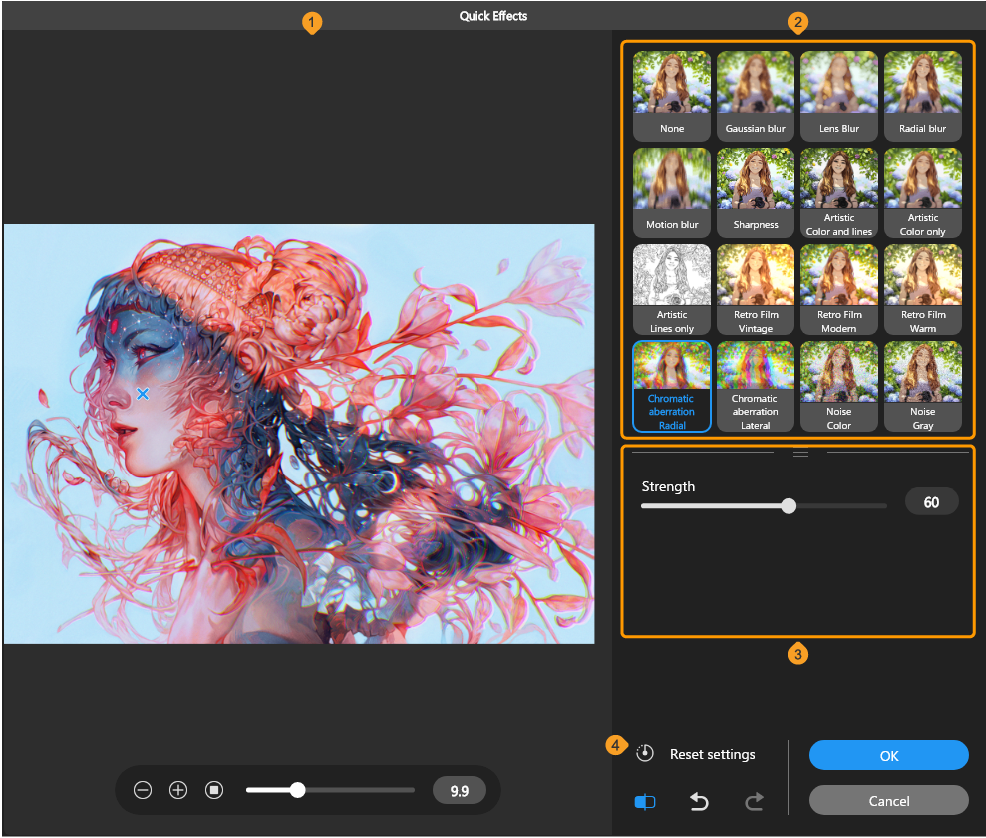
(1)Image preview
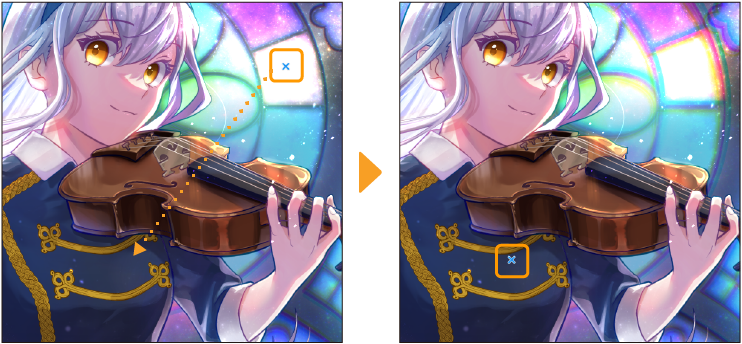
Previews the selected effect. When using Radial blur, Retro film: Vintage, Retro film: Modern, Retro film: Warm, or Chromatic aberration: Radial, you can move the center of the effect by dragging the cross.
(2)Effect gallery
The effect list is shown here with thumbnails. You can select the following effects: Blur, Sharpness, Artistic, Retro film, Chromatic aberration, Noise, and Extract lines. When you select an effect, the settings will appear below the thumbnails.
Memo | If you cannot see all the filters, you can scroll to view more or use three-line grip at the bottom of the thumbnails to extend the thumbnail area. |
(3)Settings
When an effect is selected, its settings are shown here. The settings are the same as when you select the same filter type from the Filter menu commands.
Gaussian blur | See "Gaussian blur". |
Lens blur | See "Lens blur". |
Radial blur | See "Radial blur". |
Motion blur | See "Motion blur". |
Sharpness | You can adjust the strength of the effect. When the value is higher, the image will be sharper. |
Artistic: Colors and lines | You can adjust the strength of the effect. For other settings, see "Artistic" when set to Color and lines. |
Artistic: Color only | You can adjust the strength of the effect. For other settings, see "Artistic" when set to Color only. |
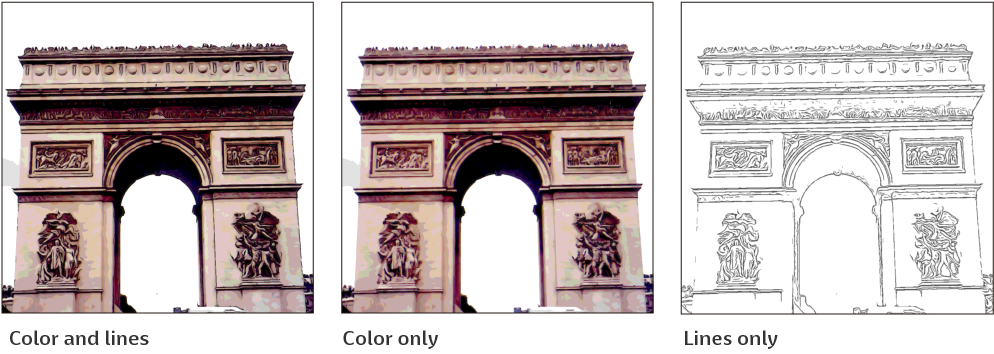
Artistic: Lines only | See "Artistic" when set to Lines only. |
Retro film: Vintage | You can adjust the strength of the effect. For other settings, see "Retro film" when set to the Vintage preset. |
Retro film: Modern | You can adjust the strength of the effect. For other settings, see "Retro film" when set to the Modern preset. |
Retro film: Warm | You can adjust the strength of the effect. For other settings, see "Retro film" when set to the Warm preset. |
Chromatic aberration: Radial | You can adjust the strength of the effect. For other settings, see "Chromatic aberration" when set to Radial. |
Chromatic aberration: Lateral | You can adjust the strength of the effect. For other settings, see "Chromatic aberration" when set to Lateral. |
Noise: Color | You can adjust the strength of the effect. This effect is the same as the "Noise" filter with the Color mode set to Color. |
Noise: Gray | You can adjust the strength of the effect. This effect is the same as the "Noise" filter with the Color mode set to Gray. |
Extract lines | You can adjust the strength of the effect. When the value is lower, small lines will not be extracted. |
(4)Reset Settings
Tap to reset the effect settings to default.
Blur
These filters blur the image on gray and color raster layers. To use them, select the relevant layer and tap Filter > Blur.
Blur and Blur (Strong)
These filters calculate the average colors around borders and sharp edges to make the image smoothly blurred.
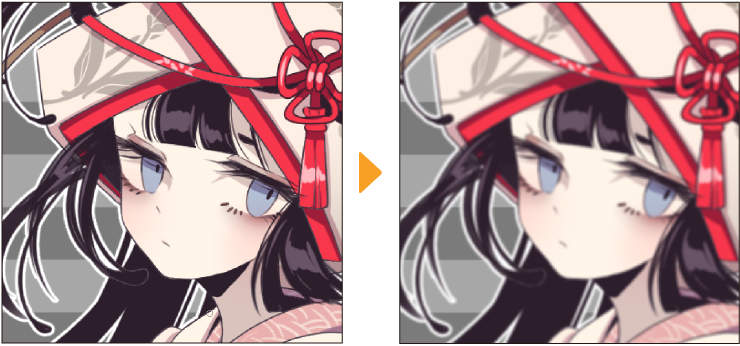
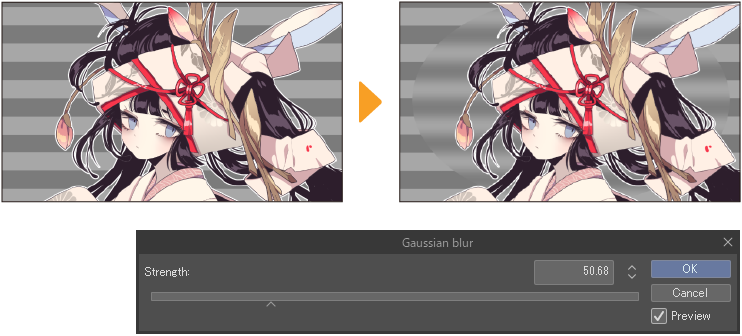
Gaussian blur
The Gaussian blur filter converts borders and sharp edges to make the image smoothly blurred. You can adjust the strength and preview the effect from the Gaussian blur dialog.
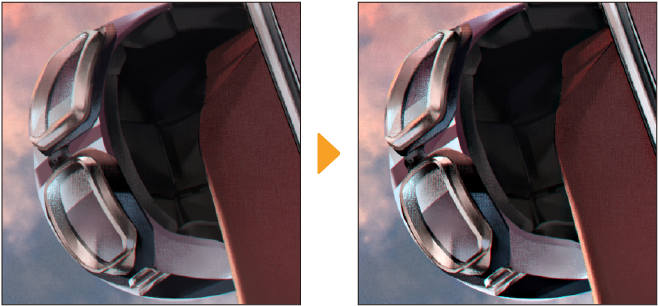
Lens blur
The Lens blur filter creates a blurred effect like photos taken with a camera lens. You can adjust and preview the effect from the Lens blur dialog.
Strength
Sets the strength of the lens blur.
Highlight shape
Choose the shape of the highlight blur, from Triangle, Square, Pentagon, Hexagon, Heptagon, or Octagon.
Highlight intensity
Brightens the highlighted pixels. When the value is higher, the highlight pixels become lighter.
Highlight roundness
Adjusts the roundness of the highlight pixels. At the maximum value, the highlights become perfect circles.
Highlight angle
Changes the angle of the highlight shapes.
Smoothing
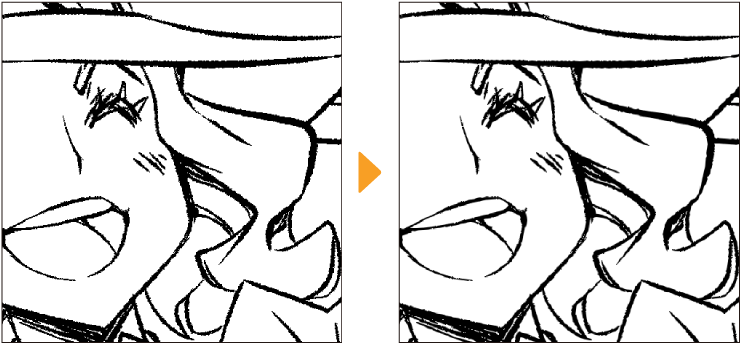
The Smoothing filter applies anti-aliasing to the edges of the outline to make jagged lines less noticeable. Anti-aliasing smooths outlines by adding intermediate colors at the boundaries between colors and at the edges of images.
Radial blur
The Radial blur filter blurs the image by smoothing and averaging it in a radial pattern. Selecting it displays the Radial Blur dialog and a red x mark on the canvas that shows the center of the effect. Drag the x mark to change its position.
You can adjust the following settings and preview the effects from the Radial blur dialog.
Strength
Sets the strength of the blur.
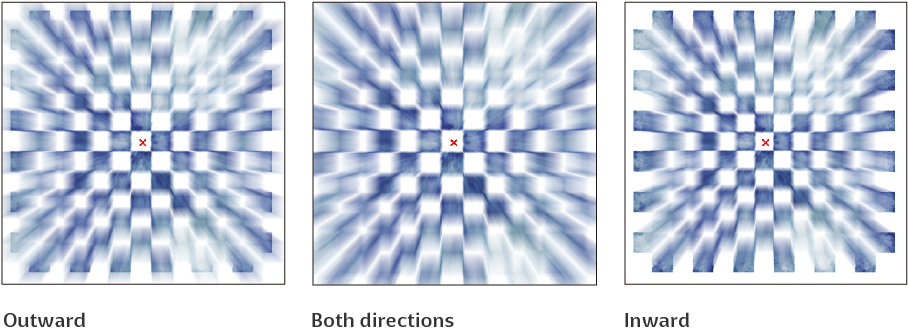
Direction
Sets the direction of the blur from Both directions, Outward, or Inward.
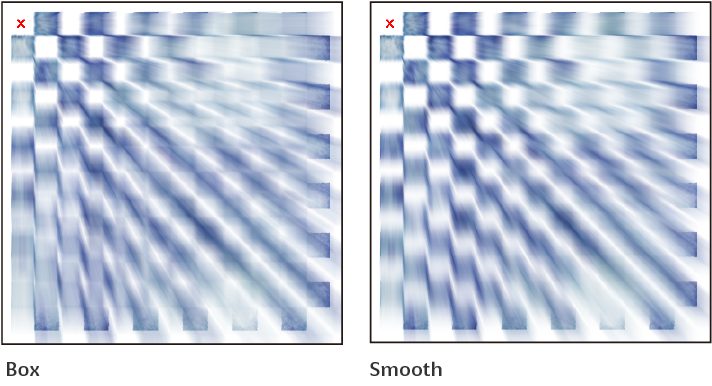
Mode
Sets the mode from Box or Smooth. Box will average the values of each pixel and its surrounding pixels. Smooth will assign more weight to central pixels and average the values of pixels.
Preview
Shows a preview of the results on the canvas.
Motion blur
The Motion blur filter smooths an image by averaging the border lines and sharp areas of the image in a given direction.
You can adjust and preview the effect from the Motion blur dialog.
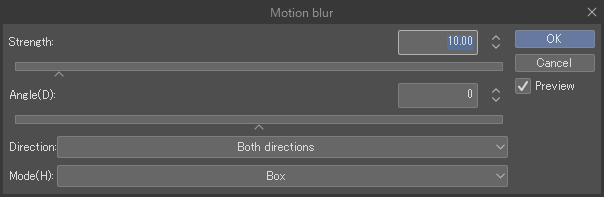
Strength
Sets the strength of the blur.
Angle
Sets the angle of the blur.
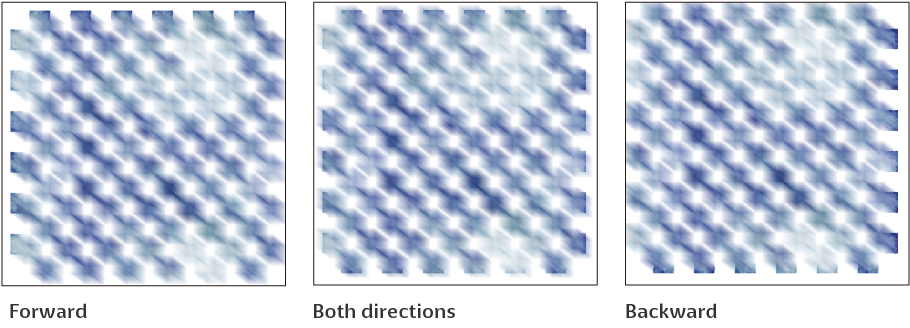
Direction to blur
Sets the direction to blur from Both directions, Forward, and Backward.
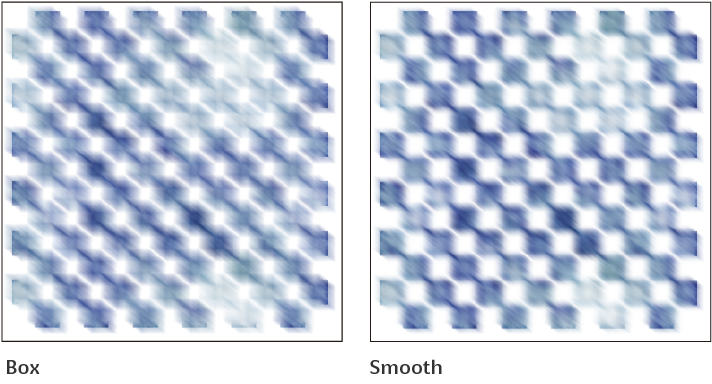
Mode
Sets the mode from Box or Smooth. Box will average the values of each pixel and its surrounding pixels. Smooth will assign more weight to central pixels and average the values of pixels.
Preview
Turn this on to preview the results on the canvas.
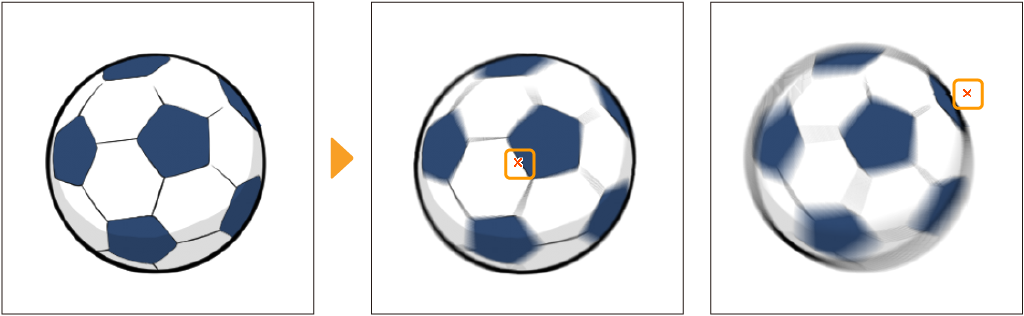
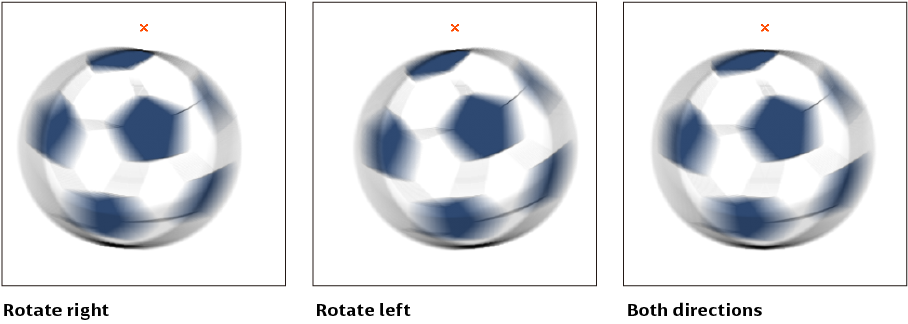
Spin blur
The Spin blur filter smooths an image by rotating it circularly in a given direction. Selecting this filter opens the Spin blur dialog and a red x mark on the canvas that shows the center of the effect. Drag the x mark to change its position.
You can adjust and preview the effect from the Spin blur dialog.
Strength
Sets the strength of the blur.
Direction
Sets the direction to blur from Both directions, Rotate right, or Rotate left.
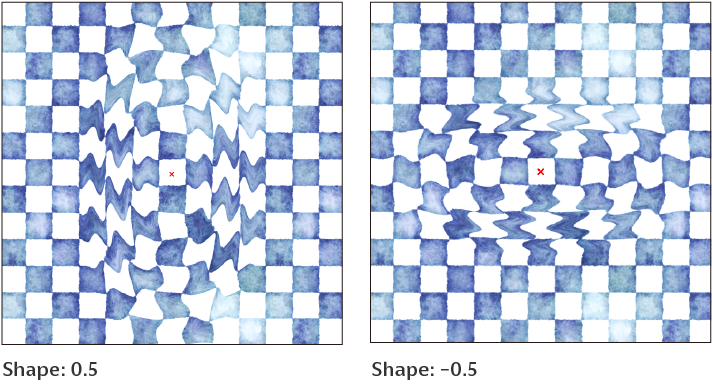
Shape
Adjusts the vertical and horizontal proportion of the spin blue area. When set to 1.0, the blur area will be a perfect circle. Higher values make the ellipse vertically longer, while lower values make the ellipse horizontally longer.
Tilt
When the ellipse is not a perfect circle, you can set the angle of the blur area.
Sharpen
The Sharpen filters sharpen images on gray and color raster layers. To use them, select the layer you want to apply the filter to, and tap Filter > Sharpen.
Unsharp mask
This filter sharpens images by enhancing the contrast at the image borders. You can set the strength and threshold value of the effect by specifying numerical values.
You can adjust and preview the effect from the Unsharp mask dialog.
Radius
Sets the size of the effect.
Strength
Sets the strength of the effect.
Threshold
Sets a minimum level of difference in values between adjacent areas to be recognized as different colors. A higher value detects fewer borders between colors.
Preview
Shows a preview of the results on the canvas.
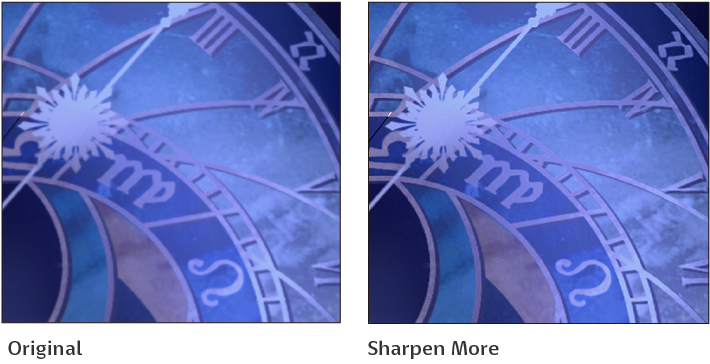
Sharpen and Sharpen More
The Sharpen and Sharpen More filters sharpen images by enhancing the contrast between separate parts. The Sharpen More filter has a stronger effect.
Effect
These filters apply special effects to an image on gray and color raster layers. To use these filters, select the layer you want to apply the filter to, and tap Filter > Effect.
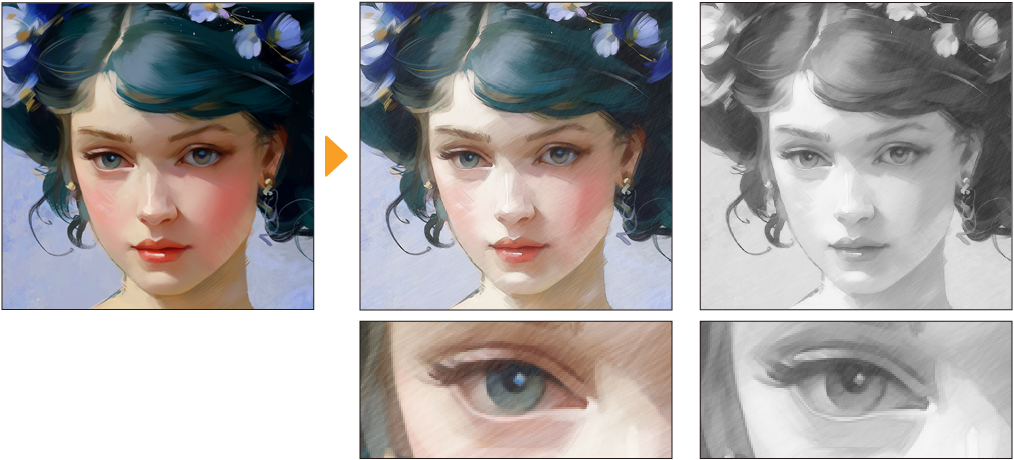
Artistic
This applies the Artistic filter to the selected layer. You can give your images a brushstroke-like texture or extract lineart.
The Artistic filter can only be used on color raster layers.
You can adjust the following settings and preview the effect from the Artistic dialog.
Process
Sets the process of the filter. You can select from Color and lines, Color only, or Lines only.
Line width
Sets the thickness of the extracted lines. If Process > Color Only is selected, this setting will not be applied.
Line simplicity
The larger the value, the more the lines connect. If Process > Color Only is selected, this setting will not be applied.
Line density
The larger the value, the more of the line that is extracted. If Process > Color Only is selected, this setting will not be applied.
Line opacity
Sets the opacity of the lines. If Process > Color Only is selected, this setting will not be applied.
Line anti-aliasing
The larger the value, the stronger the anti-aliasing resulting in smoother lines. If Process > Color Only is selected, this setting will not be applied.
Color blending
Blurs the images without adjusting the boundaries of the colors. The larger the value, the stronger the blur effect. If Process > Lines Only is selected, this setting will not be applied.
Color blur
Sets the blur range. The larger the value, the stronger the blur effect. If Process > Lines Only is selected, this setting will not be applied.
Number of colors
Sets the number of colors. The larger the value, the more colors used to make up the gradients. If Process > Lines Only is selected, this setting will not be applied.
Preview
Shows a preview of the results on the canvas.
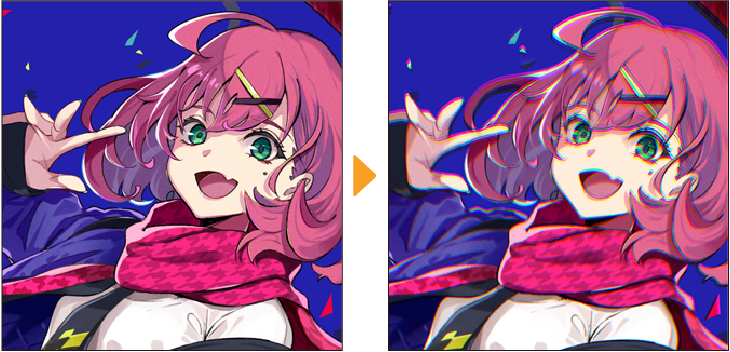
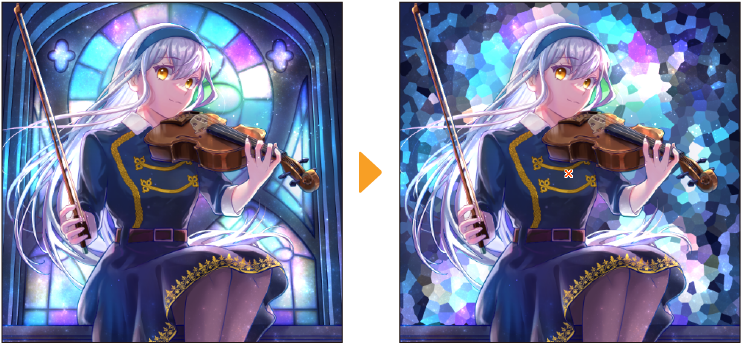
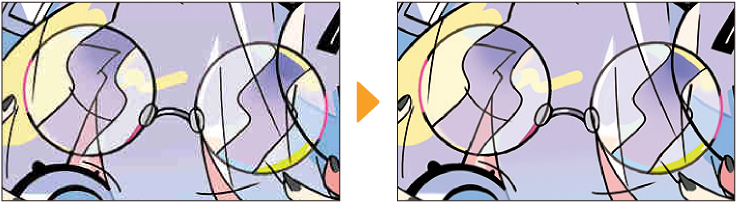
Chromatic aberration
The Chromatic aberration filter creates a color shift effect on the selected layer. You can adjust the direction of the color shift and the intensity of the effect.
You can adjust the following settings and preview the effect from the Chromatic aberration dialog.
Mode
You can adjust the type of color shift. When set to Radial, the colors will shift from the center point shown with a x on the canvas. You can move the center point by dragging it on the canvas. When set to Lateral, you can use the Angle setting to adjust the angle of the effect.
Intensity
Adjusts how intense the color shift effect is.
Angle
When the Mode is set to Lateral, you can change the angle of the chromatic aberration effect.
Preview
Shows a preview of the results on the canvas.
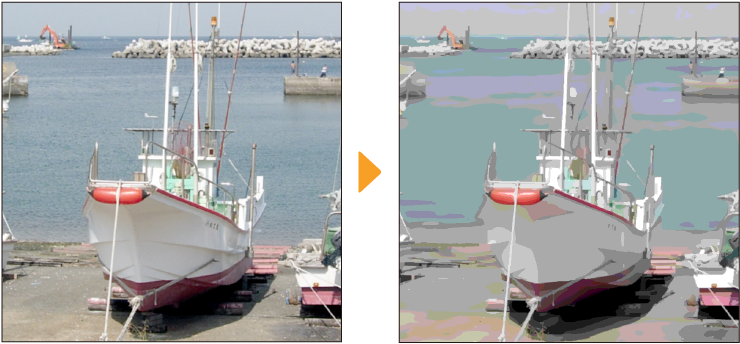
Crystallize
The Crystallize filter creates a random mosaic effect like a crystal or gemstone. You can adjust the mosaic size and the randomness.
You can adjust the following settings and preview the effect from the Crystallize dialog.
Cell size
You can adjust the size of the crystal cells. A larger value will result in larger color blocks.
Randomness
Adjusts how random the cell shapes are. When the value is set to 0, the patten will be a perfect grid.
Tiling
Turn this on if you want to use the crystallized image as a texture. When turned on, the edges of the crystal pattern will be adjusted so that it can be tiled seamlessly.
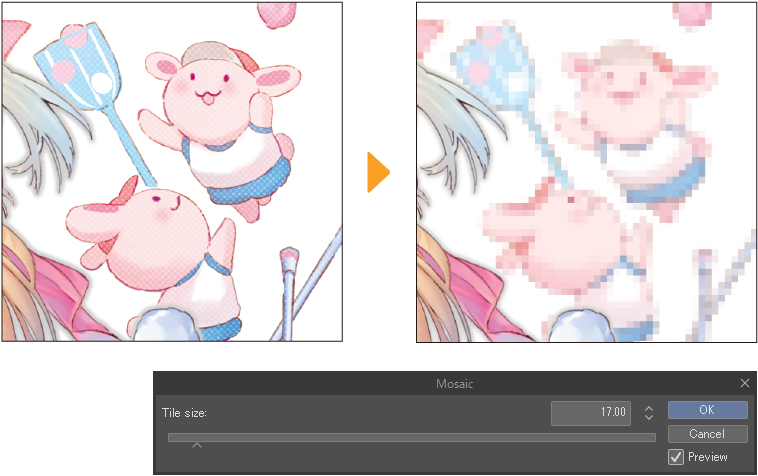
Mosaic
The Mosaic filter pixelates an image. You can adjust and preview the effect with the Tile size slider in the Mosaic dialog.
Noise
The Noise filter adds a noise effect like an old photo or film.
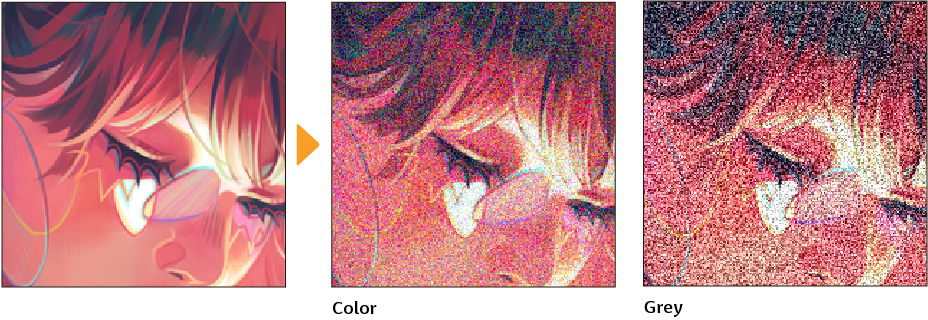
You can adjust the following settings and preview the effect from the Noise dialog.
Color Mode
Select the color of the noise pixels.Color adds RGB noise to the image, and Grey adds black and white noise.
Noise strength
Adjust the size of the noise.
Preview
Shows a preview of the results on the canvas.
Normal map
The Normal map filter converts the image to a normal map for textures.
A normal map is a technique that creates the impression of depth on the surface of a 3D model. You can apply the converted normal map to a 3D primitive to add detailed texture effects.For details, see "Setting up a normal map texture". The normal map texture can also be used in other 3D modeling software.

You can adjust the following settings from the Normal map dialog.
Strength
Adjusts the size of the Z axis. As the value gets higher, the XY axes become diluted, and the angles become sharper.
Y orientation
You can set the Y orientation to Y up (Clip Studio 3D standard format) or Y down. Y up is compatible with OpenGL format and Y down is compatible with DirectX format.
Preview
Shows a preview of the results on the canvas.
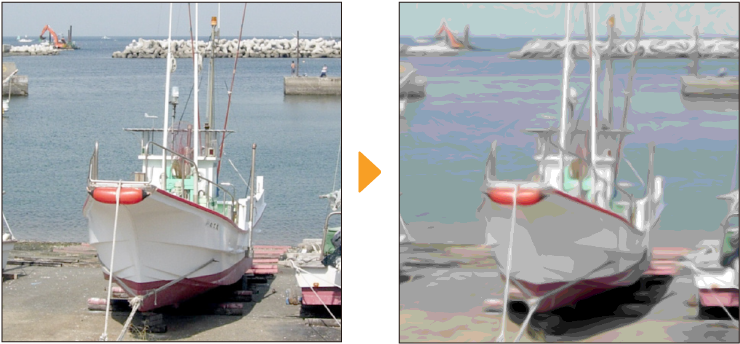
Pencil drawing
The Pencil drawing filter creates outlines and hatching as if the image was drawn with a pencil.
You can adjust the following settings for the hatching effect and preview the results from the Pencil drawing dialog.
Show outline
Turn on to add an outline like a pencil drawing.
Show hatching
Turn on to add horizontal hatching in a pencil texture. This applies hatching strokes across the entire image.
Hatching size
When Show hatching is turned on, you can change the thickness of each hatched line. A larger value makes the lines thicker.
Hatching roughness
Adjusts the thickness and length of the hatched lines. When the value is higher, the strokes appear more random.
Hatching angle
Change the angle of the hatched lines.
Greyscale output
Convert the image to greyscale like a standard pencil.
Preview
Shows a preview of the results on the canvas.
Remove jpeg noise
This removes the noise that appears when images are saved in JPEG format.
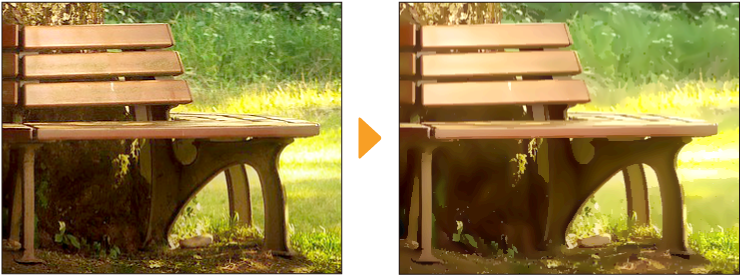
Retro film
This filter adds chromatic aberration, noise, and light effects to the image to make it look like an old photo.
You can adjust the following settings in the Retro film dialog.
Preset
You can select from three presets: Vintage, Modern, and Warm.
·Vintage: Creates a nostalgic atmosphere with a bit of exposure, like from an old camera
·Modern: Creates a move film-like effect by reducing the sepia texture and increasing chromatic aberration
·Warm: Creates a warm effect by adding sepia and light leak, without adding noise or chromatic aberration
Effect
You can select from sepia and light leak effects to give a photo look to your image.
·None: No extra effects.
·Sepia: Adds a sepia tone to the entire image.
·Light leak (slant): Adds an orange gradient from the bottom right corner to the top left corner, like light leak on photo film.
·Light leak (all): Adds an orange gradient from the right to the left across the entire image, like light leak on photo film.
·Sepia + Light leak (slant): Adds both sepia and slanted light leak effect.
·Sepia + Light leak (all): Adds both sepia and light leak across the entire canvas.
Intensity
Similar to the "Chromatic aberration" filter, you can adjust the strength of the chromatic aberration effect. However, the direction of the chromatic aberration effect is only available as radial.You can move the center of the effect by dragging the cross shown on the filter preview.
Noise strength
Adjust the size of the noise. This is the same as the setting in "Noise".
Preview
Shows a preview of the results on the canvas.
Distort
These filters distort images on monochrome, gray, and color raster layers in a variety of ways. To use them, select the layer you want to apply the filter to, and tap any one of the options from Filter > Distort.
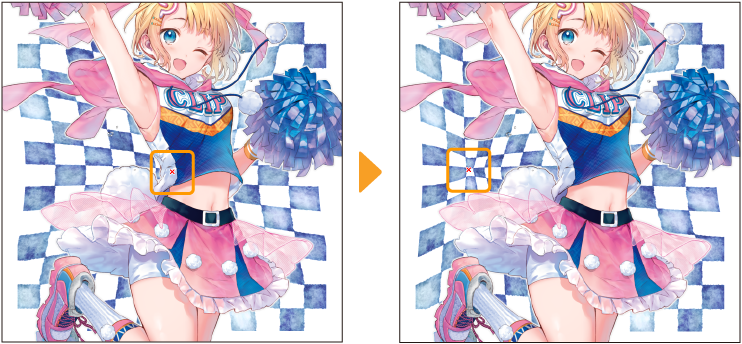
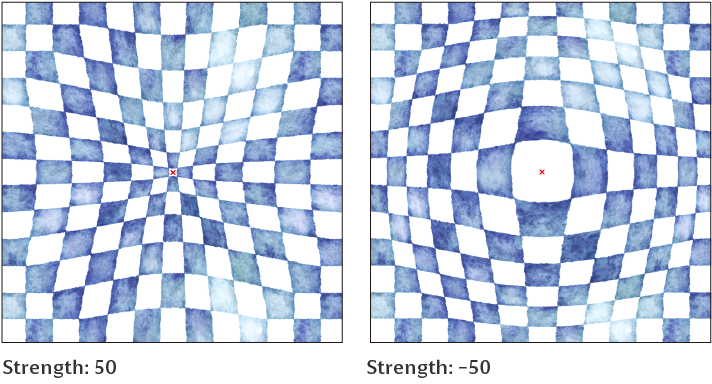
Pinch
This filter distorts images by pinching at the center point of the transformation. Selecting it displays the Pinch dialog and a red x mark on the canvas that shows the center of the effect.Drag to change its position.
You can adjust the following settings and preview the effect from the Pinch dialog.
Strength
Sets the degree of pinching to apply to the image. A positive value will pinch the image toward the center and a negative value will pinch the image away from the center.
Area
Selects the range in which to apply the transformation effect to the entire image. You can choose from Entire selection or Specify area (use Radius and Shape). Specify area (use Radius and Shape) will determine the range and vertical/horizontal ratio of the effect using the Radius and Shape settings.
Radius
Sets the range of the image distortion.
Shape
Sets the vertical/horizontal ratio of the area to distort the image. Set a positive value to make the transformation range narrower horizontally and a negative value to make the transformation range narrower vertically.
Preview
Shows a preview of the results on the canvas.
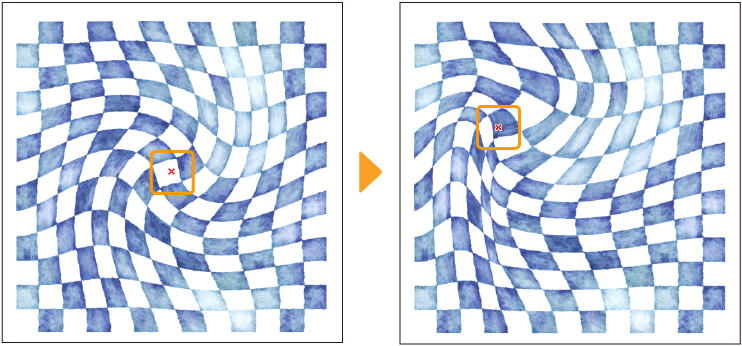
Ripple
This filter distorts the image by rotating from the center point of the transformation. Selecting it displays the Ripple dialog and a red x mark on the canvas that shows the center of the effect.Drag this to set the center of the effect.
You can adjust the following settings and preview the effect from the Ripple dialog.
Rotation
Transforms the image by rotating from the center point of the transformation.
Number of waves
Sets the number of waves that will be created.
Area
Selects the range in which to apply the transformation effect to the entire image. You can choose from Entire selection or Specify area (use Radius and Shape). Specify area (use Radius and Shape) will determine the range and vertical/horizontal ratio of the effect using the Radius and Shape settings.
Radius
Sets the range of the image distortion.
Shape
Sets the vertical/horizontal ratio of the area to distort the image. Set a positive value to make the transformation range narrower horizontally and a negative value to make the transformation range narrower vertically.
Preview
Previews the results on the canvas.
Curved surface
This filter distorts images by making them appear as if they are reflected on a cylindrical or spherical surface. Selecting it displays the Curved surface dialog and a red x mark on the canvas that shows the center of the effect.Drag this to move the center of the effect.
You can adjust the following settings and preview the effect from the Curved surface dialog.
Strength
Sets the degree to which to transform the image. A positive value distorts the image to the foreground and a negative value distorts the image to the background.
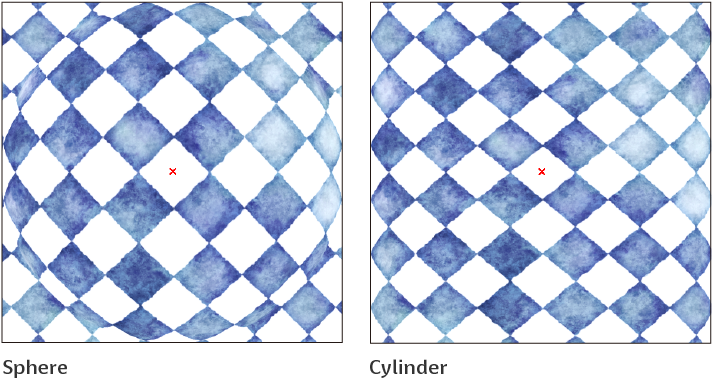
Method
Sets the type of curved face to apply to the image. You can select from Cylinder or Sphere.
Angle
Sets the angle when set to Cylinder.
Area
Selects the range in which to apply the transformation effect to the entire image. You can choose from Entire selection or Specify area (use Radius and Shape). Specify area (use Radius and Shape) will determine the range and vertical/horizontal ratio of the effect using the Radius and Shape settings.
Radius
Sets the range of the image distortion.
Shape
Sets the vertical/horizontal ratio of the area to distort the image. Set a positive value to make the transformation range narrower horizontally and a negative value to make the transformation range narrower vertically.
Preview
Turn this on to preview the results on the canvas.
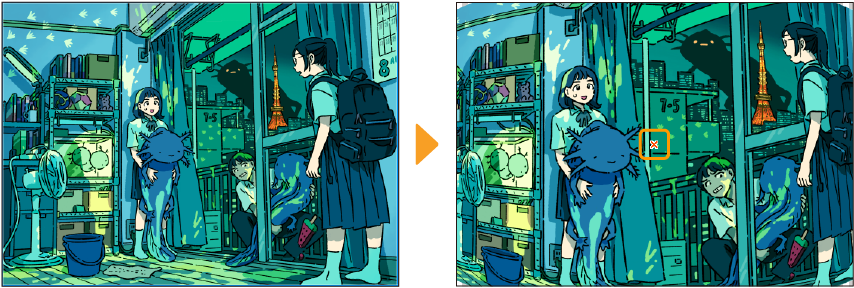
Convert to Panorama
This filter distorts images by transforming into a panoramic-style image, as if captured with a 360-degree camera.
Selecting this filter opens the Convert to Panorama dialog and a red x mark on the canvas that shows the center of the effect. Drag to change its position.
You can adjust the following settings and preview the effect from the Convert to Panorama dialog.
Distortion
You can set the strength of the distortion. The higher the value, the stronger the effect.
Angle
You can specify the angle of the central axis through the center of the effect. When set to 0, the central axis is perpendicular to the canvas.Straight lines parallel to the central axis will remain straight after applying the effect.
Scale ratio
You can set the magnification of the image. The larger the Distortion setting, the more likely that gaps may appear at the edges of the image.By enlarging the image, these gaps at the edges of the image can be made less noticeable.
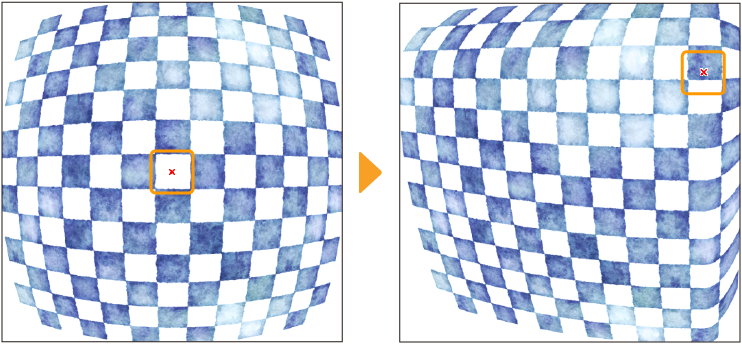
Geometric Distortion
This filter warps images by making them appear as though they are curving inwards or outwards.
Selecting this filter opens the Geometric Distortion dialog and a red x mark on the canvas that shows the center of the effect. Drag to change its position.
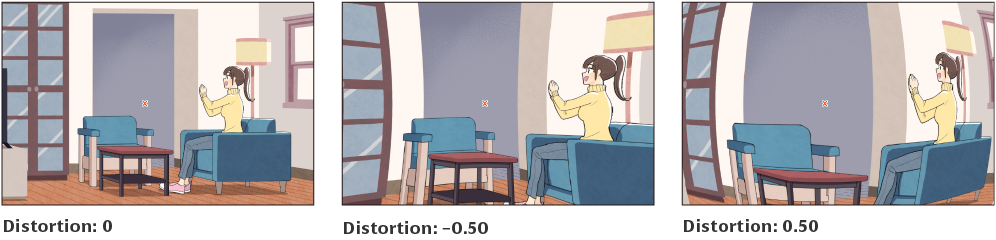
You can adjust the following settings and preview the effect from the Geometric Distortion dialog.
Distortion
You can set the strength of the distortion. Negative values distort the image inwards, and positive values distort the image outwards.The further the value is from 0, the stronger the effect.
Scale ratio
You can set the magnification of the image. The larger the Distortion setting, the more likely that gaps may appear at the edges of the image.By enlarging the image, these gaps at the edges of the image can be made less noticeable.
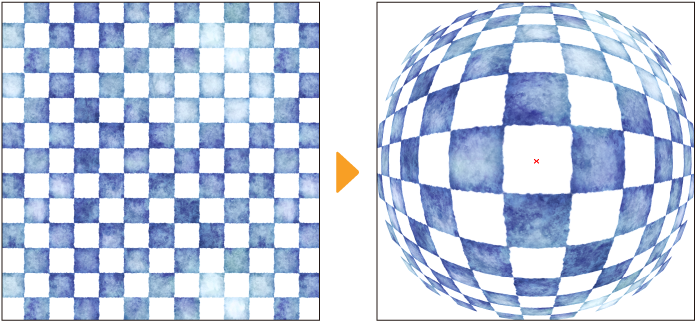
Polar coordinates
This distorts the image by converting the image coordinates to polar coordinates or rectangular coordinates.
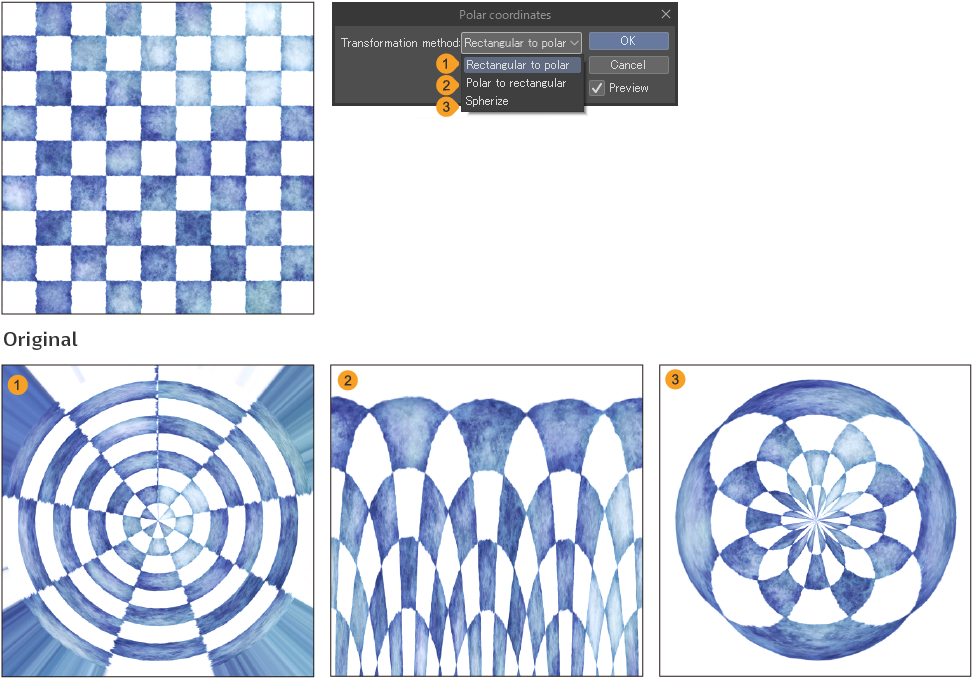
You can adjust and preview the effect from the Polar coordinates dialog.
The available options under Transformation Method are as follows:
·Rectangular to polar: Converts the coordinates of the image from rectangular coordinates (all axes form a rectangle) to polar coordinates.
·Polar to rectangular: Converts the coordinates of the image from polar coordinates (graph indicated by radii and angles) to rectangular coordinates.
·Spherize: Transforms the image by making it appear as if it is projected on a spherical surface.
ZigZag
Transforms images into a wave-like oscillating pattern.
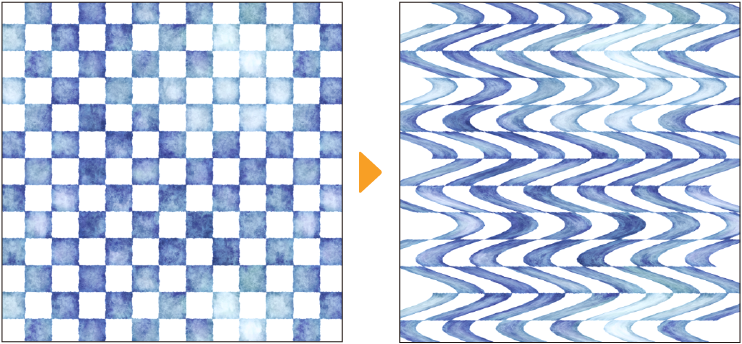
You can adjust the following settings and preview the effect from the ZigZag dialog.
Angle
Specifies the angle of the waves.
Wave height
Sets the height of the waves.
Number of waves
Sets the number of waves.
Preview
Turn this on to preview the results on the canvas.
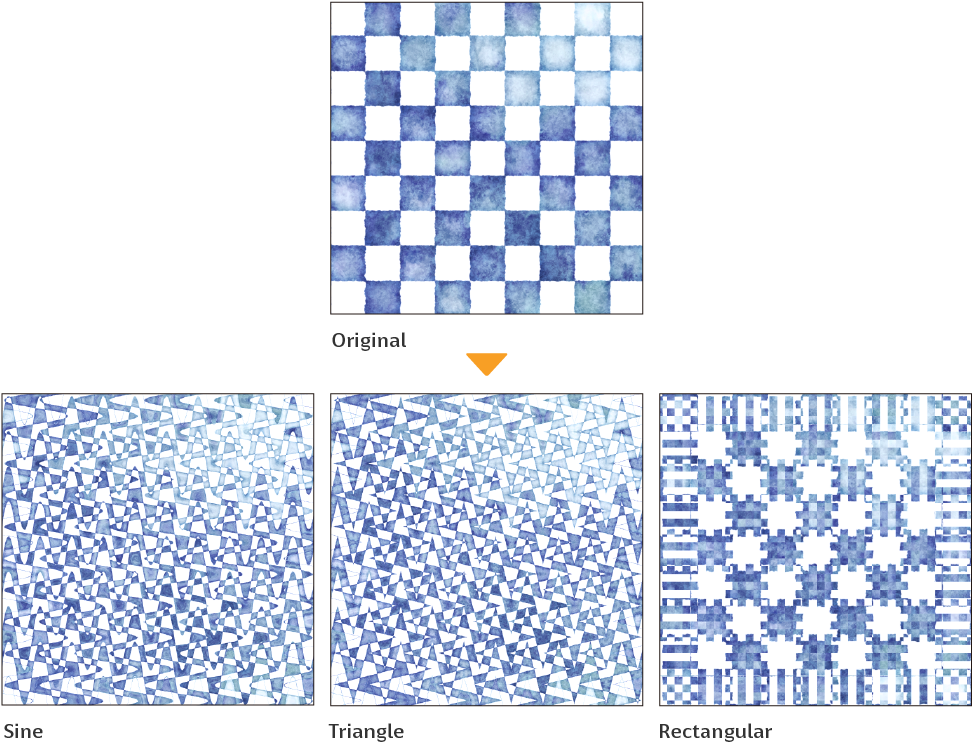
Wave
This distorts the image by converting the image coordinates into a wave shape.
You can adjust the following settings and preview the effect from the Wave dialog.
Shape
Sets the method to distort the image.
·Sine: Converts the coordinates of the image to a sine wave (a wave with a cyclic transformation).
·Triangle: Converts the coordinates of the image to a triangular wave.
·Rectangular: Converts the coordinates of the image to a rectangular wave.
Number of waves
Sets the number of waves.
Wavelength (Minimum)
Sets the minimum distance between the highest points of the waves.
Wavelength (Maximum)
Sets the maximum distance between the highest points of the waves.
Amplitude (Minimum)
Sets the minimum amplitude of the wave shape.
Amplitude (Maximum)
Sets the maximum amplitude of the wave shape.
Horizontal ratio
Sets the horizontal ratio of the amplitude.
Vertical ratio
Sets the vertical ratio of the amplitude.
Undefined areas
Selects the process for the area of the image that is outside the wave area.
·Wrap around: Fills the edges of the image using the image on the opposite edge.
·Repeat edge pixels: Fills the edges of the image with the drawing color.
Regenerate
Regenerates the wave shape by selecting random values between the minimum and maximum values for Wavelength and Amplitude.
Preview
Turn this on to preview the results on the canvas.
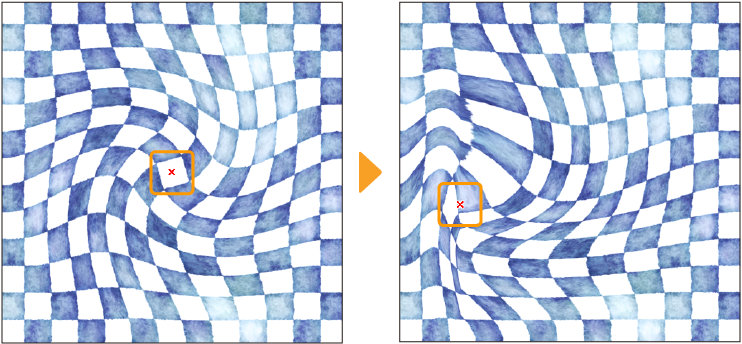
Twirl
This filter transforms images by creating a twirl effect. Selecting it displays the Twirl dialog and a red x mark on the canvas that shows the center of the effect.Drag this to change its position.
You can adjust the following settings and preview the effect from the Twirl dialog.
Twist
Set the rotation angle for twisting the image.
Tension
Set the strength with which the image is pulled.
Area
Selects the range in which to apply the transformation effect to the entire image. You can choose from Entire selection or Specify area (use Radius and Shape). Specify area (use Radius and Shape) will specify the range and vertical/horizontal ratio of the transformation effect using the Radius and Shape settings.
Radius
Set the range of the image distortion.
Shape
Set the vertical/horizontal ratio of the area to distort the image.
Set a positive value to make the transformation range narrower horizontally. Set a negative value to make the transformation range narrower vertically.
Preview
Turn this on to preview the results on the canvas.
Fisheye lens
This filter distorts images by making them appear as if they are viewed through a fisheye lens.
Selecting it displays the Fisheye lens dialog and a red x mark on the canvas that shows the center of the effect. Drag this to change its position.
You can adjust the following settings and preview the effect from the Fisheye lens dialog. The area outside the "lens" is transparent.
Distortion
Set the distortion size of the lens. The larger the value, the further forward the center of the lens will appear.
Area
Selects the range in which to apply the transformation effect to the entire image. You can choose from Entire selection or Specify area (use Radius and Shape. Specify area (use Radius and Shape) will specify the range and vertical/horizontal ratio of the transformation effect using the Radius and Shape settings.
Radius
Set the range of the image distortion.
Shape
Set the vertical/horizontal ratio of the area to distort the image. Set a positive value to make the transformation range narrower horizontally.Set a negative value to make the transformation range narrower vertically.
Preview
Turn this on to preview the results on the canvas.
Perlin noise
The Render > Perlin noise filter creates a cloud-like pattern on the selected layer gray or color raster layer. You can also change the blending mode or opacity to use the created layer as a texture.
To use it, select the layer you want to apply the filter to, and tap Filter menu > Render > Perlin noise.
Important | When applying the Perlin noise filter, the effect is applied regardless of the content on the selected layer. Please use an empty layer for this filter. |

You can adjust the following settings and preview the effect from the Perlin noise dialog.
Scale
Sets the size of the effect. The larger the value, the larger the size of the pattern.
Amplitude
Sets the amplitude of the pattern. The larger the value, the higher the contrast of the pattern.
Attenuation
The larger the value, the rougher the pattern.
Repetition
The larger the value, the weaker the blur.
Offset X
Sets the starting position (horizontal axis) of the pattern.
Offset Y
Sets the starting position (vertical axis) of the pattern.
Preview
Shows a preview of the results on the canvas.
Correction
These filters are for correcting drawing lines on monochrome, gray, and color raster layers. Select the layer you want to apply the filter to and tap Filter > Correction.
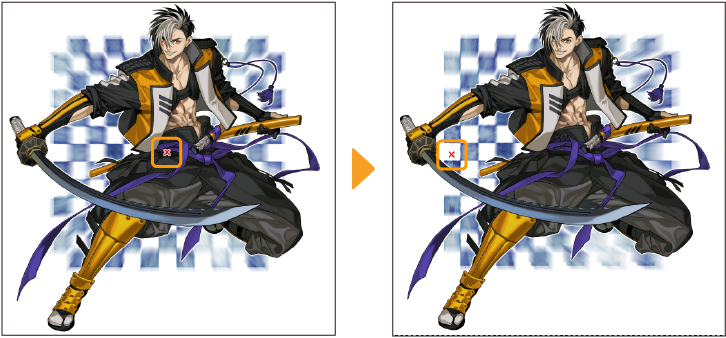
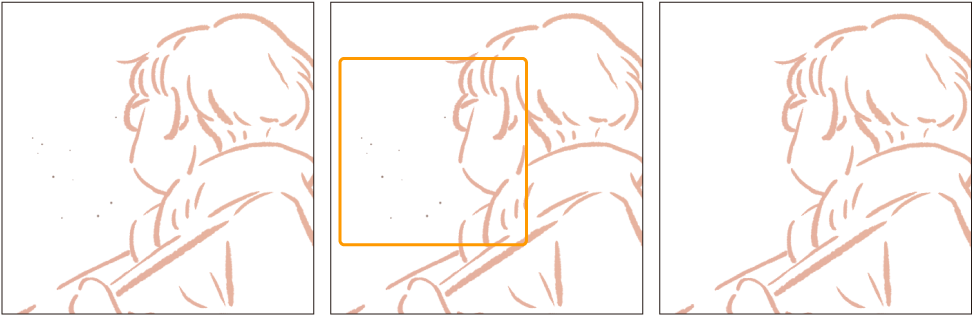
Remove dust
This automatically detects and erases dust of a specified size or smaller and fills it in with the surrounding color.
You can adjust the following settings and preview the effect from the Remove dust dialog.
Dust size
Specifies the maximum size for an object to be recognized as dust.
Mode
Describes how dust will be detected and removed. You can select from the following:
·Remove dust from transparency: Small opaque or semi-opaque spots surrounded by transparency are recognized as dust. Dust is replaced with transparency.
·Remove dust from white background: Small non-white spots surrounded by white are recognized as dust. Dust is replaced with white.
·Fill transparent gaps with surrounding colors: Small transparent or semi-transparent spots in opaque areas are recognized as dust. Dust is replaced with the main surrounding color.
·Fill transparent gaps with foreground color: Small transparent or semi-transparent spots in opaque areas are recognized as dust. Dust is replaced with the current drawing color.
Preview
Shows a preview of the results on the canvas.
Memo | You can also remove dust with the Remove dust tool. See "Remove dust" for more information. |
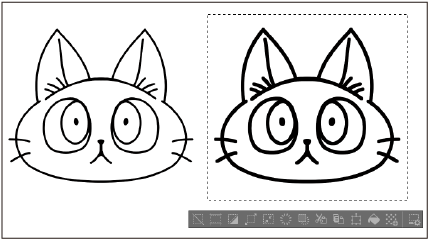
Adjust line width
Adjusts the width of lines drawn on transparent parts of a raster layer.
You can adjust the following settings and preview the effect from the Adjust line width dialog.
Process
Sets how the width will be adjusted. You can select from Narrow or Thicken.
Scale
Allows you to set the degree to which to correct the line width.
At least 1 pixel
Leaves the central one-pixel line when Process is set to Narrow.
Preview
Shows a preview of the results on the canvas.