Creating a New Canvas
You can make canvases for illustrations, webtoons, comics, animation and more from the New dialog box. You can open the New dialog box from File > New, from the New icon on the command bar, or using Ctrl + N if you have a keyboard connected.

Select Your Project Type
From the New dialog box, you can set the project type to Illustration, Webtoon, Comic, Printing of fanzine, Show all comic settings, or Animation.

The available settings will change depending on the project type, as outlined below.
(1)Illustration
Shows settings for creating illustrations suitable for web or print. However, settings for the bleed width for printing are not available. You can also make animated gifs and stickers for social media platforms.
(2)Webtoon
Shows settings for webtoons (vertical scrolling comics). In EX, you can divide your webtoon into multiple pages.
(3)Comic
Shows settings for creating comics and multi-page projects. You can set the bleed width and resolution as needed for the format you are printing. You can create single pages as well as create multi-page works in EX.
(4)Printing of fanzine (EX only)
Shows settings for creating a fanzine. You can set the bleed width and resolution as needed for the format you are printing.
(5)Show all comic settings
Shows all settings for illustrations and comics. Unlike Illustration, Comic, and Printing of fanzine, this option allows you to customize the settings more, so you can set up anything from a web project to a print project. For example, you can set bleed width for a color illustration or set a lower resolution illustration for web viewing.
(6) Animation
Shows settings for creating an animation. You can adjust settings such as the way of displaying the playback time and the size of the overflow frame. In Clip Studio Paint EX, you can create long animations over 24 frames long.
Memo | You cannot select a project type in Clip Studio Paint DEBUT. For details on the settings available in DEBUT, see "New Dialog Box for Clip Studio Paint DEBUT". |
New dialog box (Illustration)
When you select the Illustration project type, the following settings are available. This includes settings for animated illustrations too.
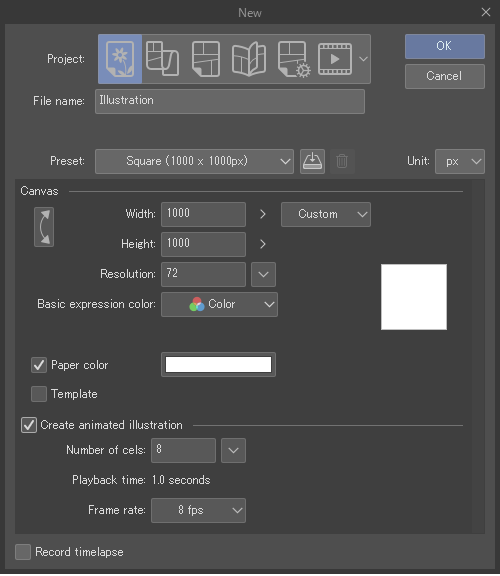
Basic settings
(1)File name
(2)Preset
You can select pre-registered settings from the pull-down menu. You can also create and delete your own presets.
(3)Unit
Select a unit for the width and height of the canvas. You can choose from centimeters, millimeters, inches, pixels, or points.
Canvas settings
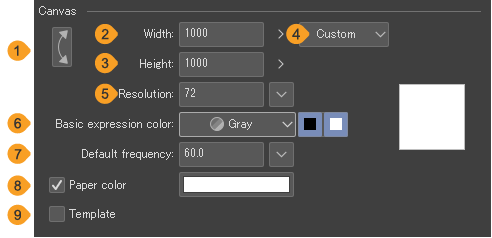
(1)Swap width/height
(2)Width
(3)Height
(4)Default size (Canvas size)
Here, you can select a default size for the height and width.
(5)Resolution
You can set the resolution of the canvas. Tap the drop-down button to the right to select a resolution.
(6)Basic expression color
You can choose Color, Gray, or Monochrome as the default expression color. New layers will be in this expression color mode by default. For details on basic expression colors, see "Expression Colors and Drawing Colors".
(7)Default frequency
When the Basic expression color is set to Gray or Monochrome, you can specify the default frequency of screentones.
(8)Paper color
You can set a color for the Paper layer by tapping the color bar.
(9)Template
Tap this to open the Template dialog and import a template material to the canvas.
If you want to change a template that you’ve already set, open the Template dialog box again by tapping the button with the template material name on it.
Animated illustration settings
This feature allows you to create an animation up to 24 frames long, useful for creating animated stickers and animated gifs for social media.
In Clip Studio Paint EX, you can create animations over 24 frames long. Go to New then select Animation from the Project options to see all animation settings.
(1)Create animated illustration
Turn this on to display the settings for creating an animated illustration.
(2)Number of cels
Allows you to set the number of cels and the total playback time. You can set up to 24 cels for the Illustration project type. Tap the drop-down icon to select the number of cels by the playback time.
If you want to adjust the number of cels per second, you can do so with the Frame rate setting.
(3)Playback time
The playback time is shown based on the number of cels and the frame rate.
(4)Frame rate
Set the number of cels (frames/images) per second. For example, if the frame rate is set to 8fps, 8 cels will be played in one second.
Record timelapse
Turn on Record timelapse at the bottom of the New dialog to record and save a timelapse from the moment the canvas is created. When you save the file in Clip Studio format (extension: .clip), the timelapse will be saved with the file. For details, see "Record timelapse".
New dialog for Webtoons
When you select the Webtoon project type, the following settings are available.
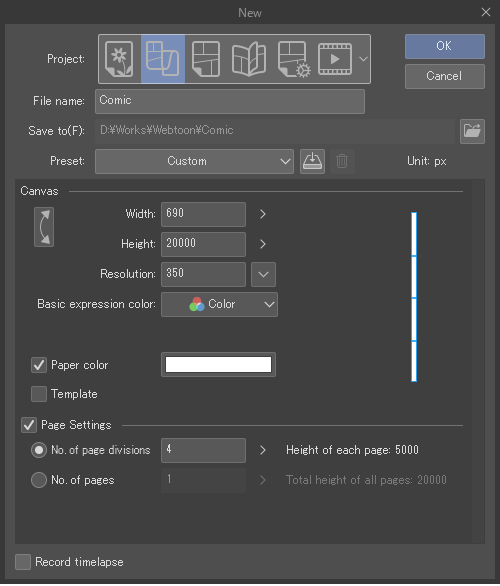
Basic settings
(1)File name
Enter a name for the project.
In EX, if you check the Page Settings box to create multi-page project (cmc format), this will be the name of the management file and the management folder.
(2)Save to (EX only)
This setting appears when Page settings is turned on. Choose the save location of the management file for the multi-page project.
(3)Preset
You can select pre-registered settings from the pull-down menu. You can also create and delete your own presets.
(4)Unit
For webtoon projects, the unit for the width and height of the canvas is fixed as px.
Canvas settings
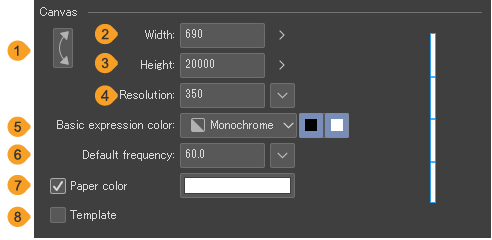
(1)Swap width/height
(2)Width
(3)Height
(4)Resolution
You can set the resolution of the canvas. Tap the drop-down button to the right to select a resolution.
(5)Basic expression color
You can choose Color, Gray, or Monochrome as the default expression color. New layers will be in this expression color mode by default. For details on basic expression colors, see "Expression Colors and Drawing Colors".
(6)Default frequency
When the Basic expression color is set to Gray or Monochrome, you can specify the default frequency of screentones.
(7)Paper color
You can set a color for the Paper layer by tapping the color bar.
(8)Template
Tap this to open the Template dialog and import a template material to the canvas. If you want to change a template that you’ve already set, open the Template dialog box again by tapping the button with the template material name.
Page settings (EX only)
When turned on, you can manage your webtoon project as multiple pages.
If you divide your project into multiple pages, they are stored inside a management folder, which contains the management file and separate Clip Studio format files for each page.
(1)Number of page divisions
When No. of page divisions is selected, the canvas height will be divided by the page height set and exported as separate pages.
(2)Number of pages
When No. of pages is selected, this creates the specified number of pages at the specified height and width.
Record timelapse
Turn on Record timelapse at the bottom of the New dialog to record and save a timelapse from the moment the canvas is created. If you save the file in Clip Studio format (extension: .clip), the timelapse will be saved with the file. For details, see "Record timelapse".
New dialog box for Comics
When you select the Comic project type, the following settings are available.
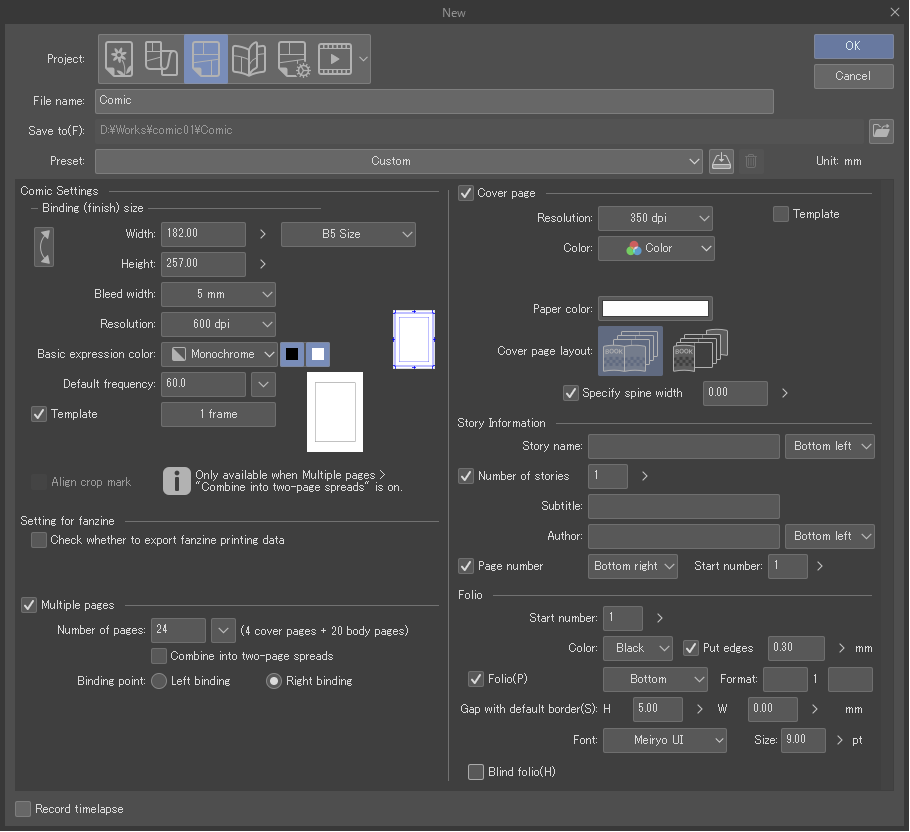
Basic settings
(1)File name
Enter a name for the project.
In EX, if you check the Page Settings box to create multi-page project (cmc format), this will be the name of the management file and the management folder.
(2)Save to (EX only)
This setting can be adjusted when Multiple pages is turned on. Choose the save location of the management folder for the multi-page project, which stores the management file and separate Clip Studio format files for each page.
(3)Preset
You can select pre-registered settings from the pull-down menu. You can also create your own presets and delete presets.
(4)Unit
For comic projects, the unit for the width and height of the canvas is fixed as px. You can change the unit when the project type is set to Show all comic settings.
Trim size
You can adjust the size of the canvas for printing, including the cropped (trim) size and the bleed width for the comic. The trim size is the area that is used for printing. For example, when you are making a B5 size book, you can change the width and height to B5 size.
For details on the paper settings for printing, see: "What are the inner border, trim border and bleed width?"
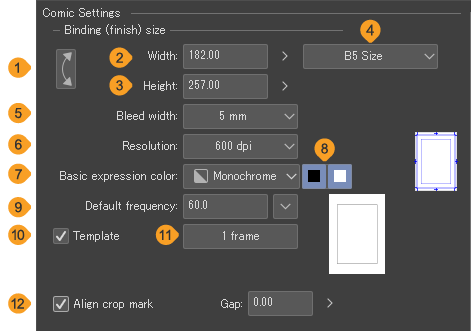
(1)Swap width/height
(2)Width
Set the width of the cropped border.
(3)Height
Set the width of the cropped border.
(4)Default size
Allows you to select a trim size (finished size). The width and height will change according to the selected size.
(5)Bleed width
Sets the bleed width. You can select from 5 mm or 3 mm. If you want to customize the bleed width, select Show all comic settings as the project type.
(6)Resolution
You can set the resolution of the canvas. The available resolutions depend on the selected basic expression color.
When the basic expression color is set to Monochrome, you can choose from 600dpi or 1200dpi. When the basic expression color is set to Color or Gray, you can choose from 350dpi or 600dpi.
(7)Basic expression color
You can choose Color, Gray, or Monochrome as the default expression color. New layers will be in this expression color mode by default. For details on expression colors, see "Expression Colors and Drawing Colors".
(8)Default frequency
When the Basic expression color is set to Gray or Monochrome, you can specify the default frequency of screentones.
(9)Template
Tap this to open the Template dialog and import a template material to the canvas.
If you want to change a template that you’ve already set, open the Template dialog box again by tapping the button with the template material name on it.
(10)Align crop marks (EX only)
This option is available when Multiple pages > Combine into two-page spreads is turned on. This setting aligns the positions of the cropped border on the left and right pages and combines the crop marks. Enter in a number in interval to change the finish border interval on the right and left side pages.
When turned off, crop marks are created at the position where the edges of the left and right pages match.
Setting for fanzine (EX only)
Turn on Check whether to export fanzine printing data to check whether the current settings are suitable for exporting as fanzine printing data. If the data cannot be exported as fanzine printing data, a message will appear when you tap the OK button.
Multiple pages (EX only)
Turn this on to create a file with multiple pages. You can also set the following:

(1)Number of pages
Enter the number of pages for the project. Tap the drop-down button to the right to select the number of pages.
If Cover page is turned on, enter the total number of pages including the cover page and back page. If you want to add a cover to a work with 16 pages of text, add 4 pages and set the number to 20 pages.
(2)Combine into two-page spreads
Turn this on to connect the left and right pages so you can work on them as two-page spreads.
(3)Binding point
Selects the direction in which to bind the book. Generally, Left binding is used for Western-style comics, and Right binding is used for Japanese-style manga.
(4)Start page
Set which side to put the first page. Select From Right if you want to start from the page that is placed on the right, or From Left if you want to start from the page that is placed on the left.
The Start page setting is not available when Cover page is turned on.
Cover page (EX only)
Turn this on to add cover pages to your project.
For the cover pages, you can use a different resolution, basic expression color, and template to the main body pages. The settings are the same as in Comic settings > Trim size. This section explains settings for cover pages.
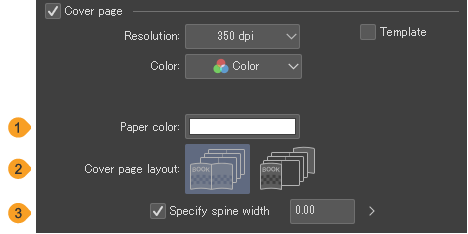
(1)Paper color
You can set a color for the Paper layer by tapping the color bar.
(2)Cover page layout
You can select whether to create the front and back cover pages as a spread or to create them as separate pages.
(3)Specify spine width
Set the spine width if the cover pages are to be printed as a spread. Turn this option on to specify the width.
If this option is left off, the spine width will be automatically estimated, but the value may differ from the actual spine width depending on the thickness of the paper used for printing.
Story information (EX only)
You can add story information for managing your project. The story information is displayed outside the bleed border of each page, in the non-printable area. You can create a project without entering anything in Story Information.
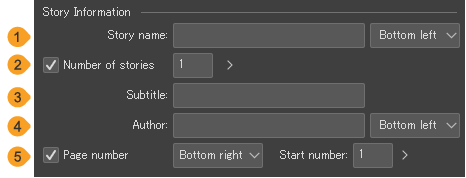
(1)Story name
Enter a title for the project and select where you want the name to appear on the page from the drop-down menu. You can also set if and where the Number of stories and Subtitle will appear.
(2)Number of stories
(3)Subtitle
(4)Author
Enter the author name or production team name. Select where you want the name to appear on the page from the drop-down menu.
(5)Page number
Turn it on to display a page number on each page. Select where you want the number to appear from the drop-down menu. You can set the Start number for the page count.
Folio (EX only)
You can add folio (page numbers) to your project. These page numbers will be visible on print or digital books when exported and is different from the Page number setting in Story Information. Folio numbers will not be added to the cover pages.
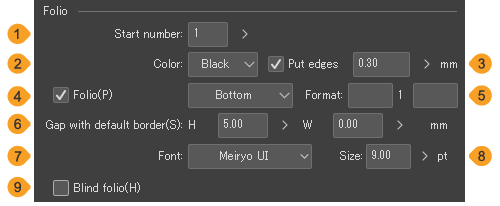
(1)Start number
(2)Color
Choose a color for the page numbers. If you would like to change the page number color for an individual page, open that page file and select the page number with the Object sub tool.
(3)Put edges
Turn this on to add a border around the page numbers. You can adjust the width of the edge.
(4)Folio
Turn this on to show the page numbers on the printed page. The pull-down menu shows options for where to place the page numbers.
(5)Format
You can add text before or after the page numbers. Enter any characters that you want to add in the right and left fields.
(6)Gap from inner border
Set the gap between the folio and the inner border. A larger value increases the size of the gap.
(7)Font
Select a font from the font list to use for the page numbers.
(8)Size
Set the font size for the page numbers.
(9)Blind folio
When turned on, hidden page numbers are indicated in the lower part of the gutter (the side where the book is bound). When using Blind folio, you cannot change settings such as font and size.
Record timelapse
Turn on Record timelapse at the bottom of the New dialog to record and save a timelapse from the moment the canvas is created. When you save the file in Clip Studio format (extension: .clip), the timelapse will be saved with the file. For details, see "Record timelapse".
New dialog box (Printing of fanzine)
When you select the Printing of fanzine project type, the following settings are available.
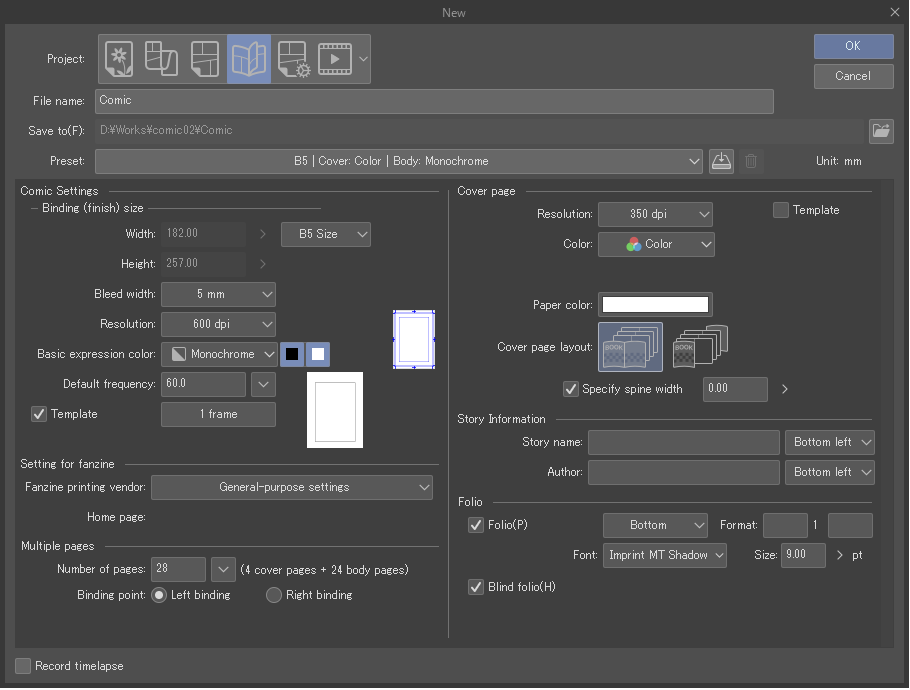
Basic settings
(1)File name
(2)Save to
This setting can be adjusted when Page settings is turned on. Choose the save location of the management folder for the multi-page project, stores the management file and separate Clip Studio format files for each page.
(3)Preset
You can select pre-registered settings from the pull-down menu. You can also create your own presets and delete presets. For details, see "Presets".
(4)Unit
The unit for setting the width and height of the canvas. In this window, the unit is fixed as mm.
Trim size
You can adjust the trim size (crop marks) and the bleed width for the comic. The trim size is the area that is used for printing.
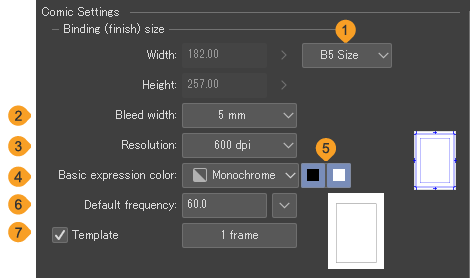
(1)Default size
Allows you to select a default size (fanzine size) for the cropped border. The width and height will change according to the selected size. You cannot change the width and height values when the project type is Printing of fanzine. To customize the width and height, use Show all comic settings as the project type.
(2)Bleed width
You can set the bleed width as 5 mm or 3 mm. If you want to customize the bleed width, use Show all comic settings as the project type.
(3)Resolution
You can set the resolution of the canvas. The available resolutions depend on the selected basic expression color.
When the basic expression color is set to Monochrome, you can choose from 600dpi or 1200dpi. When the basic expression color is set to Color or Gray, you can choose from 350dpi or 600dpi.
(4)Basic expression color
You can choose Color, Gray, or Monochrome as the default expression color. New layers will be in this expression color mode by default.
(5)Default frequency
When the Basic expression color is set to Gray or Monochrome, you can specify the default frequency of screentones.
(6)Paper color
You can set a color for the Paper layer by tapping the color bar.
(7)Template
Tap this to open the Template dialog and import a template material to the canvas. If you want to change a template that you’ve already set, open the Template dialog box again by tapping the button with the template material name on it.
(8)Setting for fanzine
In the English software, you can use only General purpose settings. Check the guidelines of your planned printing vendor while setting up your project.
Multiple pages
(1)Number of pages
Enter the number of pages for the project. Tap the drop-down button to the right to select the number of pages.
If Cover page is turned on, enter the total number of pages including the cover page and back page. If you want to add a cover to a work with 16 pages of text, add 4 pages and set the number to 20 pages.
Memo | You should choose the number of pages based on the fee table of the printing vendor. If you haven’t chosen a printing vendor, it is a good idea to set the number of body pages as a multiple of 4. This is because many printing vendors print in batches of 4 or 8 pages. |
(2)Binding point
Selects the direction in which to bind the book. Generally, Left binding is used for Western-style comics, and Right binding is used for Japanese-style manga.
Cover page
For the cover page, you can use a different resolution, basic expression color, and template to the main body pages. The settings are the same as outlined in Comic settings > Trim size. This section explains settings for cover pages.
(1)Paper color
You can set a color for the Paper layer by tapping the color bar.
(2)Cover page layout
You can select whether to create the front and back cover pages as a spread or to create them as separate pages.
(3)Specify spine width
Set the spine width if the cover pages are to be printed as a spread. Turn this option on to estimate the width according to the number of pages and standard paper thickness.
Important | The actual spine width may differ from the automatically calculated number, depending on the type of paper used for the body pages. If you plan to use special paper for your project, we recommend that you check with the printing vendor. |
Story information
You can add story information for managing the project. The story information is displayed outside the bleed border of each page, in the non-printable area. You can create a project without entering anything in Story Information.
(1)Story name
Enter a title for the project. Select where you want the name to appear on the page from the drop-down menu.
(2)Author
Enter the author name. For fanzine projects, you can also enter a production team name. Select where you want the name to appear on the page from the drop-down menu.
Folio
(1)Folio
Turn this on to show the page numbers on the printed page. The drop-down menu shows options for where to place the page numbers.
(2)Format
You can add text before or after the page numbers. Add the characters that you want to add in the right and left fields.
(3)Font
Select a font from the font list to use for the page numbers.
(4)Size
Set the font size for the page numbers.
(5)Blind folio
When turned on, hidden page numbers are indicated in the lower part of the gutter (the side where the book is bound). Settings such as font and size cannot be set for Blind folio.
Record timelapse
Turn on Record timelapse at the bottom of the New dialog to record and save a timelapse from the moment the canvas is created. If you save the file in Clip Studio format (extension: .clip), the timelapse will be saved with the file. For details, see "Record timelapse".
Memo | Leaving the timelapse on for longer will result in a larger file size. If you are submitting the Clip Studio format (extension: .clip) file directly to the printing vendor, create a back-up of your file and then delete the timelapse data before sending. |
New dialog box (Show all comic settings)
When you select Show all comic settings as the Project type in the New dialog box, the following settings are available.
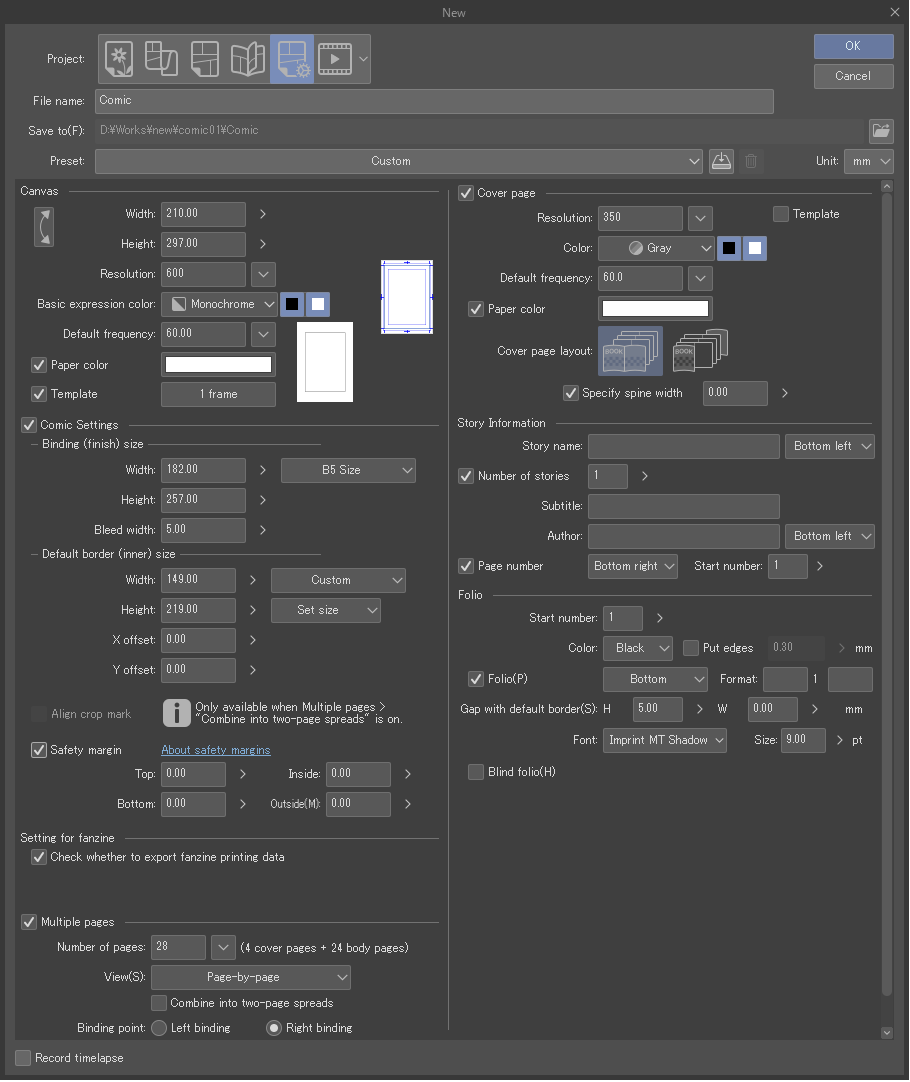
Basic settings
(1)File name
(2)Save to (EX only)
This setting can be adjusted when Page settings is turned on. Choose the save location of the management folder for the multi-page project, which stores the management file and separate Clip Studio format files for each page.
(3)Preset
You can select pre-registered settings from the pull-down menu. You can also create your own presets and delete presets.
(4)Unit
Select a unit for the width and height. You can choose from centimeters, millimeters, inches, pixels, or points.
Canvas
You can set the size of the canvas. When Comic settings is turned off, the size set will be the final size.
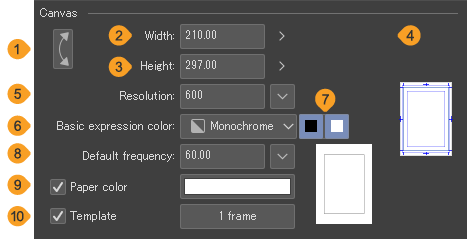
(1)Swap width/height
(2)Width
(3)Height
(4)Default size (Canvas size)
Allows you to select a width and height from default sizes. This setting will not be available if Comic Settings is turned on.
(5)Resolution
You can set the resolution of the canvas. Tap the drop-down button to the right to select the resolution.
(6)Basic expression color
You can choose Color, Gray, or Monochrome as the default expression color. New layers will be in this expression color mode by default.For details on basic expression colors, see "Expression Colors and Drawing Colors".
(7)Default frequency
When the Basic expression color is set to Gray or Monochrome, you can specify the default frequency of screentones.
(8)Paper color
You can set a color for the Paper layer by tapping the color bar.
(9)Template
Tap this to open the Template dialog and import a template material to the canvas. If you want to change a template that you’ve already set, open the Template dialog box again by tapping the button with the template material name.
Comic Settings
Turn this on to display comic settings such as the trim size and inner border.
Trim size
You can adjust the trim size and the bleed width for the comic. The trim size is the area that is used for printing.For example, when you are making a B5 size book, you can change the width and height to B5 size.You can set the bleed width to be any value less than the canvas width and height.

(1)Width
(2)Height
(3)Default size
Allows you to select a default trim size. The width and height will change according to the selected size.
(4)Bleed width
Sets the bleed width.
Inner border
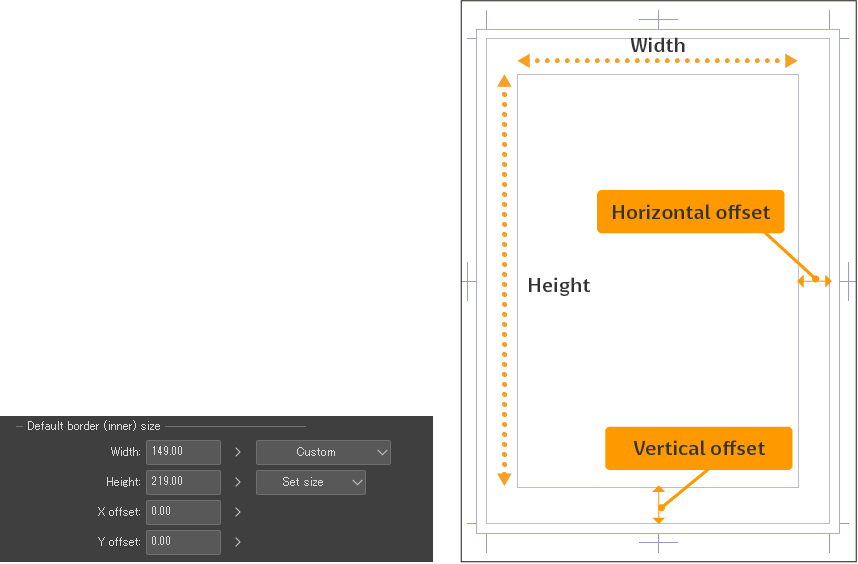
You can set the size of the border for the panels. Set an inner border size from Set margin and then Set size. If the inner border is set to the same size as the trim size, there will be no empty space outside of the panels.
(1)Set size
You can set the width and height of the inner border as well as the X (horizontal) offset and Y (vertical) offset values. When the X offset and Y offset are set to 0, the inner border will be centered on the page.
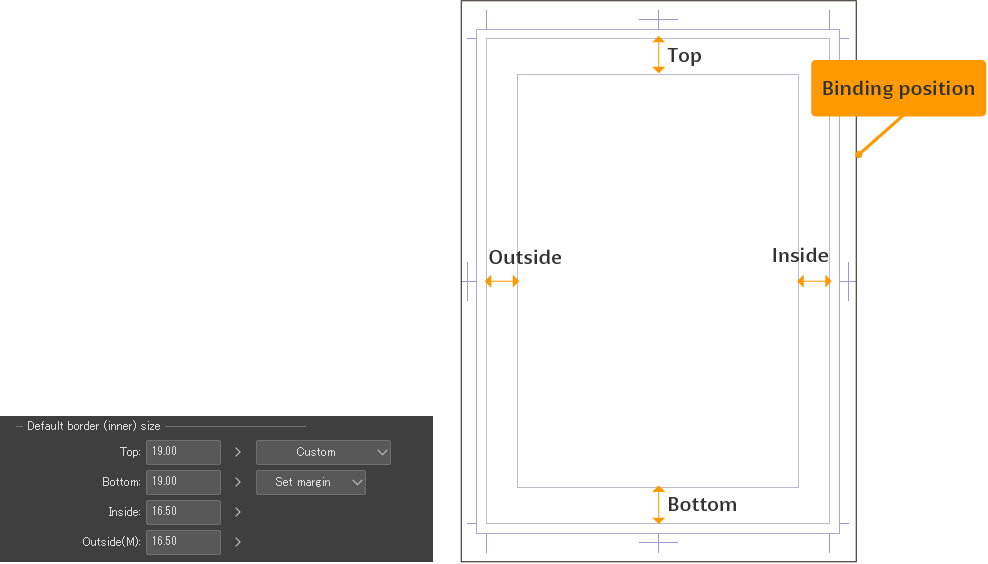
(2)Set margin
Set the inner border size by using Set margin to change the bleed width and inner border size and position.
Align crop marks (EX only)
Turn on the Combine into two-page spreads setting under Multiple pages to set this.
Turn this on to align the positions of the trim margin on the left and right pages and combine the crop marks. Enter in a number in interval to change the finish border interval on the right and left side pages.
When turned off, crop marks are created at the position where the edges of the left and right pages match.
Safety margin
Turn this on to add a safety margin to the canvas. The safety margin indicates the print-safe area for both magazines and books.Usually, publishers and printing companies specify the position.
You can set the width of the margin for each side of the page.
Setting for fanzine (EX only)
Turn on Check whether to export fanzine printing data and then tap OK to check whether you can export the fanzine printing data. If the data cannot be exported as fanzine printing data, a message will appear when you tap the OK button in the New dialog box.
Multiple pages (EX only)
Turn this on to create a file with multiple pages.
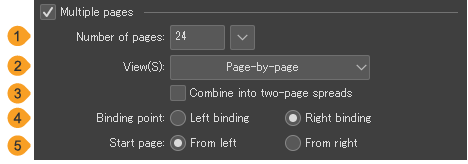
(1)Number of pages
Enter the number of pages for the project. Tap the drop-down button to the right to select the number of pages.
If Cover page is turned on, enter the total number of pages including the cover page and back page. If you want to add a cover to a work with 16 pages of text, add 4 pages and set the number to 20 pages.
(2)Page view mode
You can set the page viewing mode to Page-by-page or Webtoon. Select Page-by-page to see settings for multi-page projects. Some settings here may affect what is displayed in the page management window.
(3)Combine into two-page spreads
Turn this on to connect the left and right pages so you can work on them as two-page spreads.
(4)Binding point
Selects the direction in which to bind the book. Generally, Left binding is used for Western-style comics, and Right binding is used for Japanese-style manga.
(5)Start page
Set which side to put the first page. Select From Right if you want to start from the page that is placed on the right, or From Left if you want to start from the page that is placed on the left.
The Start page setting is not available when Cover page is turned on.
Cover page (EX only)
Turn this on to add a cover page to your work.
For the cover page, you can use a different Resolution, Basic expression color, and Template to the main body pages. The settings are the same as the Canvas settings.This section explains settings for cover pages.
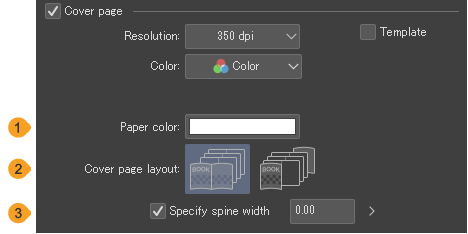
(1)Paper color
You can set a color for the Paper layer by tapping the color tile.
(2)Cover page layout
You can select whether to create the front and back cover pages as a spread or to create them as separate pages.
(3)Specify spine width
Set the spine width if the cover pages are to be printed as a spread. Turn this option on to specify the width.
If this option is left off, the spine width will be automatically calculated. However, this value may differ from the actual spine width depending on the thickness of the paper used for printing.
Story information (EX only)
You can add story information for managing the project. The story information is displayed outside the bleed border of each page, in the non-printable area.You can create a project without entering anything in Story Information.
This information is the same as Story Information for the Comic project type.
Folio (EX only)
You can add folio (page numbers). These page numbers will be visible on print or digital books when exported and is different from Page number setting in Story Information. However, it will not be visible on the cover page.
These settings are the same as the folio settings for the Comic project type.
Record timelapse
Turn on Record timelapse at the bottom of the New dialog to record and save a timelapse from the moment the canvas is created. If you save the file in Clip Studio format (extension: .clip), the timelapse will be saved with the file.For details, see "Record timelapse".
New dialog box (Animation)
When you select Animation as the project type, the following settings are available.
For an explanation of terms such as the output frame, title-safe area, and overflow frame, see "Animation cel terms".
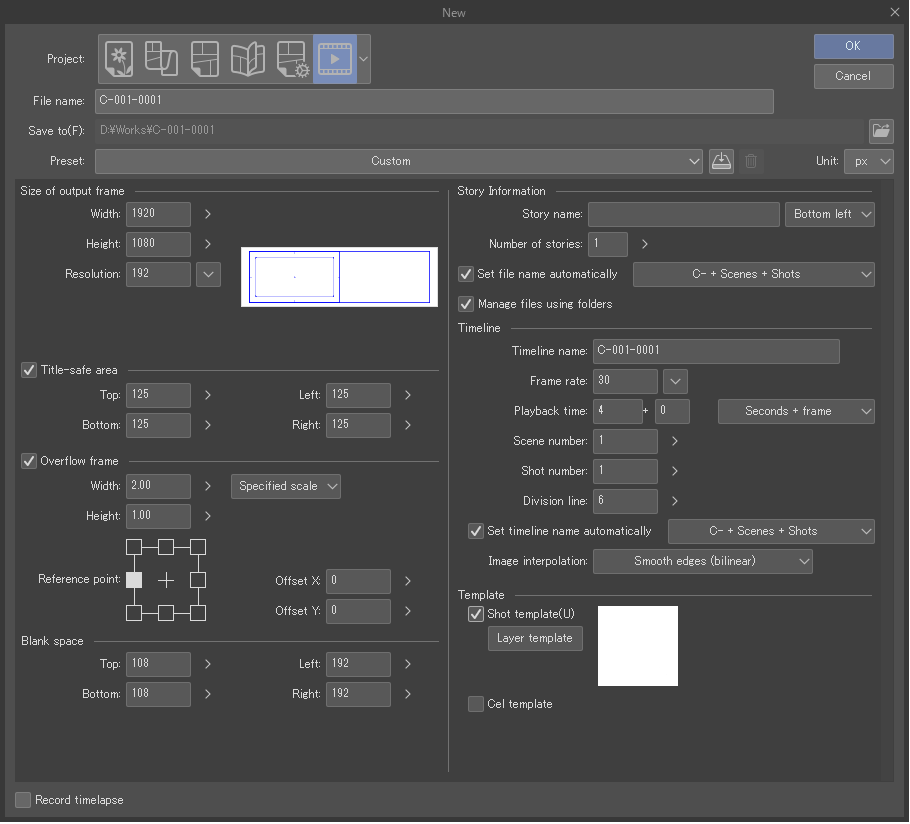
Basic settings
(1)File name
Enter a name for the project.
In EX, if you check the Manage files using folders box to create a folder for the project (.cmc), this will be the name of the management file and the management folder.
(2)Save to (EX only)
This option appears when Manage files using folders is turned on. Choose the save location of the management folder for the multi-page project, which stores the management file and separate Clip Studio format files for each page.
(3)Preset
You can select pre-registered settings from the pull-down menu. You can also create your own presets and delete presets.For details, see "Presets".
(4)Unit
Select a unit for the width and height. You can choose from centimeters, millimeters, inches, pixels, or points.
Animation frame settings
Turn this on to display settings for the animation canvas, such as margins to show the size of the output frame or title-safe area.
Size of output frame
Set the size and resolution of the output frame on the canvas.
(1)Width
You can set the width of the output frame.
(2)Height
You can set the height of the output frame.
(3)Resolution
You can set the resolution of the canvas. Tap the drop-down button to the right to select the resolution.
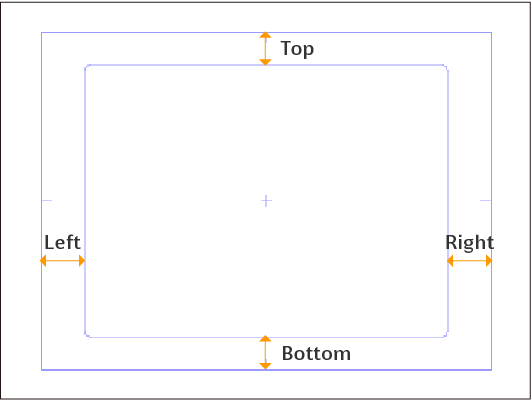
Title-safe area
Turn this on to add a title-safe area to the canvas. Set the title-safe area by entering values to define the size and position of the margin.
Overflow frame
Turn this on to add an overflow frame to the canvas. Overflow frames are useful for creating cuts that move horizontally or vertically across the canvas.
(1)How to add an overflow frame
You can set the overflow frame to Specified scale or Specified size.
If you select Specified scale, then the width and height of the overflow frame will be a multiple of the size of the output frame. If you would like the overflow frame to be double the width, then enter 2.00 in Width.
If you select Specified size, then the width and the height will be whatever values you enter.
(2)Reference point
You can define where the reference point for the overflow frame is in relation to the output frame. Tap on the outer boxes or the center cross to move it.
(3)Offset X
This will determine where the reference point is in relation to the title-safe area and output frame on the x-axis.
(4)Offset Y
This will determine where the reference point is in relation to the title-safe area and output frame on the y-axis.
Blank space
Adds blank space around the overflow frame. If there is no overflow frame, the blank space will be added around the output frame.You can specify the values of the top, bottom, left, and right margins.
Story information (EX only)
(1)Story name
Enter a title for the project. Select the position where you want the story name to appear on the blank space of the canvas from the drop-down menu.
(2)Number of stories
Enter the number of stories. Wherever you choose to display the story name on the blank space of the canvas is where the number of stories will appear as well.
(3)Set file name automatically
When turned on, file names will get assigned automatically. Files will be named according to the option selected from the drop-down menu.
(4)Manage files using folders
Tick the Manage files using folders box to create a management file (cmc format) for the individual files.
Timeline
(1)Timeline name
Enter the timeline name.
(2)Frame rate
Set the frame rate for the timeline.
The frame rate (fps) is the maximum number of images that can be displayed in one second to run the animation. For example, if a frame rate of 30 is set, up to 30 images (cels) can be shown each second.Typical frame rates for TV animation are 24fps or 30fps.
(3)Playback time
Allows you to set the playback time. You can use the drop-down menu to select how to display frames on the Timeline.
Select Frame number (from 1) or Frame number (from 0) to set frame (cel) numbers on the entire timeline. The difference between Frame number (from 1) and Frame number (from 0) is the start number of the frames.
Select Seconds + frame to set the playback time with time and the frames. To add frames after the specified number of seconds, enter the number of frames to be added in the field on the right side.
Select Time code to set the playback time to a specific time in minutes : seconds : frame. To add frames after writing in the minutes and seconds, enter the number of frames to be added in the field on the right side.
(4)Scene number
Enter a number to set as the scene number.
(5)Shot number
Enter a number to set as the shot number.
(6)Division line
You can set the line that divides the Timeline palette. Division lines will be shown at the specified frame interval (for example, after every five frames).
(7)Set timeline name automatically
When turned on, timeline names will get assigned automatically. Files will be named according to the option selected from the drop-down menu.
(8)Image interpolation
You can select the method for interpolating the colors of pixels when transforming a cel or image material by using Smooth edges (bilinear, Hard edges (nearest neighbor), Clear edges (bicubic), or High accuracy (average colors).
Template
Check the Template box to see the Template dialog box and select the template material you want with different numbers of rows and frames.
Check the Shot template box to make a canvas with the template materials on a layer already.
Check the Cel template box to set what template material will be present when you create a new animation layer from the Animation menu.
If you want to change a template you’ve already set, open the Template dialog box again by tapping the button with the template material name.
Record timelapse
Turn on Record timelapse at the bottom of the New dialog to record and save a timelapse from the moment the canvas is created. If you save the file in Clip Studio format (extension: .clip), the timelapse will be saved with the file.For details, see "Record timelapse".
Animation cel terms
(1)Output frame
The area that is shown when you export the animation.
(2)Title-safe area
The title-safe area is smaller than the output frame. It indicates the part of the video that will be visible in all environments, as different screen sizes may crop parts of videos in some cases.Create a title-safe area to display the frame in which you should keep all important elements of your animation.
(3)Overflow frame
This is the entire drawing area. You can make a large overflow frame to allow for camerawork such as panning across a scene.
(4)Blank space
An extra margin around the output frame and overflow frame. A larger area than the output frame or overflow frame may be displayed in some cases depending on the editing and playback environment.To draw to the edge of the screen, you will need to draw up until the blank space.
New Dialog Box for Clip Studio Paint DEBUT
The following New dialog box appears in Clip Studio Paint DEBUT.
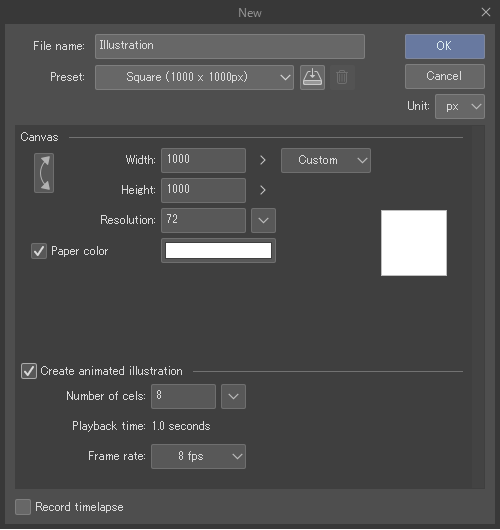
(1)File name
(2)Preset
You can select pre-registered settings from the pull-down menu. You can also create your own presets and delete presets.
(3)Unit
Select a unit for the width and height. You can choose from centimeters, millimeters, inches, pixels, or points.
Canvas
(1)Swap width/height
(2)Width
(3)Height
(4)Default size (Canvas size)
Here, you can select a default size for the height and width.
(5)Resolution
You can set the resolution of the canvas. Tap the drop-down button to the right to select the resolution.
(6)Paper color
You can set a color for the Paper layer by tapping the color tile.
Animated illustration settings
This feature allows you to create an animation up to 24 frames long, useful for creating animated stickers and animated gifs for social media.
(1)Create animated illustration
Turn this on to display the settings for creating an animated illustration.
(2)Number of cels
Allows you to set the number of cels and the total playback time. The maximum number of cels you can set is 24. Tap the drop-down icon to select the number of cels by the playback time.
If you want to adjust the number of cels per second, you can do so with the Frame rate setting.
(3)Playback time
The playback time is shown based on the number of cels and the frame rate.
(4)Frame rate
Set the number of cels (images) per second. For example, if a frame rate of 8fps is set, 8 cels will be played in one second.
Record timelapse
Turn on Record timelapse at the bottom of the New dialog to record and save a timelapse from the moment the canvas is created. If you save the file in Clip Studio format (extension: .clip), the timelapse will be saved with the file.For details, see "Record timelapse".
Presets
Presets are pre-arranged settings available in the New dialog box. You can use default presets or create your own.

(1)Preset
When you select a preset from the pull-down menu, the canvas size, resolution, and so on will change to the settings registered in the preset. Available presets depend on the Project type you have chosen and your Preferences.If you change the settings after choosing a preset, then the name will change to Custom.
(2)Register to preset
You can register the settings in the New dialog box as a preset. Tap to open the Add to presets dialog box.Enter a preset name and select the settings you want to include in the preset.Finalize your setting with OK and the new preset will appear in the Preset drop-down menu.
Presets can be registered for each Project type. Select the project type that the preset was set in to select your desired preset.
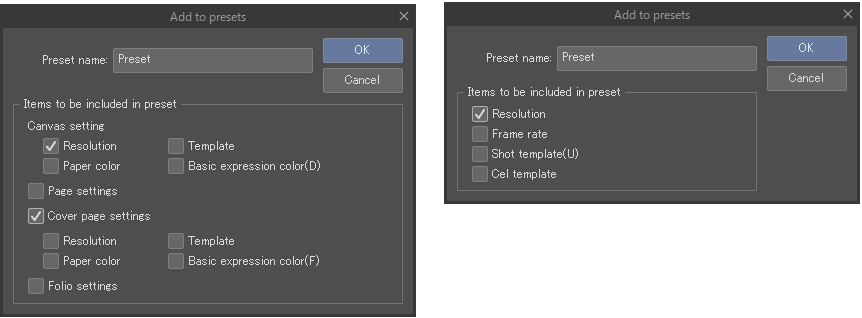
Memo | ·The available settings may differ depending on what Clip Studio Paint grade you are using and what project type you have selected. ·If the chosen Preset name is the same as an existing preset, a confirmation dialog will appear. To overwrite the previous preset, tap Save. To keep the existing preset, tap Change name to rename the new preset. ·Width, Height, and Unit will be saved regardless of what is set in the Add to presets dialog box.Comic Settings will be available as a preset in the project categories: Comic, Printing of fanzine, and Show all comic settings. When Animation is set as the Project type, the Size of output frame, Title-safe area, Overflow frame and Blank space are also registered to the preset. |
(3)Delete preset
Tap to delete the selected preset from the preset list. However, you can only delete your custom presets, not default presets.
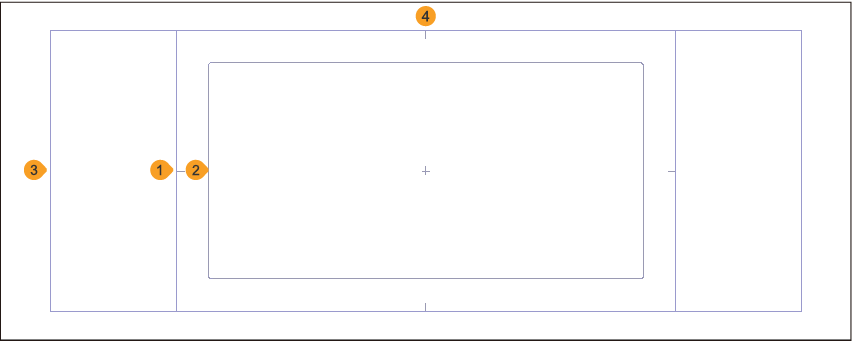
What are the inner border, trim border and bleed width?
These are settings for comic borders in the project categories: Comic, Printing of fanzine, and Show all comic settings.
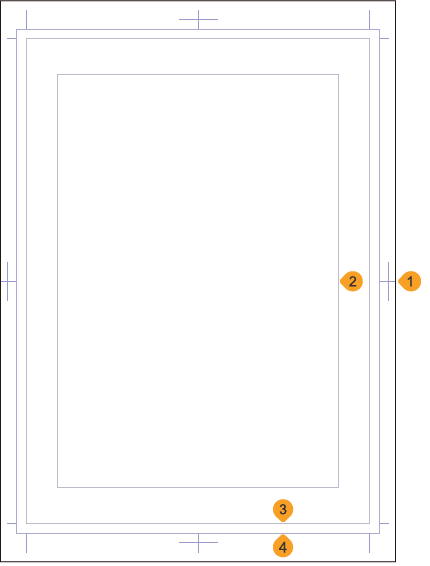
(1)Paper size
This is the size of the entire canvas. You can select a paper size for your canvas in the Show all comic settings project category.
Paper size will be set automatically in Comic and Printing of fanzine project categories according to the Trim size setting.
(2)Inner border
This is a reference border for laying out frames. If you have selected Show all comic settings as your project category, you can set the inner border size and position in the Inner border settings.
The inner border will be set automatically in Comic and Printing of fanzine project categories according to the Trim size setting.
(3)Trim border (crop marks)
This is the line at which the pages will be trimmed for binding after printing. Images within this border will be printed.The trim border is the Trim size.
(4)Bleed border
This is an extra margin to compensate for misaligned trimming of the edges of the pages during the print process. The area between the bleed border (the first border from the edge) and the trim border (the second border from the edge) is called the bleed area.If you plan to print to the edge of the paper, draw up to the bleed border.
Expression Colors and Drawing Colors
Expression color is a term for the type of color handled in a file or layer. You can set one of three expression colors for each layer: Monochrome, Gray, or Color.
If you have set the expression color to Monochrome or Gray, then the drawing color will be black or white.
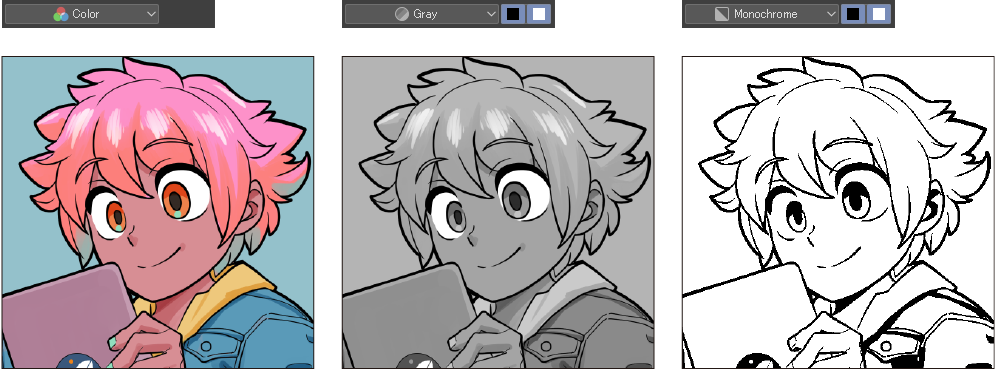
Color
This expression color handles around 16.77 million colors, almost every color that can be discerned by the human eye. Use this for full-color illustrations and comics.
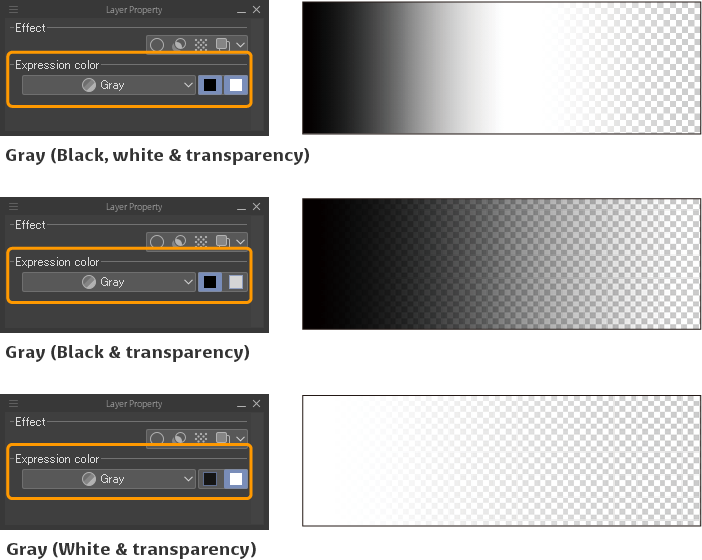
Gray
This expression color only displays grayscale, on a scale of 256 achromatic colors. The drawing colors can be set as black, white, and transparent, black and transparent, or white and transparent.
Monochrome
This expression color handles black and/or white as well as transparency. You can create full duotone data (images with two color values). The drawing colors can be set as black, white, and transparent, black and transparent, or white and transparent.
It is recommended to set the expression color to Monochrome when creating a manga project for black-and-white printing.
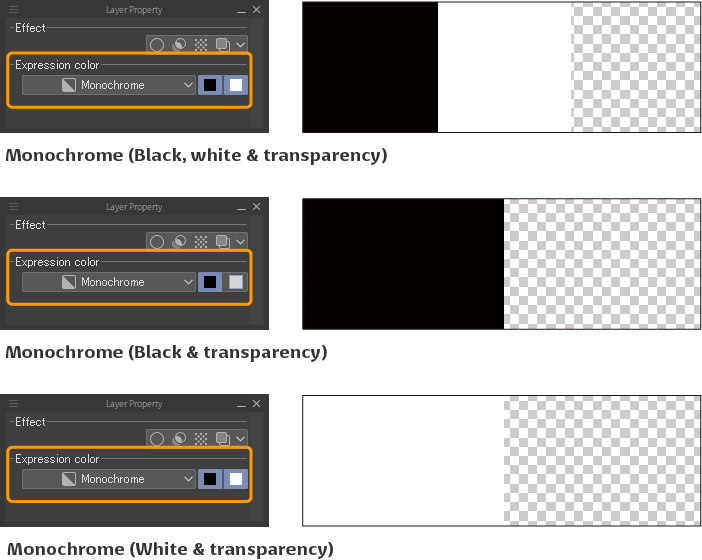
When Monochrome is the expression color of a layer, the image is drawn as duotone data even when using drawing tools that have gradients or anti-aliasing. When drawing with colors other than black and white, darker colors appear as black and lighter colors appear as white.
To convert an image to duotone for monochrome printing, draw on a layer with Gray or Color as the expression color and then use Tone on the Layer Property palette.
Setting and changing the expression color
You can set the default expression color when creating a project from the New dialog box with the Basic expression color setting. The Basic expression color is used by default for new raster layer or vector layers.
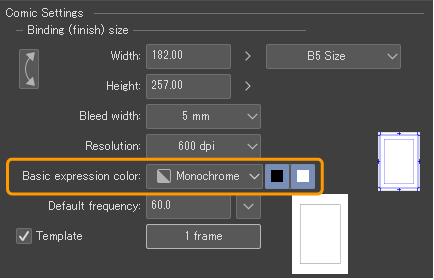
You can change the expression color of individual layers in the Layer Property palette > Expression color. Layers that have a different expression color from the Basic expression color will be indicated with an expression color icon on the Layer palette.

You can change the default expression color for the project from the "Canvas Properties" dialog.
Create New from Clipboard (Windows/macOS/iPad)
A new canvas can be created from an image copied to the clipboard in Clip Studio Paint or other applications by selecting the File menu > Create new from clipboard.
A canvas will be created according to the size of the clipboard image, and the image will be imported.
Create new from app clipboard (Android)
A new canvas can be created from an image copied to the clipboard in Clip Studio Paint by selecting the File menu > Create new from app clipboard.
A canvas will be created according to the size of the clipboard image, and the image will be imported.
Create new file from photo library (iPad)
Select the File menu > Create new from photo library to open the OS photo library. You can select a photo or video from your photo library to create a new canvas containing that photo or video.
A copy of the selected file will be created in Clip Studio Paint as a new file. The original photos and videos in your library remain unaltered.
·When you import an image, a message will appear asking if you want to extract lines from the image. If the photo is of line art on paper, you can use this to extract the lines.If you want to use the image as it is, press Cancel.
·When you import a video, a canvas with a timeline will be created. The canvas size and frame rate will match the original video file.A movie track and sound track will be created on the timeline.
Create new from device storage (Android)
Select File menu > Create new from device storage to import a general image format file from the storage and open it in Clip Studio Paint.
You can import the following file formats: BMP, JPEG, PNG, TIFF. Files other than these cannot be opened in Clip Studio Paint.If any other file type is selected, an error message will appear.
A copy of the selected file will be created in Clip Studio Paint as a new file. The original photos and videos in your library remain unaltered.
·When you import an image, a message will appear asking if you want to extract lines from the image. If the photo is of line art on paper, you can use this to extract the lines.If you want to use the image as it is, press Cancel.
·When you import a video, a canvas with a timeline will be created. The canvas size and frame rate will match the original video file.A movie track and sound track will be created on the timeline.
Memo | ·When using a Samsung Galaxy series device, tapping a BMP, JPEG, PNG, TIFF, or a compressed ZIP file in My Files will display an Open in App option. You can use this to open these files in Clip Studio Paint. |
Create New from Movie (Windows/macOS)
A new canvas can be created from an image copied to the clipboard in Clip Studio Paint or other applications by selecting the File menu > Create new from movie. The canvas size and frame rate will match the original video file. A movie track and sound track will be created on the timeline.
You can import the following video file formats:
Windows: AVI format (extension: avi), MP4 format (extension: mp4), QuickTime format (extension: mov)
macOS: QuickTime format (extension: mov) or MP4 format (extension: mp4)
