Change canvas size and settings
After creating a canvas or multi-page project in Clip Studio Paint, you can change the size, basic expression color, and other settings. For multi-page projects, changes can be applied to all pages at once.
Important | If you change the timelapse settings to Off, any recorded timelapse data will be deleted. Deleted timelapse data cannot be recovered. |
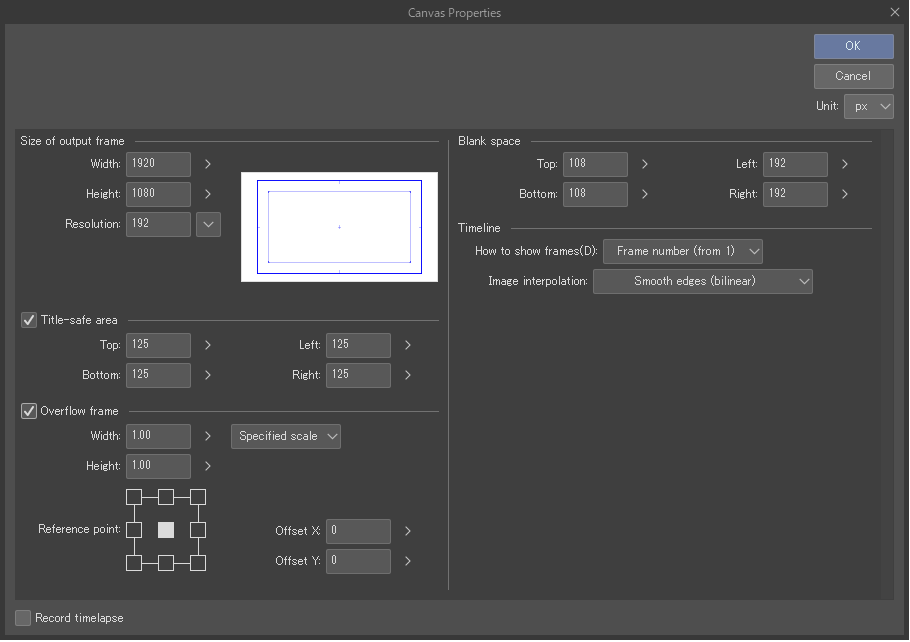
Canvas Properties
You can change the settings of the current canvas in the Edit menu > Canvas Properties dialog. The available settings depend on the type of project selected when creating the canvas.
If you are editing a single page in a multi-page project, the settings will only apply to the current page. You cannot change settings for the other pages.
Canvas Properties dialog
The settings that appear in the Canvas Properties dialog depend on how the project was created or last edited.
·When the Project is set to Illustration, Comic, Webtoon, Printing of fanzine or Show all comic settings, you can use the Canvas Properties dialog to change the original settings, such as the canvas size, default expression color, and the crop marks and inner border size. For details on each setting, see "New dialog box (Show all comic settings)". If you have turned on Create animated illustration or if you have the timeline displayed, the settings for How to show frames and Image interpolation will also appear. You cannot change the frame rate settings from the Canvas Properties dialog. To change these, use the Animation menu > Timeline > Change settings or Change frame rate.
·When the Project is set to Animation, you can use the Canvas Properties dialog to change settings such as the output frame size and safe areas. For details on each setting, see "New dialog box (Animation)".
The settings will be the same as when you first made the project or last changed the settings.
If the canvas has border lines for printing
(1)Delete border lines for printing
This button appears if the canvas has trim margins for printing. Tap to remove print marks such as the trim margin, crop marks, and inner border.
If the canvas has frame lines for animation
(1)Delete frame lines for animation
This button appears if the canvas has borders to indicate the animation frame. Tap to remove animation frame lines such as the output frame and overflow frame. When these are deleted, the previous output frame will become the canvas, and the basic expression color will become the paper color.
If the canvas does not have lines for printing or animation
(1)Add border lines for printing
Tap to add print marks such as the trim margin, crop marks, and inner border. When you turn this setting on, Comic Settings will appear in the Canvas Properties dialog.
(2)Add frame lines for animation
Tap to add animation frame lines such as the output frame and overflow frame. When you turn this setting on, Animation frame settings will appear in the Canvas Properties dialog. The previous canvas will become the output frame, and the paper color will become the basic expression color.
Memo | You cannot create an animation project only by tapping Add frame lines for animation. You also need to create a timeline on the canvas. See "Creating a timeline" for details. |
Change page settings (EX only)
You can change the settings of the current selected page from the Story menu > Change page settings.
You can change multiple page settings at once by selecting the pages you want to change from the Story window, then opening Change page settings dialog. However, you cannot change settings by batch if the selected pages have different sizes, resolutions, or basic expression colors. In this case, you will need to configure the settings separately for each page.
You cannot Undo the setting changes for multiple pages. To undo the setting changes, open the settings window again and change them back. Using Undo will only undo changes made to the current open page.
The settings shown in the dialog depend on what was set upon when creating the canvas or when you last edited the page settings. Settings for single page projects will be the same as in the Canvas Properties dialog box.
·When the Project is set to Illustration, Webtoon, Comic, Printing of fanzine or Show all comic settings, you can use the Change page settings dialog to change settings such as the default expression color and frequency and the crop marks and inner border size. For details on each setting, see "New dialog box (Show all comic settings)". If you have turned on Create animated illustration or if you have the timeline displayed, the settings for How to show frames and Image interpolation will also appear.
·When the Project is set to Animation, you can use the Change page settings dialog to change settings such as the frame size and the method of showing frames in the timeline. For details on each setting, see "New dialog box (Animation)".
·You can add or remove border lines for printing or for animation in the Change page settings dialog. The method is the same as in the "Canvas Properties" dialog.
Change project settings (EX only)
In the Story menu > Change project settings dialog, you can change the settings for all pages in the project. The available settings depend on the Project type that was selected when creating the file.
Project can be selected from the Change project settings dialog box., and you can adjust settings like when creating a new canvas. The available settings depend on the project type. You can also change the number of pages in the project from single to multiple and vice versa.
When editing a file that was initially created as an Animation project, an animation-specific dialog box will appear.

Memo | If you created the file in an older version of Clip Studio Paint, the Project setting may not be available. |
Change project settings (Illustration)
The settings available in the Change project settings dialog box are the same as if you started a new Illustration project from the New dialog box. However, you cannot set Template or Create animated illustration from the Change project settings dialog box. See "New dialog box (Illustration)" for details on each setting.
Change project settings (Webtoon)
The settings available in the Change project settings dialog box are the same as if you started a new Webtoon project from the New dialog box. See "New dialog for Webtoons" for details on each setting.
If changing a single page project to a multiple page project, the Create story folder dialog box will appear after pressing OK in the Change project settings dialog box.
Change project settings (Comic)
The settings available in the Change project settings dialog box are the same as if you started a new Comic project from the New dialog box. See "New dialog box for Comics" for details on each setting.
Comic Settings
The settings available are similar to New > Comic Settings > Trim size. However, you cannot use a template.
Color profile
You can edit the same settings as the Color profile section in the New dialog. For details, please refer to "New dialog box for Comics".
Setting for fanzine
Turn Check whether to export fanzine printing data on to trigger a check if the Fanzine printing data is exportable when tapping OK in the Change project settings dialog box. If the data cannot be exported as fanzine printing data, a message will appear when you tap the OK button in the New dialog box.
Multiple pages
You can change the number of pages. However, you cannot set a lower number of pages than the current amount.
If the current project is a single page project, turning Multiple pages on will change it to a multiple page project. After tapping OK in the Change project settings, you will need to create a management folder with the Create story folder dialog box.
Cover page
If the project already has a cover, you can change the Resolution and Basic expression color of the cover.
Turn Cover page off to have the cover page, inside cover page, back cover, and inside back cover replaced by body pages. The existing resolution and basic expression color are maintained from the Cover page settings. The resolution and basic expression color can be changed from the "Change page settings (EX only)" dialog box.
Turn this on to add cover pages to your project. After tapping OK in the Change project settings dialog box, a message saying "Set existing pages as cover pages?" may appear.
If you select No, the cover page, inside cover page, back cover page, and inside back cover page will be added in the management window and the number of pages will be updated. The resolution and basic expression color will be the same settings specified in the Change project settings dialog box.
Tap Yes and the main text pages will be replaced by cover pages and the number of pages will not change. However, the pages that are overwriting the cover pages will not use the resolution and basic expression color set in the Change project settings dialog box, and the body page settings will be maintained. The resolution and basic expression color can be changed from the "Change page settings (EX only)" dialog box.
Memo | ·If you have an odd number of pages, then you will not be able to add a cover even if Cover page is turned on. Be sure to set an even number of pages. If there are too few pages, the body pages will not be replaced with the cover. ·If the starting page or ending page is part of a spread then another page will be added as a filler, separate from the cover. |
Story Information/Folio
When Reset setting changes page by page is turned on, the position, size, edge settings and so on for the Story information and pagination for all pages are adjusted individually and changed to the values set with the Change project settings dialog box.
Story information
The information is the same as in the Story Information in the New dialog box. However, you cannot use a template.
Folio (EX only)
The information is the same as in the Folio in the New dialog box. However, you cannot use a template.
Change project settings (Printing of fanzine)
The settings available in the Change project settings dialog box are the same as if you started a new Printing of fanzine project from the New dialog box. See "New dialog box (Printing of fanzine)" for details on each setting.
The following settings will appear how you set them in the New dialog box.
Story Information/Folio
When Reset setting changes page by page is turned on, the position, size, edge settings and so on for the Story information and pagination for all pages are adjusted individually and changed to the values set on the Change project settings dialog box.
Change project settings (Show all comic settings)
The settings available in the Change project settings dialog box are the same as if you started a new Show all comic settings project from the New dialog box. This dialog box may appear if you are opening a project you created on an older version of the application. See "New dialog box (Show all comic settings)" for details on each setting.
The following settings will appear how you set them in the New dialog box.
Multiple pages
You can change the number of pages. However, you cannot set a lower number of pages than the current amount.
If the current project is a single page project, turning Multiple pages on will change it to a multiple page project. After tapping OK in the Change project settings, you will need to create a management folder with the Create story folder dialog box.
Cover page
If the project already has a cover, you can change the resolution and basic expression color of the cover.
Turn Cover page off to have the cover page, inside cover page, back cover, and inside back cover replaced by body pages. The existing resolution and basic expression color are maintained from the Cover page settings. The resolution and basic expression color can be changed from the Change page settings dialog box.
Turn this on to add cover pages to your project. After tapping OK in the Change project settings dialog box, a message saying "Set existing pages as cover pages?" may appear.
If you select No, the cover page, inside cover page, back cover, and inside back cover will be added in the Management window and the number of pages will be updated. The resolution and basic expression color will be the same settings specified in the Change project settings dialog box.
Tap Yes and the main text pages will be replaced by cover pages and the number of pages will not change. However, the pages that are overwriting the cover pages will not use the resolution and basic expression color set in the Change project settings dialog box, and the body page settings will be maintained. The resolution and basic expression color can be changed from the Change page settings dialog box.
Memo | ·If you have an odd number of pages, then you will not be able to add a cover even if Cover page is turned on. Be sure to set an even number of pages. If there are too few pages, the body pages will not be replaced with the cover. ·If the starting page or ending page is part of a spread, then another page will be added as a filler, separate from the cover. |
Story Information/Folio
When Reset setting changes page by page is turned on, the position, size, edge settings and the like for the Story information and pagination for all pages are adjusted individually and changed to the values set on the Change project settings dialog box.
Change project settings (Animation)
When Animation is selected as the Project type, the Change project settings dialog allows you to change settings related to animation projects. See "New dialog box (Animation)" for details on each setting.
Story information
You can set Story name, Number of stories, as well as where to show story information.
Reset setting changes page by page
When turned on, each page’s Story Information and display position can be changed from the Change project settings dialog box.
Manage files using folders
Tick the Manage files using folders box to create a management file (.cmc format) for the individual files.
After tapping OK in the Change project settings you will need to set the Management folder in the Create story folder dialog box.
Template
Check the Cel template box to set what template material will be present when you add a new animation layer from the Animation menu.
If you want to change a template that you have already set, open the Template dialog box again by tapping the button with the template material name.