Tonal Correction Effects
Tonal correction effects can be applied from the Edit menu > Tonal Correction and Layer menu > New Correction Layer.
Memo | You cannot use New Correction Layer in Clip Studio Paint DEBUT. |
Brightness/Contrast
Adjusts the brightness and contrast of an image.
Memo | If you select a raster layer with expression color set to Monochrome, you cannot use Edit menu > Tonal Correction > Brightness/Contrast. |
You can adjust the following settings:
Brightness
Adjusts the brightness of the image. The larger the value, the brighter the image, and the smaller the value, the darker the image.
Contrast
Adjusts the contrast (difference between lights and darks) of the image. The higher the value, the stronger the contrast; the lower the value, the weaker the contrast.
Auto adjust
This option is available when you select Edit menu > Tonal Correction > Brightness/Contrast. It automatically adjusts the brightness and contrast of the selected layer.
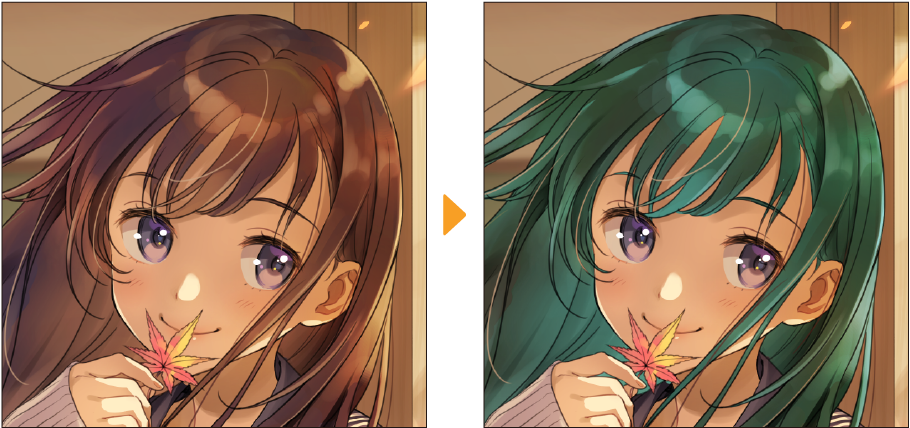
Hue/Saturation/Luminosity
Adjusts the hue, saturation, and luminosity based on the HSV color model.
Memo | If you select a raster layer with Expression Color set to Monochrome or Gray, you cannot set Edit menu > Tonal Correction > Hue/Saturation/Lightness. |
You can adjust the following settings:
Hue
Adjusts the hue of the color (red, green, yellow, etc.).
Saturation
Adjusts the vividness of the colors. Higher values result in more vivid colors. Lower values result in gray washed-out colors.
Luminosity
Adjusts the brightness of the color. Larger values result in brighter colors. Smaller values result in darker colors.
Posterization
Use Posterization to simplify the image into a set number of color levels. Adjust the level of posterization with the Levels setting. You can set between 2 and 20 levels. More levels will result in a smoother effect.
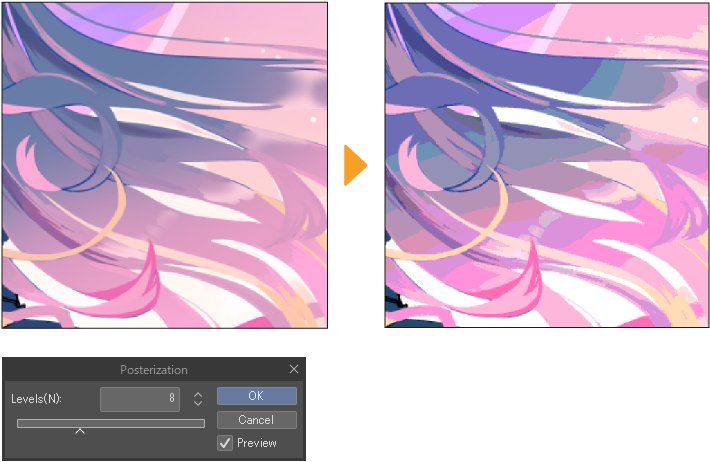
Memo | ·You cannot use Edit menu > Tonal Correction > Posterization on raster layers with the expression color set to Monochrome. ·You cannot use Posterization in Clip Studio Paint DEBUT. |
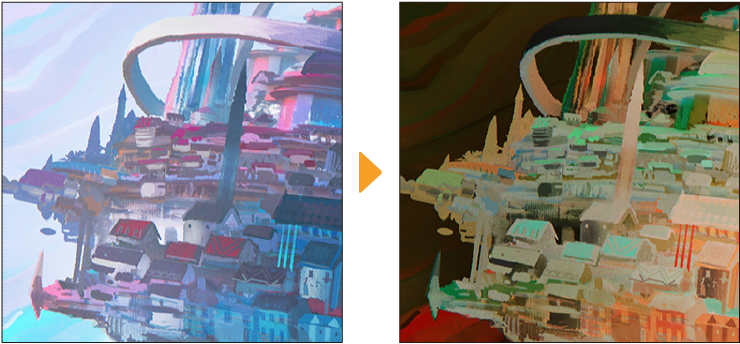
Reverse gradient
Reverse gradient allows you to invert the colors of the image. The inverted values are in RGB (a range from 1–255).
For example, R: 100, G: 255, B: 0 would be inverted to R: 155, G: 0, B: 255.
Memo | You cannot use Reverse gradient in Clip Studio Paint DEBUT. |
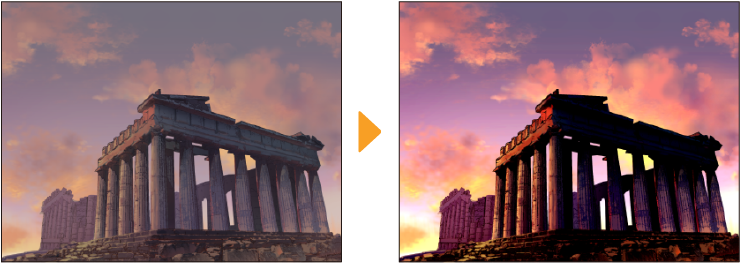
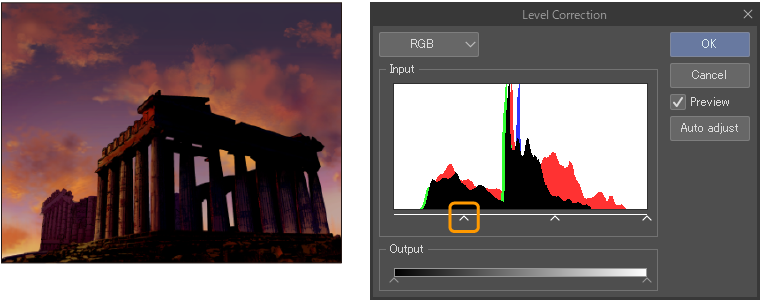
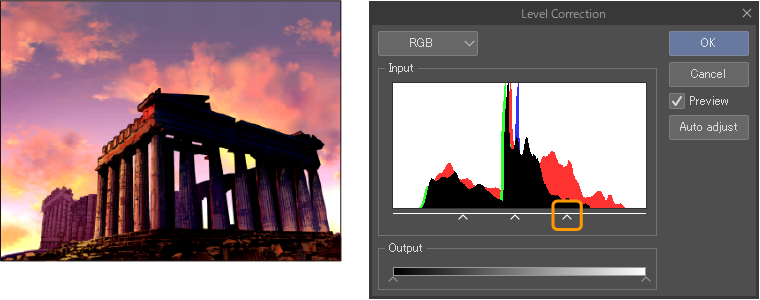
Level Correction
Level Correction allows you to adjust the contrast of an image, using a histogram as a guide.
You can adjust the following settings in the dialog:
Channel
Selects a channel to adjust the levels. You can choose from RGB, Red, Green, or Blue.
Histogram
This graph displays the volume of the dark areas (left side) and bright areas (right side) as mountain-like peaks.
Shadows
This controls the darkest parts of the image. Drag to the left and right to adjust the brightness of the image. Drag to the left to make the image brighter, or to the right to make it darker.
Midtones
This controls the midtones of the image. When you move the Shadows control point or the Highlights control point, the Midtones control point moves in tandem. You can move the Midtones control point without affecting the Shadows or Highlights control points. Drag to the left to make the image brighter, or to the right to make it darker.
Highlights
This controls the lightest parts of the image. Drag to the left and right to adjust the brightness of the image. Drag to the left to make the image brighter, or to the right to make it darker.
Shadows output
This controls the darkest parts of the image. Drag to the left and right to adjust the brightness of the image. Drag to the left to make the image brighter, or to the right to make it darker.
Highlights output
This controls the brightest parts of the image. Drag to the left and right to adjust the brightness of the image. Drag to the left to make the image brighter, or to the right to make it darker.
Auto adjust
This appears when you select Edit menu > Tonal Correction > Level Correction. It automatically adjusts the colors of the selected layer.
Memo | You cannot use Edit menu > Tonal Correction > Level Correction on raster layers with the expression color set to Monochrome. |
Tone curve
You can use the Tone Curve correction to adjust the contrast of the image.
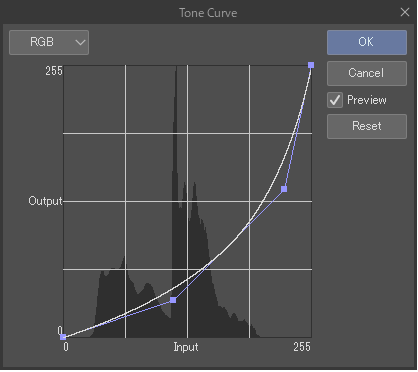
Channel
Selects a channel to adjust the brightness. You can choose from RGB, Red, Green, and Blue.
Tone curve
This graph adjusts the contrast of the image. The horizontal axis of the graph is the Input value (original brightness), and the vertical axis is the Output value (brightness after setting). Tapping the graph adds control points. You can drag the control points to adjust the color.
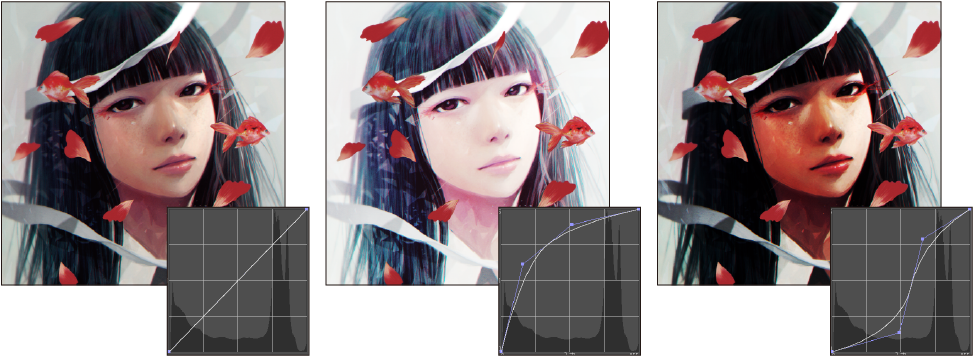
This graph displays the volume of the dark areas (left side) and bright areas (right side) as a histogram in the background. Adjust the tone curve while checking the balance of the original image in the histogram. To delete a control point, drag it outside of the graph.
Memo | ·You cannot use Edit menu > Tonal Correction > Tone Curve on raster layers with the expression color set to Monochrome. ·You cannot use Tone curve in Clip Studio Paint DEBUT. |
Color balance
Color balance adjusts the color tone of the image by changing the balance of each RGB color.
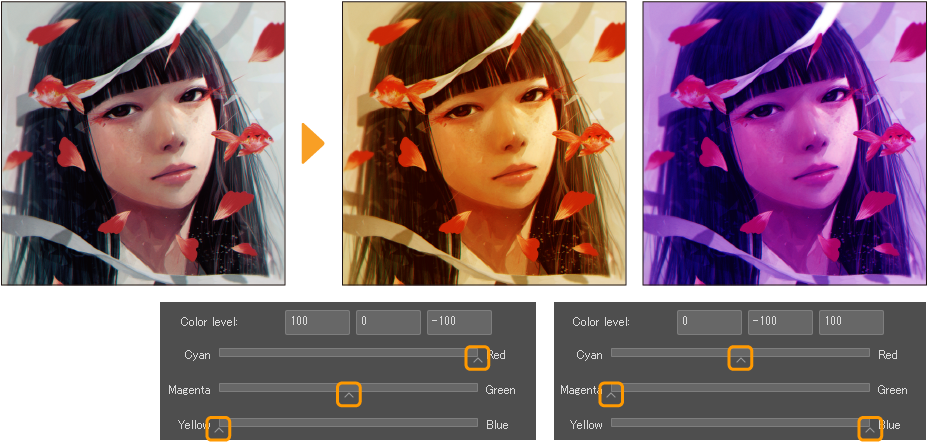
Color balance
You can adjust the color balance by inputting values or moving the sliders. You can move the sliders left and right to adjust the balance of cyan and red, magenta and green, and yellow and blue. The value of each slider is reflected as you move them. From left to right, the numbers show the current values of Cyan - Red, Magenta - Green, and Yellow - Blue.
Gradient balance
Adjusts the color balance from selected levels: Shadow, Half tone and Highlight. Shadows adjusts the dark areas of the image, Highlights adjusts the light areas of the image, and Half tone adjusts the bright areas in the middle of the image.
The results of each are different even if Color Balance is set to the same value. Changes made to the Shadows, Highlights, or Half tone options are kept when moving on to the next option. You can go back and select the option again to readjust its values.
Keep brightness
Retains the brightness of the image even after adjusting the color balance.
Memo | ·You cannot use Edit menu > Tonal Correction > Color Balance on raster layers with the expression color set to Monochrome. ·You cannot use Color balance in Clip Studio Paint DEBUT. |
Binarization
Binarization converts the image into black and white.
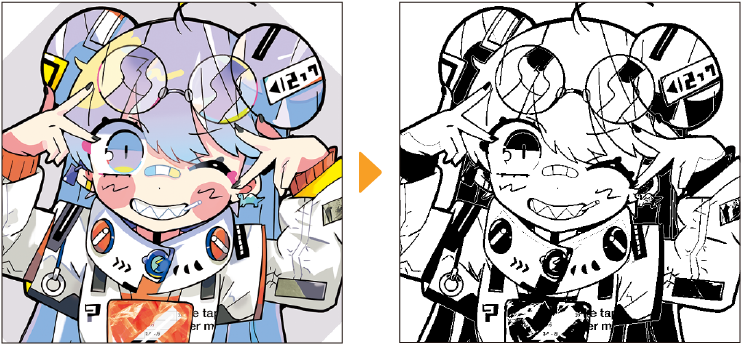
You can adjust the following settings:
Threshold
Sets the threshold between black and white. Colors darker than the set threshold will be converted to black, while colors brighter than the set threshold will be converted to white.
Leave transparency
Appears when you select Edit menu > Tonal Correction > Binarization. If turned on, the opacity of the original image will be kept.
Memo | ·You cannot use Edit menu > Tonal Correction > Binarization on raster layers with the expression color set to Monochrome. ·You cannot use Binarization in Clip Studio Paint DEBUT. |
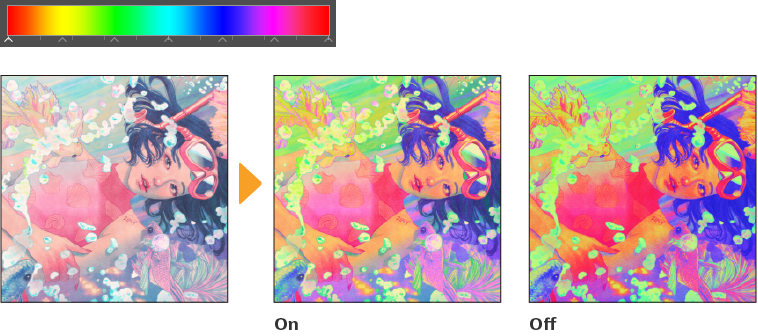
Gradient map
Each shade in the image is replaced with colors of the selected gradient according to the darkness of the color. You can use this to test color palettes or to add color harmony at the finishing stages of an illustration.

In the Gradient map dialog, you can adjust settings for the gradient set, the gradient colors, and how it is applied based on the existing colors of the image. You can preview the results on the canvas while you adjust the settings.
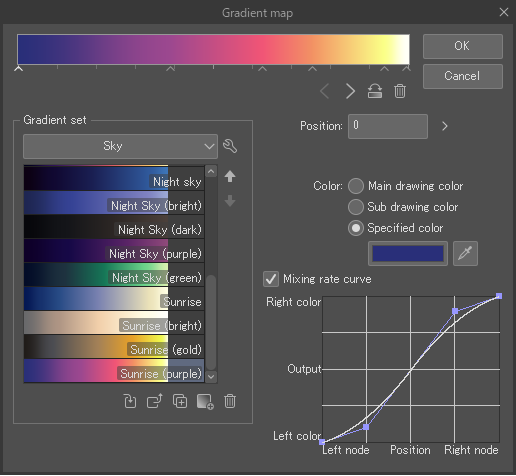
When you create a gradient map from the Layer menu > New adjustment layer > Gradient map, the gradient map layer will be created above the current layer, and you can edit it later. By default, it will be set to 100% opacity on the Normal blending mode, but you can adjust the blending mode and opacity for a more subtle effect.
For detailed information on editing the gradient colors and settings in the Gradient Map dialog, please see "Gradient dialog".
Memo | ·You cannot use Edit menu > Tonal Correction > Gradient map on raster layers with the expression color set to Monochrome or Gray. ·You cannot use gradient maps in Clip Studio Paint DEBUT. |
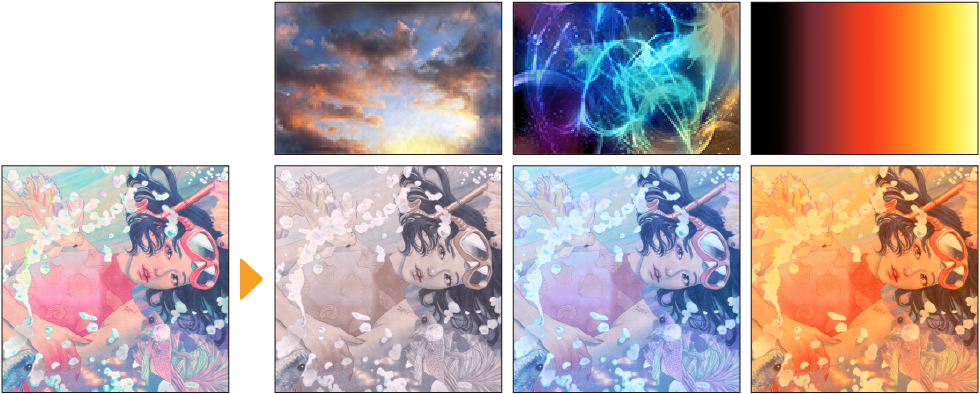
Color Match
Color Match adjusts the colors of the layer to match the color scheme of a selected image or gradient. You can use this to make subtle changes, or completely change the color scheme of your artwork.
Memo | ·You cannot use Color Match as a Correction layer. You can only use it from the Edit menu > Tonal Correction > Color Match. ·You cannot use Color Match in Clip Studio Paint DEBUT. |
In the Color Match dialog, you can adjust the following settings depending on whether you set it to refer to an image or a gradient.
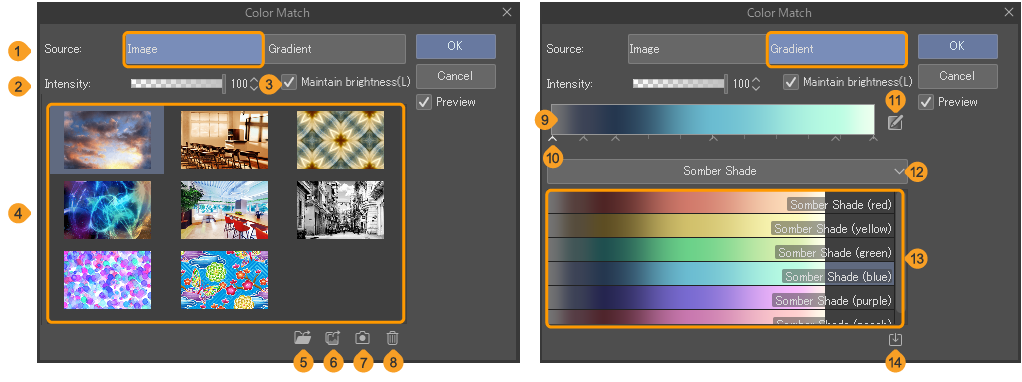
(1)Source
You can set the source for the new color scheme to Image or Gradient. The relevant settings will appear for the selected source type. When set to Image, you can use the reference image’s color scheme to the image on the canvas. When set to Gradient, you can apply a gradient set to the image, similar to "Gradient map".
(2)Intensity
You can adjust the intensity of the applied colors. The default setting is 100. The lower the value, the less effect the color reference will have.
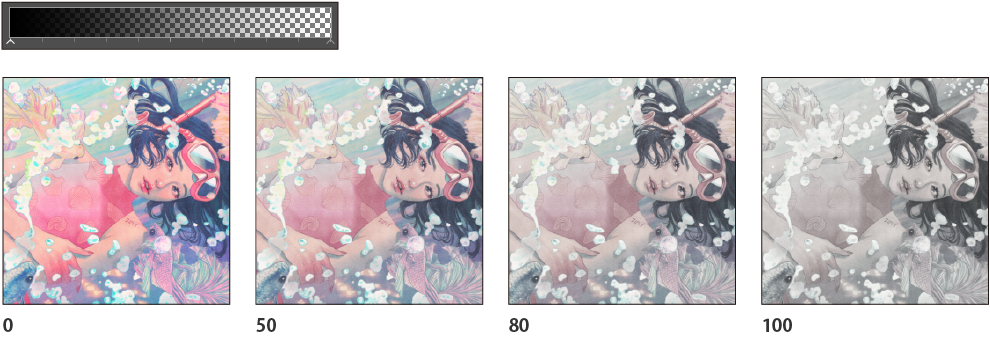
(3)Maintain brightness
Turn this on if you want to maintain the brightness of the original image, or turn it off if you want the colors to be closer to the referenced image or gradient color.
(4)Image list
A thumbnail list of images you can apply to the canvas. Tap a thumbnail to apply the color scheme.
(5)Select from files
Add an image file to apply as a color match. You can import the following file types: Clip Studio format (.clip), BMP, JPEG, PNG, WebP, TIFF, Targa (.tga), Adobe Photoshop Document (.psd), and Adobe Photoshop Big Document (.psb).
(6)Import from photo library (tablet)
Import an image from your device storage or photo gallery.
(7)Import from camera (tablet)
Tap to launch the camera app. You can take a photo and add it to the thumbnail list.
(8)Delete
Remove an image from the thumbnail list.
(9)Color bar
This is the preview of the selected gradient. Tap the color bar to open the "Gradient dialog" where you can edit the gradient in detail.
(10)Node
The nodes mark each color of the gradient as well as the transition points. You can edit the gradient with the nodes by dragging and dropping horizontally. Drag the node vertically to delete the selected node. Tap the area under the color bar to add a new node.
(11)Gradient settings
Tap to open the "Gradient dialog" where you can edit the gradient in detail.
(12)Gradient set list
Tap to open a drop-down list of gradient sets. Select a gradient set and the gradient list will change.
(13)Gradient list
Gradients registered in the current gradient set are shown in the gradient list. Tap to select a gradient and double-tap to apply the gradient to the color bar.
Unlike "Gradient map", reversing the gradient does not affect the results on the canvas.
(14)Add gradient set from materials
Tap to open the Add gradient set dialog where you can search for gradient set materials.