Convert to lines and tones (EX only)
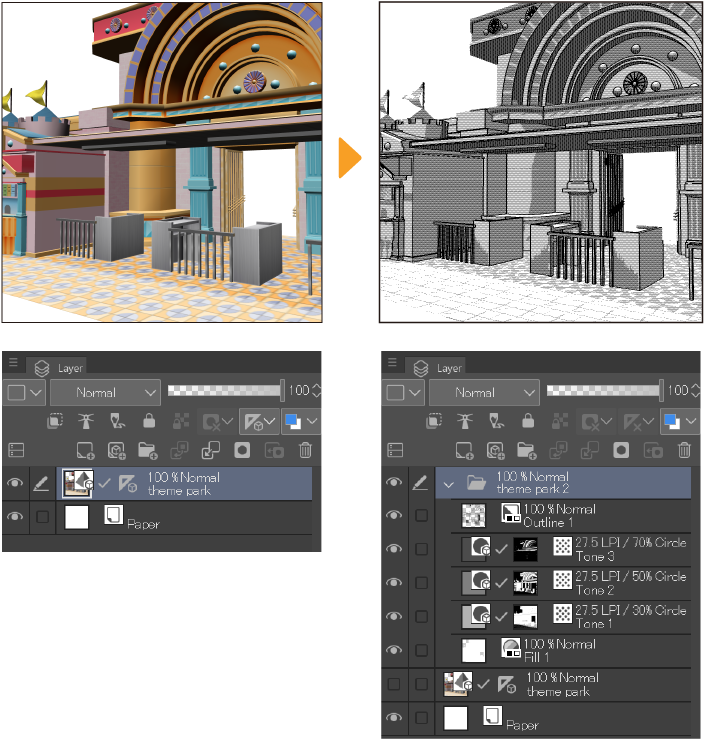
In Clip Studio Paint EX, you can convert images or 3D models into separate layers with lines and screentone shading.
Extracting lines from images
You can convert a selected layer into a folder containing separate layers for the lines and tones.
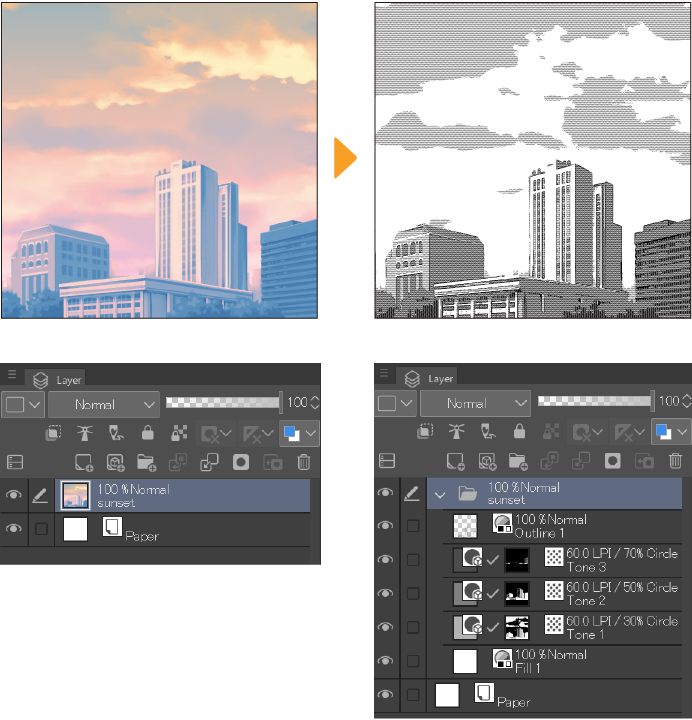
Select the layer you want to convert, then use the Layer menu > Convert to lines and tones to open the dialog. Adjust the settings to get the desired result, then tap OK to convert the layer. You can use the Preview setting to check the result first.
Memo | If converting from a 3D layer, additional settings will appear in the dialog. See "Extracting lines from 3D models" for details on converting a 3D layer to lines and tones. |
Basic settings
When converting to lines and tones, you can set up presets and view a preview on the canvas.
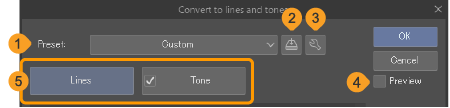
(1)Preset
When you select a preset from the pull-down menu, the dialog settings will change to those registered in the preset. If you change the settings after choosing a preset, then the name will change to Custom.
(2)Register to preset
You can register the current settings as a preset. Tap to open the Add to presets dialog box. Enter a preset name and select the settings you want to include in the preset. Finalize your setting with OK and the new preset will appear in the Preset drop-down menu.
Presets registered for extracting lines from an image cannot be used to extract lines from a 3D object, and vice versa.
(3)Edit preset
Tap to open the Edit preset dialog, where you can edit and manage your presets. See "Edit presets" for details.
(4)Preview
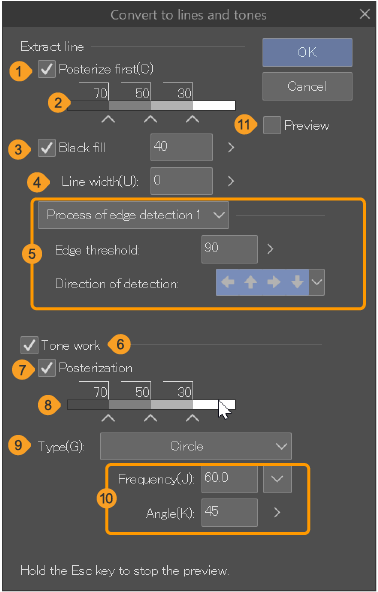
Adjust the grayscale gradient to extract as an outline. The stripes show the proportion of each level of shading. Use the nodes to adjust the grayscale gradient by dragging the nodes horizontally to adjust the levels. You can tap an empty space on the bar to add a new node, or drag nodes out of the slider to remove them.
(5)Category
Tap Lines or Tone to view and edit the settings for extracting lines and tones from the image. Tap the Tone checkbox on to adjust the tones. If it is turned off, only the lines will be extracted.
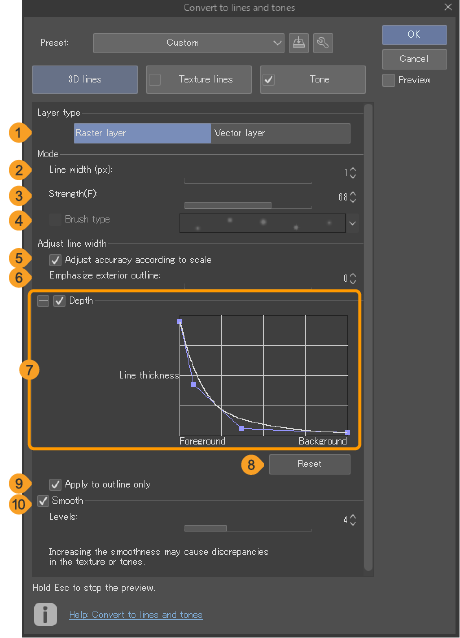
Lines settings
When you select the Lines category, you can view and edit the following settings.
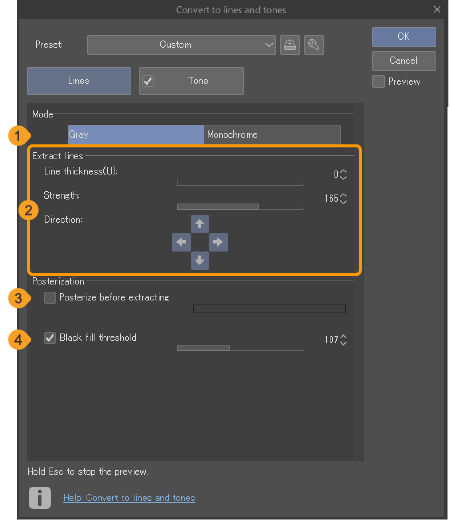
(1)Mode
Set the mode for extracting the lines, from Gray or Monochrome. Depending on the chosen mode, the Extract lines settings will change.
(2)Extract lines
Defines how edges are detected in order to extract the outline. The settings shown depend on the Mode selected.
When Mode is set to Gray
The following settings will appear when the Mode is set to Gray.
·Line thickness: You can set the width of the outline by entering a value or adjusting the slider.
·Strength: When the value is higher, the detection is stronger, and more lines are likely to be picked up.
·Direction of detection: Use the arrow icons to specify the directions in which to detect the outline. When turned off, outline detection is weaker in that direction.
When Mode is set to Monochrome
The following settings will appear when the Mode is set to Monochrome.
·Line thickness: You can set the width of the outline by entering a value or adjusting the slider.
·Line density: Adjusts the continuity of the detected outline based on variation in thickness. When the value is larger, the lines will be longer and have fewer breaks.
·Remove fragments: This adjusts the levels of the lines detected. The larger the value, the more likely that faint lines will not be picked up.
(3)Posterize before extracting
If turned on, the original layer is posterized before outline extraction. The levels can be adjusted with the levels slider.
(4)Black fill threshold
Set the areas to be filled in black. You can set the threshold by entering a value or adjusting the slider.
Tone settings
When the Tone checkbox is on, you can view and edit the following settings.
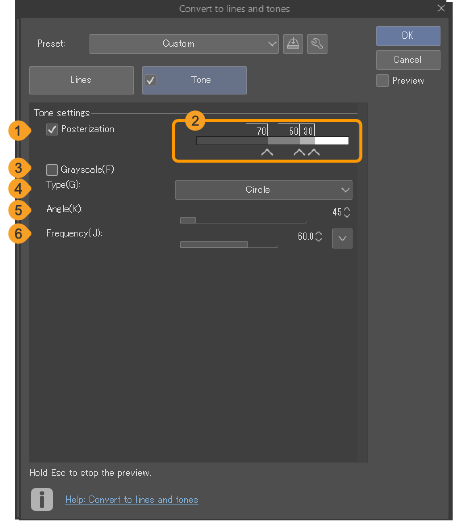
(1)Posterization
When turned on, you can adjust the density of the tone using the levels slider.
(2)Levels slider (tones)
Adjusts the density of the tones. Drag the nodes horizontally to adjust the levels of each density. Tap an empty space on the bar to add a new node, or drag nodes out of the slider to remove them.
(3)Grayscale
Turn on to apply grayscale to the tone posterization instead of a dot pattern. When turned on, you cannot use the Type, Angle, or Frequency settings.
(4)Type
Select the shape of the screentone dots.
(5)Angle
Specify the angle of the pattern.
(6)Frequency
Specify the frequency of the pattern. When Type is set to Noise, the Size and Factor settings appear instead of Frequency.
Extracting lines from 3D models
You can convert a 3D model into a folder containing separate layers for the outlines and tones.
Select the layer you want to convert, then use the Layer menu > Convert to lines and tones to open the dialog. Adjust the settings to get the desired result, then tap OK to convert the layer. You can use the Preview setting to check the result first.
Memo | If converting from an image, different settings will appear in the dialog. Please see "Extracting lines from images" for details on converting an image to lines and tones. |
Basic settings
When converting to lines and tones, you can set up presets and view a preview on the canvas.

(1)Preset
When you select a preset from the pull-down menu, the dialog settings will change to those registered in the preset. If you change the settings after choosing a preset, then the name will change to Custom.
(2)Register to preset
You can register the current settings as a preset. Tap to open the Add to presets dialog box. Enter a preset name and select the settings you want to include in the preset. Finalize your setting with OK and the new preset will appear in the Preset drop-down menu.
Presets registered for extracting lines from an image cannot be used to extract lines from a 3D object, and vice versa.
(3)Edit preset
Tap to open the Edit preset dialog, where you can edit and manage your presets. See "Edit presets" for details.
(4)Preview
Adjust the grayscale gradient to extract as an outline. The stripes show the proportion of each level of shading. Use the nodes to adjust the grayscale gradient by dragging the nodes horizontally to adjust the levels. You can tap an empty space on the bar to add a new node, or drag nodes out of the slider to remove them.
(5)Category
Tap 3D lines, Texture lines, or Tone to view and edit the settings for extracting lines, texture, and tones from the image. Use the Texture lines and Tone checkboxes to determine whether to extract texture and tones. When turned off, only the lines will be extracted.
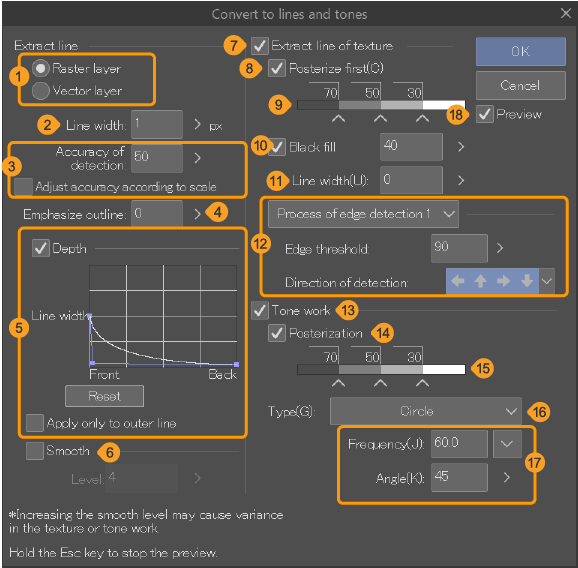
3D Lines settings
When you select the 3D lines category, you can view and edit the following settings.
(1)Layer type
Choose whether to extract the lines to a raster layer or a vector layer.
(2)Line width
You can set the width of the outline by entering a value or adjusting the slider.
(3)Strength
When the value is higher, the detection is stronger, and more lines are likely to be picked up.
(4)Brush type
When the layer type is set to Vector layer, you can use this checkbox to set up a brush tip shape for the extracted lines. Use the dropdown to choose from a list of preset brush shapes.
(5)Adjust accuracy according to scale
Turn on Adjust accuracy according to scale to adjust the precision depending on the size of the 3D material. Line extraction for parts of the model that are far from the camera will be suppressed. This setting is not available for 3D layers compatible with Ver. 1.5 or earlier.
(6)Emphasize exterior outline
Use this setting to adjust how much the outline is emphasized. The outline is the boundary line between the 3D model and the space around it. If there are overlapping 3D models or parts, this overlap will not be considered part of the outline.
(7)Depth
Turn this on to give depth to the lines. Expand the Depth settings with the + symbol to use the graph to adjust the results. When there is a bigger difference between the Foreground and Background detection, the depth effect will be stronger.
(8)Reset
Reset the depth graph to default.
(9)Apply to outline only
Turn on to apply the depth settings only to the outline of the 3D material.
(10)Smooth
Turn this on to smooth the outlines of 3D layers, and use the Levels slider to adjust the intensity. A larger level value makes the outline smoother.
Texture lines settings
When the Texture lines checkbox is on, the texture of the 3D layer will also be converted, you can view and edit the settings for the texture lines. See "Lines settings" for details.
Tone settings
When the Tone checkbox is on, you can view and edit the tone settings. See "Tone settings" for details.