AI Tools
Smart Smoothing
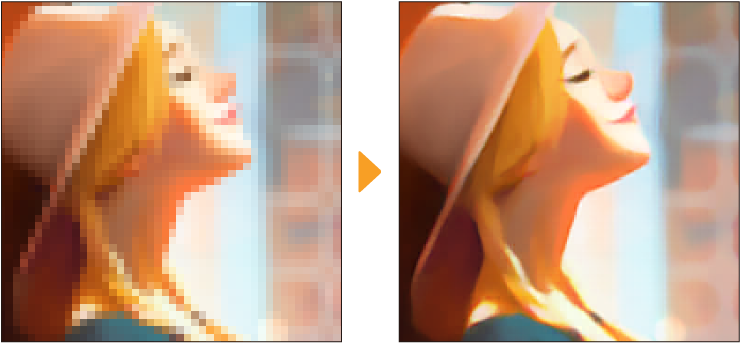
Smart Smoothing is a feature that smooths images and reduces pixel noise caused by enlarging an image when changing the resolution or transforming it.You can only use Smart Smoothing on raster and image material layers (excluding image materials using vectors).
Use this feature by selecting a layer and then tapping the Edit menu > Smart Smoothing. Then, adjust the settings in the Smart Smoothing dialog and tap OK.
For images with jaggies caused by low resolution, applying Change Image Resolution from the Edit menu to scale the image up before Smart Smoothing will give a better result.
You can adjust the following settings:
Intensity
Specifies the strength for Smart Smoothing.The appropriate Intensity depends on the scale ratio of the image.Weak is aimed for images that have been doubled in size, Middle for images that have been tripled in size, and Strong for images that have been quadrupled in size.
Remove noise
Removes noise from the image.
Processing unit
Selects the hardware used to process the Smart Smoothing.Depending on your device, you might not be able to select this.
Preview
Shows a preview of the results on the canvas.The larger the canvas size, the longer it may take for the preview to load.Hold down Esc to stop the preview.
Colorize (Technology preview)
This function uses AI technology to automatically colorize line art merged into a single layer.
|
Important |
When you use this feature, the image data is uploaded to a server, where the AI interprets the data and colors the image.A network connection is necessary to use this function.For information on images uploaded to the server and generated data, see "About AI features". |
Colorize all
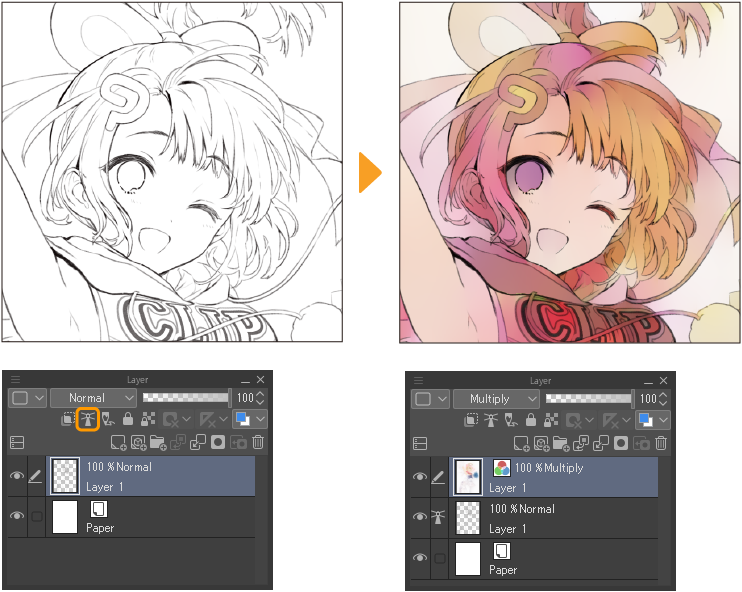
First, select the layer with your line art and set it as the reference layer.
Then select Edit > Colorize (Technology preview) > Colorize all. This will create a new raster layer on top of the selected layer with the colorized result.
For details on reference layers, see "Reference layers".
Use hint image and colorize
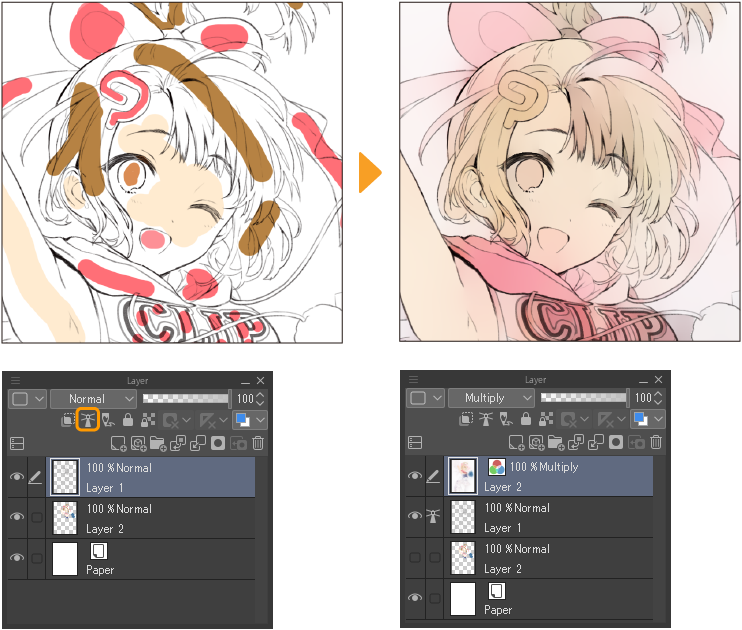
In addition to the line art, you can also create a hint layer to specify the colors when colorizing the image.You can use one lineart layer and one hint layer with Use hint image and colorize. Multiple layers cannot be referenced.
Select the layer your line art is on and set it as the reference layer.Create a new raster layer and paint the colors that will serve as a hint for the colorization.Then select Edit menu > Colorize (Technology preview) > Use hint image and colorize. This will create a new raster layer on top of the selected layer with the Colorized result.The hint layer will be hidden.
For details on reference layers, see "Reference layers".
Use more advanced settings
In addition to line art, you can create a layer with colors as a hint, and then use the Auto Colorize dialog to adjust the colorization method.
First, create your line art and color hint layers.
Then select Edit menu > Colorize (Technology preview) > Use more advanced settings. This will open the Colorize dialog.Make color adjustments in the Colorize dialog and tap OK.
This will create a new raster layer above the line art layer with the colorized result.The hint layer will be hidden.
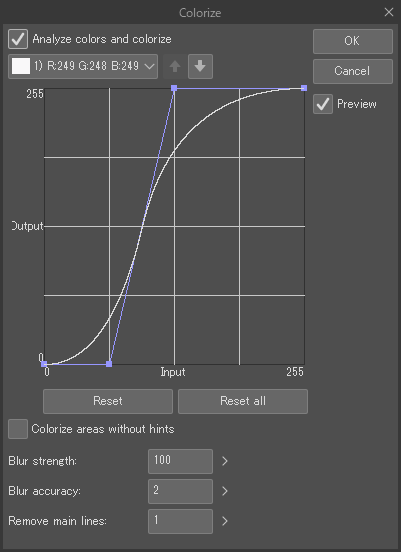
Analyze colors and colorize
When active, automatic coloring is performed for each color on the hint layer.The color output can be adjusted with the Tone Curve graph.
Select color
Selects the color to adjust with the Tone Curve graph.The order of the dropdown menu reflects the order of processing in the case of overlapping colors.The current hint color is shown on the dropdown.If there are more than 10 hint colors, the 10 colors with the largest areas are extracted.We recommend using no more than 10 solid hint colors.
Up
Moves the selected color one step up.
Down
Moves the selected color one step down.
Tone Curve
Adjusts the output of the selected part.Drag the control points to adjust.
Reset
Resets the tone curve setting for the selected color.
Reset all
Resets the tone curve settings for all colors.
Colorize areas without hints
When turned on, the results will be combined with the results that would be made with Colorize all.
Blurring intensity
Sets the intensity of blurring the coloring results for lines and line boundaries.The larger the number, the more blurred the colors are.
Blurring accuracy
Specifies the number of times to calculate the blur.The larger the number, the smoother the blur effect will be.
Remove main lines
Makes main lines less visible by expanding the bright areas of an image.The larger the value, the wider the bright areas become.
Preview
Shows a preview of the results on the canvas.
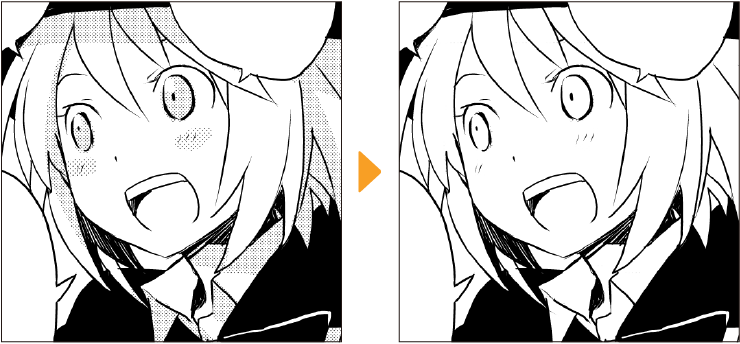
Remove tones (Technology preview)
Selected screentones on a raster layer can be removed or converted to grayscale.This is useful when loading manuscripts created with traditional media or files that have been flattened.If you create a selection area, the effect will only be applied to that area.
When used on a raster layer with the expression color set to Color, the image will be converted to grayscale.
|
Important |
This function is a technology preview.You can try it out before its official release. This feature cannot be used on images with height x width dimensions exceeding 53,000,000 pixels. When you use this feature, the image data is uploaded to the server, where the AI interprets the data and converts the tones.A network connection is necessary to execute this function.For information on images uploaded to the server and generated data, see "About AI features". |
|
Memo |
You cannot use Remove tones (Technology preview) in Clip Studio Paint DEBUT or PRO versions |
Delete tones from selected layer
You can remove screentones from raster layers.Select the layer and tap Edit menu > Remove tones (Technology Preview) > Delete tones from selected layer.
Change tones to grayscale
The screentones on a raster layer can be changed to grayscale.Select the layer and tap Edit menu > Remove tones (Technology Preview) > Change tones to grayscale.
