Import image file to canvas
You can import an image file to the canvas by choosing File menu > Import and selecting the relevant option. You can import the following file formats: BMP, JPEG, TGA, PNG, TIFF, Adobe Photoshop Document (extension: psd) and Adobe Photoshop Big Document (extension: psb), and Clip Studio name file (extension: cnsf).
An image material layer will be created for each file opened, regardless of the original file configuration.
You cannot draw on image material layers with drawing tools. Use the Layer menu > Rasterize to convert it to a standard raster layer that you can draw on.
Image
You can import an image file as an image material layer by choosing File menu > Import > Image....
When using Windows/macOS, you can also import an image file by dragging and dropping it to the Layer palette. If you select more than one file, an image material layer will be created for each file.
If you import an image while a selection area is active on the canvas, a layer mask will be created and the area outside the selection will not be visible.
Pattern from Image
Select File menu > Import > Pattern from Image and an image material layer of that image tiled will be created. If you select more than one file, an Image material layer will be created for each file.
If you import an image while a selection area is active on the canvas, a layer mask will be created and the area outside the selection will not be visible.
From photo library (iPad)
Import an image file as an Image material layer by choosing File menu > Import > From photo library to select an image from your iPad photo library.
If you import an image while a selection area is active on the canvas, a layer mask will be created and the area outside the selection will not be visible.
From storage (Android)
Import an image file as an Image material layer by choosing File menu > Import > From device to select an image from your Android storage.
If you import an image while a selection area is active on the canvas, a layer mask will be created and the area outside the selection will not be visible.
Camera (tablet)
Select the File menu > Import > Camera... to switch to your tablet camera. Once you have used the camera to take a picture, tap the Use Photo button in the lower right corner. Return to Clip Studio Paint and the image will be imported as an Image material layer.
If you import an image while a selection area is active on the canvas, a layer mask will be created and the area outside the selection will not be visible.
Batch import (EX only)
You can use Batch import to import an image file to each page in a multiple page project. Select the File menu > Import > Batch import and select the files you want to import.
The Batch import dialog will open, and the canvas will show a preview of the image on the first page. Dictate where the image will appear on the canvas by using the handles or by using the Tool Settings palette.
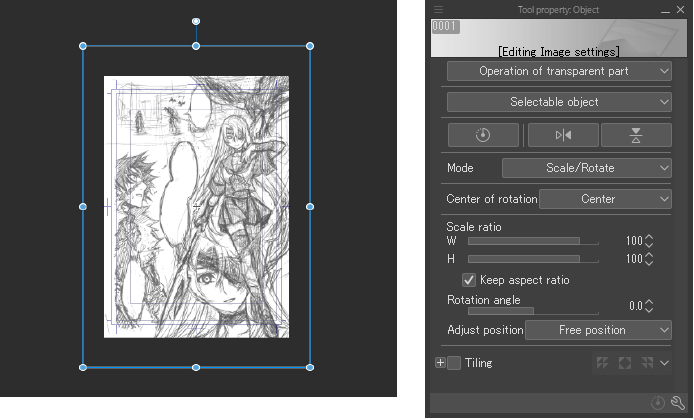
Once you have finished placing the image, set the start page and layer type from the Batch import dialog box. Press OK in the Batch import dialog box to import the image files to each page. If you import more images than the current total of pages, more pages will be added.
Memo | Using Batch import on a canvas that is not part of a multi-page project will prompt the Create story folder dialog to appear. For details on the Create story folder dialog box, see "Creating a story folder". |
You can edit the following settings when batch importing.
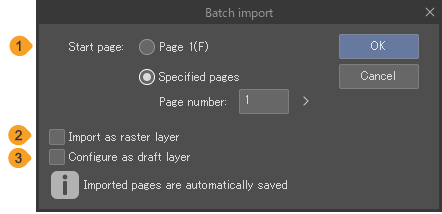
(1)Start page
Select Page 1 to import images from the first page. Select Specified page to import images from the page specified in Page number.
(2)Import as raster layer
Check this on to import the image as a raster layer. If this option is not checked, the image will be imported as an Image material layer.
(3)Set as draft layer
Check this on to set the image as a draft layer. The contents of draft layers will not be visible when you export the file in a different format or print it.