Creating a story folder
When you add additional pages to a single-page project, such as by importing pages or adding blank pages from the Story menu > Add page, the Create story folder will appear.
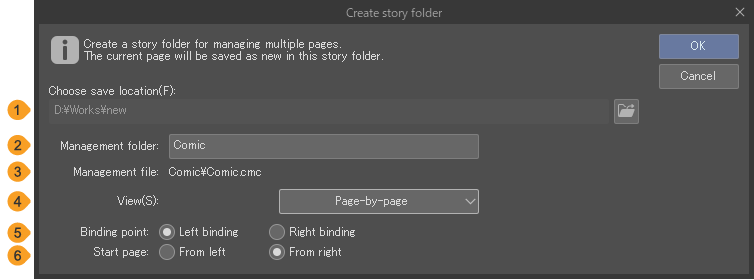
(1)Choose save location
Choose the save location of the management folder for the multi-page project. Tap the Browse icon to open your file manager and choose a save location. The current file will also be newly saved in the chosen location.
(2)Management folder
Set a name for the management folder and file.
(3)Management file name
(4)View
You can set the page viewing mode to Page-by-page or Webtoon. Select Page-by-page to see settings for multi-page projects. Some settings here may affect what is displayed in the page management window.
(5)Binding point
Selects the direction in which to bind the book. Generally, Left binding is used for Western-style comics, and Right binding is used for Japanese-style manga.
(6)Start page
Set which side to put the first page. Select From Right if you want to start from the page that is placed on the right, or From Left if you want to start from the page that is placed on the left.
The Start page setting is not available when Cover page is turned on.
Memo | If adding new pages from the Change project settings dialog, the View setting and Binding point, Start page settings will not appear. |
Select Scan Device (Windows/macOS)
To use a commercial scanner, you will need to select the appropriate scanner driver. Select the File menu > Import > Select scan device. The Select source dialog box will appear, and you can select the scanner.
Scan (Windows/macOS)
Use a scanner to import your paper drawings into Clip Studio Paint. Select File menu > Import > Scan.
Once the scanner driver is displayed, set up the driver, and scan. The scanned image will appear as an image material layer on the layer you are currently editing.
Memo | Please refer to your scanner to see how to set it up. Please refer to the instruction manual of the scanner. |
Continuous Scan (Windows/macOS)
You can scan in multiple pages to the same project using a commercial scanner. Select File menu > Import > Continuous Scan.
Memo | Continuous Scan is only available in Clip Studio Paint EX. |
Once the scanner driver is displayed, set the driver, and scan all the pages you have. Once all the pages are scanned, exit the driver.
The canvas will show a preview of the image on the start page. Dictate where the image will appear on the canvas by using the handles visible or by using the Tool Settings palette.
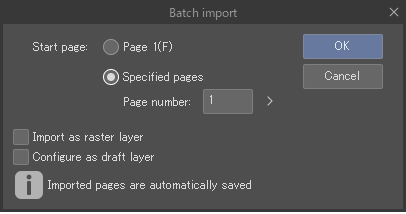
Once you have finished placing the image, set the start page and layer type from the Continuous Scan dialog box.
Press OK in the Continuous Scan dialog box to import the image file to each page. If you have more images than pages available, more pages will be added. The Continuous scan dialog box has the same functions as the Batch import dialog box.
Memo | Using Continuous Scan on a canvas that is not part of a multi-page project will prompt the Create story folder dialog to appear. |
Create file object
Import an image file as a file object layer by going to the File menu > Import > Create file object.
You can import the following image file formats: Clip Studio format (extension: clip), BMP, JPEG, PNG, TIFF, Targa, Adobe Photoshop Document (extension: psd), and Adobe Photoshop Big Document format (extension: psb).
For details on file object layers, see "File objects".