Using layers
There are several palettes for managing and editing layers. See the following sections for more details.
Layer Palette

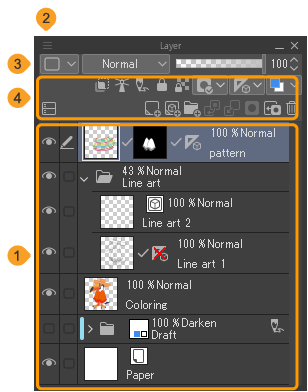
The Layer palette shows the layers of the canvas stacked in order. You can also use the Layer palette menu and icons to change layer properties, add new layers, merge layers, and so on.
(1)Layer list
(2)Layer palette menu
The Layer palette menu is the three bars at the top left of the Layer palette. It contains the same menu commands as the Layer menu, as well as additional commands for changing the layout of the Layer palette.
(3)Layer Property bar
The Layer Property bar is the top two rows of icons. You can use these icons to change the properties of the selected layer.
(4)Layer Command bar
The Layer command bar is the lowest row of icons. Here you can easily access commands to add new layers, clip to lower layers, and create layer masks.
Layers list

This is the list of layers in the file. You can drag vertically within the layer list while holding the space bar to scroll through the layer list.
Memo | You can display the layers list in two panes by tapping the Display layer list in split view icon at the bottom left of the Layer palette command bar. This is useful when you have a lot of layers to scroll through. |

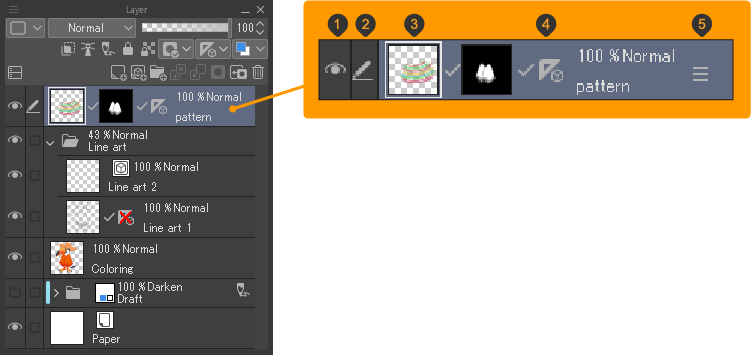
(1)Visibility
Sets whether the layer is visible or hidden. When an eye icon is shown, the layer is visible. You can right-click the icon to open a context menu with more commands for making multiple layers visible or hidden.
Hold Alt while tapping the icon to make only the selected layer visible. To return to the previous view, hold Alt and tap the icon again.
(2)Layer status
This column shows the layer status with icons. The active layer is indicated with a pen icon.
You can hold Alt or Shift and tap the Layer status box to select or deselect additional layers as well as the active layer. When multiple layers are selected, layers other than the active layer are indicated with a check mark.
Reference layers are indicated with a lighthouse icon, and light table layers on the Animation cels palette are indicated with the light table icon.
(3)Layer thumbnail
The thumbnail shows the drawing on the layer.
You can tap the layer thumbnail while holding Ctrl to create a selection from the layer.
(4)Layer details
This area displays layer information such as the layer name, opacity, and blending mode. The current selected layer is indicated in light blue. You can double-tap the field to rename the layer.
On Windows/macOS, you can move layers in the layer stack by dragging this area up or down.
(5)Grip (tablet)
The grip icon is used to reorder layers on tablets.
Drag the grip up and down to change the layer order. When multiple layers are selected, all selected layers will be moved.
Property Bar

The Property Bar shows the properties of the selected layer. You can use these icons to edit the selected layer. You can hide the Property Bar from the Layer palette by tapping Layer palette menu > Show property bar.
(1)Change palette color
Adds a color mark to the layer selected on the Layer palette. You can select from the dropdown list, or select Use other color to choose a custom color with the Color settings dialog box.
(2)Blending mode
This dropdown menu allows you to specify the blending mode. See "Blending modes" for details.
(3)Opacity slider
Adjusts the opacity of the selected layer. The smaller the value, the more transparent the layer will be.
(4)Clip to layer below
Limits the area of the selected layer to within the area of the layer immediately below.
(5)Set as reference layer
Sets the selected layers or layer folder as a reference layer. When turned on, a lighthouse icon appears beside the reference layer. Click again to toggle this setting on and off.
(6)Set as draft layer
Sets the selected layer as a draft layer.
(7)Lock layer
Locks a layer so that the settings cannot be changed and the layer cannot be drawn on. Click again to toggle this setting on and off.
(8)Lock transparent pixels
Locks the transparent areas of a raster layer. When this setting is on, you can draw on existing areas without running over to transparent areas. Click again to toggle this setting on and off.
(9)Mask settings
This dropdown allows you to disable/enable the selected mask and show the mask area in purple.
(10)Ruler settings
Set the range of layers that will show and snap to the ruler, and toggle whether the ruler and layer move together.
(11)Change layer color
Toggles the Layer color setting on and off to change the layer to a specified color. By default, the layer color is blue. You can set a custom layer color using the dropdown arrow and selecting Layer color (substitute for black) or Sub color (substitute for white).
Command Bar

The Command Bar is the bottom row in the Layer palette. This row lists command icons related to layers.
From left to right, the commands are:
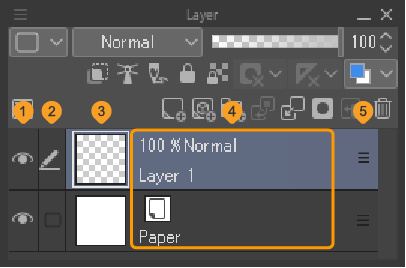
(1)Show layer list in split view
(2)New raster layer
(3)New vector layer
(4)New layer folder
(5)Transfer to lower layer
(6)Merge with layer below
(7)Create layer mask
(8)Apply mask to layer
(9)Delete layer
You can hide the Command Bar from the Layer palette by tapping the Layer palette menu > Show command bar. You can also move the Command Bar to the bottom of the Layer palette from the Layer palette menu > Set command bar below list.