Clip Studio Tabmate (Windows/macOS/Android/Chromebook)
The Clip Studio Tabmate is a handheld shortcut device (sold separately) that allows you to perform different commands in Clip Studio Paint.
Memo | ·See more details about the Clip Studio Tabmate and its product specifications here. ·Please refer to the instructions included in the package for details on how to connect the Clip Studio Tabmate. |
CLIP STUDIO TABMATE Settings
Set what buttons will do what in Clip Studio Paint in the CLIP STUDIO TABMATE Settings dialog.
·Windows: Open the File menu > CLIP STUDIO TABMATE > CLIP STUDIO TABMATE Settings.
·macOS/Android/Chromebook: Open the Clip Studio Paint menu > CLIP STUDIO TABMATE > CLIP STUDIO TABMATE Settings.
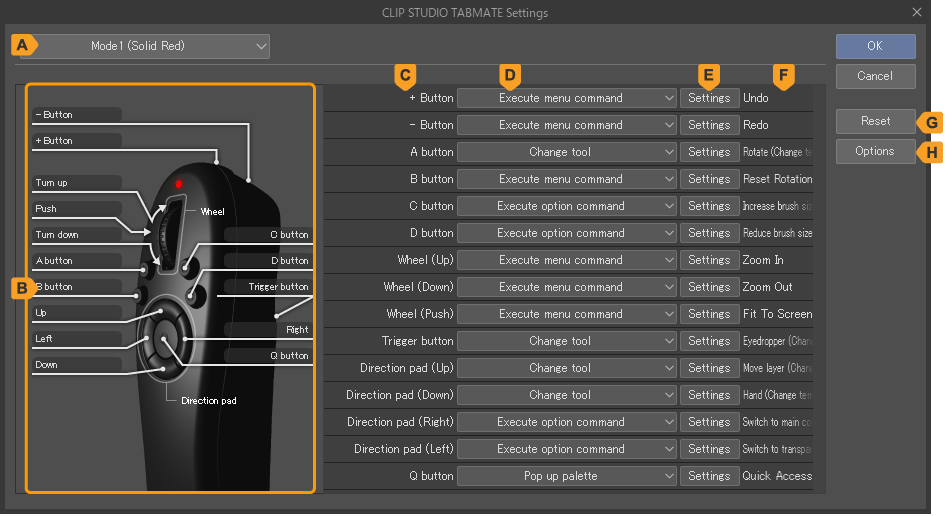
A.Modes
You can set different modes for different functions on your Clip Studio Tabmate. You can set up a Mode 1 up to a Mode 4.
Switch between the modes by pressing the Clip Studio button on the Clip Studio Tabmate.
B.Preview
Displays the Clip Studio Tabmate modes and the functions. The functions selected will be displayed in the LED preview when its mode is selected. Pressing the Clip Studio Tabmate’s buttons will highlight the button name.
C.Button names
Names of the Clip Studio Tabmate buttons that you can assign Clip Studio Paint actions. Depending on the action assigned to the button it may be displayed as a button movement or number.
D.Assigned functions
Assigns Clip Studio Paint functions to the Clip Studio Tabmate. Select the function you want assign to each button from the pull-down menu. Depending on the function, a pop-up dialog box corresponding to the selected function will appear.
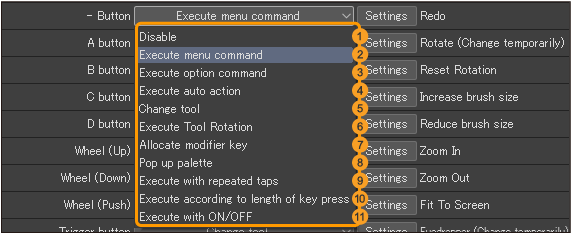
(1)Disable
This disables the button.
(2)Execute menu command
Pressing the button will execute the menu command. If you select this option, the Settings for "Execute menu command" dialog box will appear. Select a menu command from the dialog box and click OK to assign it.
(3)Execute option command
Pressing the button will execute an auxiliary operation. If you select this option, the Settings for "Execute option command" dialog box will appear. Select a command from the dialog box and click OK to assign it.
The following auxiliary functions can be assigned through the Settings for "Execute option command" dialog: Canvas, Tool property palette, Brush size palette, Sub tool palette, Drawing color, Edit, Confirm and Cancel, Layer Property Palette, and Quick Access Palette.
(4)Execute auto action
Pressing the button will execute an auto action. If you select this option, the Settings to Execute auto action dialog box will appear. Select an auto action from the dialog box and tap OK to assign it.
(5)Change tool
Pressing the button will switch to a tool or sub tool. If you select this option, the Settings to change tools dialog box will appear. Select a tool or sub tool from the dialog box and tap OK to assign it to a button.
If you turn on Switch tool temporarily (tool shift) in the Settings to change tools dialog box, you can change to a different tool while holding down a button on the Clip Studio Tabmate. Releasing the button will return it to the original tool.
(6)Execute tool rotation
Tool rotation is a function that allows you to switch the Clip Studio Paint tools each time a Clip Studio Tabmate button is pressed. If you select this option, the Tool Rotation Settings dialog box will appear where you can set tools.
(7)Allocate modifier key
You can assign modifier keys (Ctrl, Shift, Alt, Space) from the Settings to allocate modifier key dialog. More than one modifier key can be selected from the Settings to allocate modifier key dialog box. In that case, it will be equivalent to multiple modifier keys being pressed.
(8)Pop up palette
Pressing a button will summon the palette set from the Palette pop-up settings dialog. Set the display command for the palette in the Palette pop-up settings dialog. You can choose either Display/hide pop-up or Display pop-up while pressing button and select the name of the palette. Tap OK after selecting the palette you want and the display command.
Pressing the Clip Studio Tabmate button when set to Display/hide pop-up will hide the selected palette. Pressing the Clip Studio Tabmate button when set to Display pop-up while pressing button will display the selected palette while pressed.
(9)Execute with repeated taps
Multiple functions of Clip Studio Paint can be assigned to a single button on the Clip Studio Tabmate. Different functions can be executed according to the number of times the button is pressed. Unlike tool rotation, functions other than tools can also be selected. For more details on this setting, see When the number of consecutive taps to execute is selected.
(10)Execute according to length of key press
Multiple functions of Clip Studio Paint can be assigned to a single button on the Clip Studio Tabmate. Different functions can be executed depending on the length of the button press. For more details on this setting, see When selecting Execute according to length of key press.
(11)Execute with ON/OFF
Different functions can be turned on while pressing a Clip Studio Tabmate button and then turned off again upon release of the button.
For more details on this setting, see When Execute with ON/OFF is selected.
Memo | The following items cannot be selected for Pop up palette, Execute with repeated taps, Execute according to length of key press, or Execute with ON/OFF: ·Wheel (Up) ·Wheel (Down) ·Items added when Execute with repeated taps is selected ·Items added when Execute according to length of key press is selected ·Items added by selecting Execute with ON/OFF |
E.Settings
Tap this to bring up the settings for the operation selected.
F.Information area
This indicates the action assigned to the button. If the function has registered shortcut keys, you can assign those functions without selecting it from the Assigning functions drop-down menu.
Double-clicking this column shows Input with shortcut. Input the shortcut key for the operation and press Enter to have it displayed here.
G.Reset
You can reset the Clip Studio Tabmate to its default settings.
H.Options
For more details, see the TABMATE Options dialog.
Tool Rotation Settings dialog
Configure the settings in the Tool Rotation Settings dialog to control the Tool Rotation settings for the Clip Studio Tabmate. You can bring up the Tool Rotation Settings by doing the following.
·In the Clip Studio Tabmate Settings dialog select Tool Rotation from the assigned functions pulldown menu.
·Windows users: Open the File menu > CLIP STUDIO TABMATE > Tool Rotation Settings.
·macOS/Android/Chromebook users: Open the Clip Studio Paint menu > CLIP STUDIO TABMATE > Tool Rotation Settings.
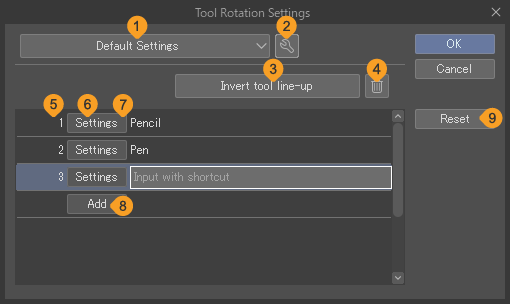
(1)Select setting
Multiple settings can be made for the tool rotation. You can choose to set tools from various settings.
(2)Show menu
Tap this to bring up a menu where you can change the settings of the selected tool rotation or add tool rotation settings.
Create new settings: Create a new tool rotation setting.
Delete settings: Delete the currently selected tool rotation settings in the Tool Rotation Settings dialog.
Duplicate settings: Duplicate the currently selected tool rotation settings in the Tool Rotation Settings dialog.
Edit settings: Select this to bring up the Edit settings dialog. You can change the name of the tool rotation settings here.
(3)Invert tool line-up
Tap this to reverse the order of the tools.
(4)Delete tool from line-up
Deletes a tool from the tool rotation. Select the tool you want to delete from the assigned tool line-up and tap Delete tool from line-up.
(5)Order
Numbers indicating the order of the tools when switching through them.
(6)Settings
Tap this to bring up the Tool settings dialog. Select a tool or sub tool and tap OK to add it to the tool rotation. The assigned tool or sub tool will be displayed to the right of the Settings button.
(7)Tool name
The name of the tool or sub tool set in the tool rotation will be displayed here.
Double tap the tool name to display Input with shortcut. Enter in the shortcut key for the tool or sub tool you want and press Enter to set it in the tool rotation.
(8)Add
Tap this to add a tool to the tool rotation. Each tool rotation can have up to 10 tools assigned to it.
(9)Reset
Use this to reset the tool rotation to the default. Any added tool rotation settings and tool assignments will be deleted.
TABMATE Options dialog
You can set the button operation timing for the Clip Studio Tabmate.
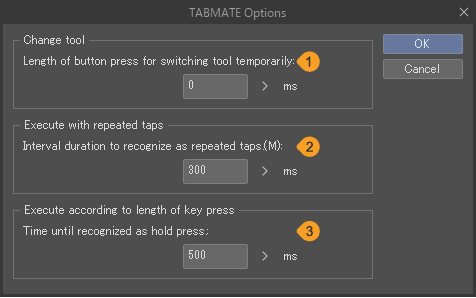
(1)Length of button press for switching tool temporarily
Different functions can be executed depending on the length of the button press. This setting will affect the operation of Change tools.
(2)Interval duration to recognize as repeated taps.
Different functions can be executed depending on the interval duration of the button press. This setting will affect the operation of Execute with repeated taps.
(3)Time until recognized as hold press.
Different functions can be executed depending on the length of the button press. This setting will affect the operation of Execute according to length of press.
Detailed settings
Depending on the operation assigned, you may need to set more specific settings in the CLIP STUDIO TABMATE Settings dialog.
If Execute Tool Rotation is selected
In the CLIP STUDIO TABMATE Settings dialog, if you set a button to Execute Tool Rotation the tool rotation settings dialog will appear.
Select the tool rotation you want applied from the settings drop-down menu.
The tool rotation settings will be reflected in the Tool Rotation Settings dialog in the assigned tool list. Press OK to set the tool rotation to the button.

In the CLIP STUDIO TABMATE Settings dialog, the setting of the tool rotation assigned from the pulldown menu in the Tool Rotation Settings dialog will be displayed next to Settings.
If Execute with repeated taps is selected
If Execute with repeated taps is set to a button in the CLIP STUDIO TABMATE Settings dialog then options 1-4 will appear under the Execute with repeated taps option. The higher the number, the more repeated taps will be needed, with the limit of four.
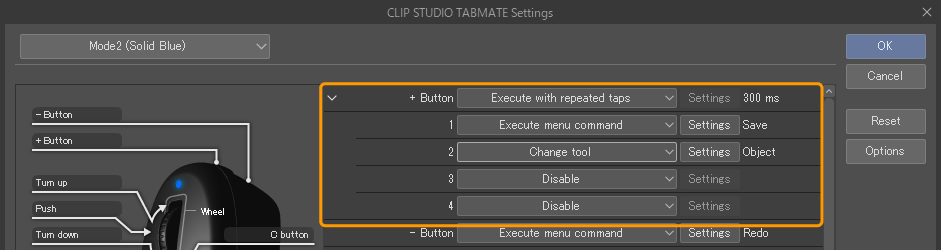
Select the operations for 1 to 4 in the same way you would for a normal button, by selecting it from the pulldown menu. Depending on the function, a pop-up dialog box corresponding to the selected function will appear.
For details on the settings and available functions dialog, refer to the CLIP STUDIO TABMATE Settings dialog.
You will not be able to select Allocate modifier key, Pop up palette, Execute with repeated taps, Execute according to length of key press, or Execute with ON/OFF from the pulldown menu for 1 to 4.
Memo | Selecting Execute with repeated taps will make a time appear next to the Settings button. This is the time that you set in TABMATE Options dialog. |
If Execute according to length of key press is selected
If Execute according to length of key press is set, the options for Short press, Long press, and Long press and release will appear under the button assigned Execute according to length of key press.
·Short press means a normal press on the button will execute the set function.
·Long press means a long press on the button will execute the set function.
·Long press and release means a long press and then release of the button will execute the set function.
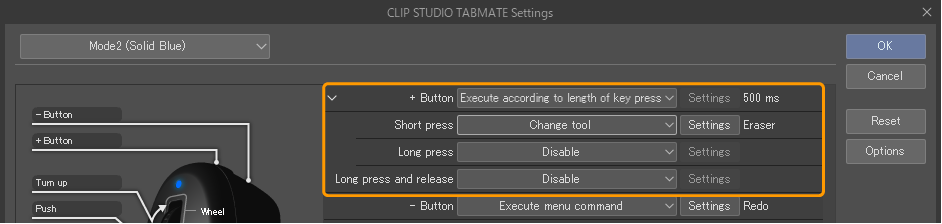
Select the operations for Short press, Long press, and Long press and release in the same way you would for a normal button, by selecting it from the pulldown menu. Depending on the function, a pop-up dialog box corresponding to the selected function will appear.
For details on the settings and available functions, refer to the "CLIP STUDIO TABMATE Settings".
You will not be able to select Allocate modifier key, Pop up palette, Execute with repeated taps, Execute according to length of key press, or Execute with ON/OFF from the pulldown menu for Short press, Long press, or Long press and release.
Memo | Selecting Execute according to length of key press will make a time appear next to the Settings button. This is the time that you set in the TABMATE Options dialog. |
If Execute with ON/OFF is selected
If Execute with ON/OFF is set to a button in the CLIP STUDIO TABMATE Settings dialog, then options ON and OFF will appear under the Execute with ON/OFF option.

ON means that the function will be executed when pressing down on the button.OFF means that the function will be executed when releasing the button after a press.
Select the operations for ON and OFF in the same way you would for a normal button, by selecting it from the pull-down menu. For certain functions, a pop-up dialog box with settings will appear.
For details on the settings and available functions, refer to the CLIP STUDIO TABMATE Settings dialog.
You will not be able to select Allocate modifier key, Pop up palette, Execute with repeated taps, Execute according to length of key press, or Execute with ON/OFF from the pulldown menu for ON or OFF.