Command Bar
The bar with various icons for different functions all lined up is called the Command Bar. Tap the different buttons on this bar to quickly access different commands. The following are the default commands available on the Command Bar.

(1)Open CLIP STUDIO
Opens Clip Studio, the app launcher that comes with Clip Studio Paint. You can use Clip Studio to access materials, latest news, as well as manage your projects in the cloud.
(2)New
(3)Open
(4)Save
(5)Undo
(6)Redo
(7)Erase
(8)Delete Outside Selection
(9)Fill
(10)Scale/Rotate
(11)Deselect
(12)Invert selected area
(13)Show border of selected area
(14)Snap to Ruler
(15)Snap to Special Ruler
(16)Snap to Grid
(17)Connect to smartphone
(18)Open Support
Memo | You cannot use Snap to Ruler, Snap to Special Ruler or Snap to Grid in Clip Studio Paint DEBUT. |
On iPad/Android tablets and Windows tablets with touch gestures enabled, the following icons also appear.

(1)Display application menu
(2)Close/Open all palettes
Tap this to minimize all palettes, ideal for when you want maximum space for your canvas.
(3)Touch gestures settings
Command Bar settings
Doing one of the following will bring up the Command Bar Settings dialog, where you can edit which functions appear on the Command Bar.
·Display the context menu for the Command Bar and tap Command Bar Settings.
·Windows users: Open the File menu > Command Bar Settings.
·MacOS/tablet users: Open the Clip Studio Paint logo menu > Command Bar Settings.
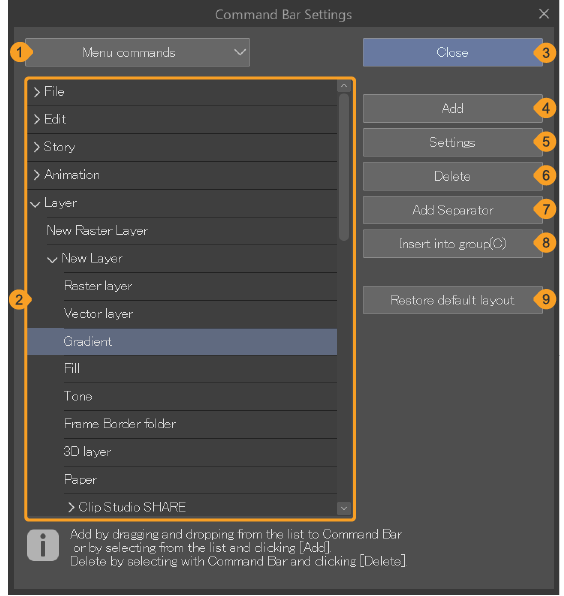
(1)Category
Select a category and the list displayed will change accordingly. You can choose Menu commands, Pop-up palettes, Options, Tool, Auto Action, or Drawing color. If you choose Drawing color, you can choose a color to add from the Color settings dialog that appears.
Memo | “Pop-up palettes” shows the list of palettes you can command to pop-up and display near the Command Bar. |
(2)List
A list of functions under the selected category will appear. Select the function you want to add to the Command Bar.
(3)Close
(4)Add
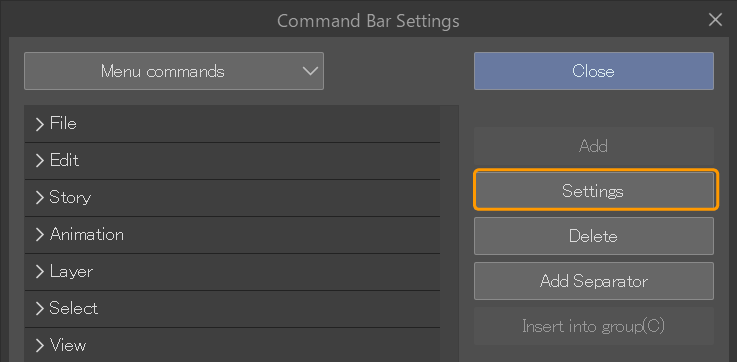
(5)Settings
Change the icon or name of the functions on the Command Bar. A dialog with settings for the selected function will appear.
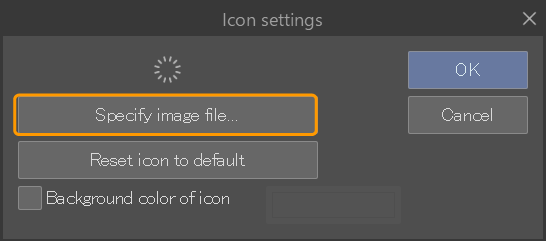
·For Menu commands, Pop-up palettes, Options, or Auto Action, the Icon settings dialog will appear.
·For Tool, the Sub tool settings dialog will appear. You can change the sub tool name or icon.
·For Drawing color, the Name Settings dialog will appear. Enter in name and tap OK to change the hover text that appears as the name. The default name is the color’s RGB values.
(6)Delete
(7)Add Separator
A separator will be added to the right of the icon to the Command Bar.
Memo | Dragging and dropping an icon from the Command Bar onto a separator will create a new separator next to that button in the new position. Dragging and dropping an icon to the right-most side of the Command Bar will create a separator to the left of the button in the new position. |
(8)Insert into group
The icon selected on the Command Bar will become a group with the item selected in the Command bar settings dialog box.
(9)Restore default layout
Restores the Command Bar to the default state. This removes any added icons and reverts the position of icons to the original state. Icon images or background colors will also return to the default state.
Memo | You cannot customize the Command Bar in Clip Studio Paint DEBUT. |
Add and delete icons
Open the Command Bar Settings dialog to add and delete icons from the Command Bar.
Adding icons
In the Command Bar Settings dialog, select the category you want from the pull-down menu, select a function and add the function by tapping Add or by dragging the function from the list to a position on the Command Bar.
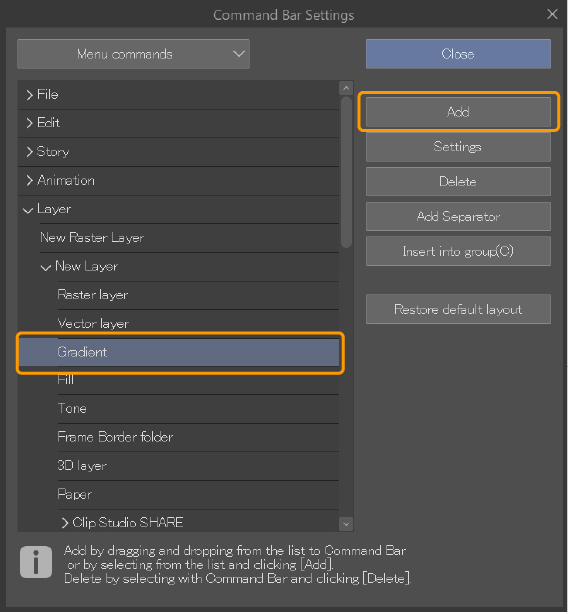
The selected function will be added to the Command Bar.

Memo | You can also drag and drop the following to the Command Bar to add them without opening the Command Bar Settings dialog. ·Selection Launcher icons ·Tools ·Sub tools or sub tool groups The following can be dragged and dropped to the Command Bar while pressing the Ctrl. ·Auto Actions ·Buttons from the Quick Access palette |
Deleting icons
While the Command Bar Settings dialog is open, select a command on the Command Bar and tap Delete.
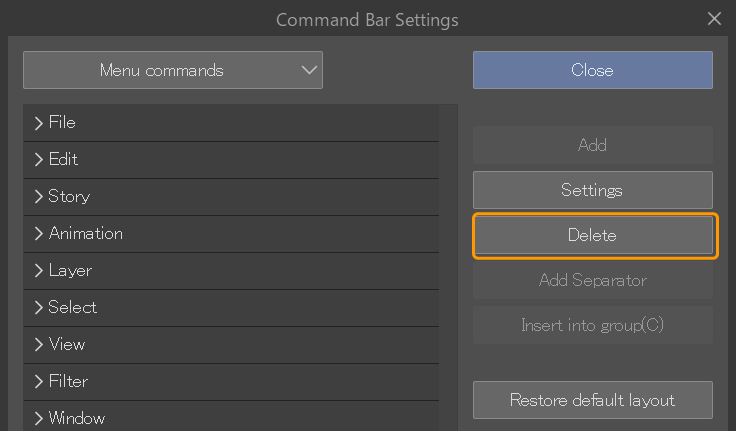
The icon will be deleted from the Command Bar.

Memo | ·You can delete separators on the Command Bar in the same way. ·You can also delete icons by displaying the context menu for the button and tapping Delete. |
Moving an icon
While the Command Bar Settings dialog is open, you can drag and drop icons to change their positions.
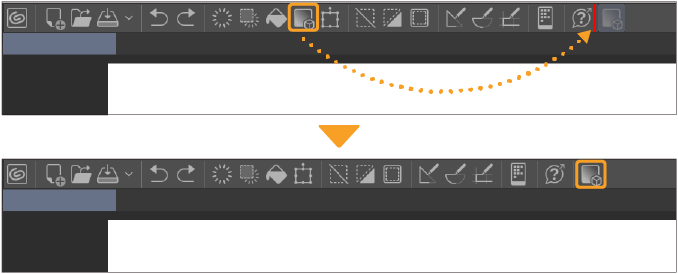
Dragging and dropping an icon from the Command Bar onto a separator will create a new separator next to that button as well as change its position.
Grouping icons
Dragging and dropping an icon on top of other Command Bar buttons will create a group.
An arrow will appear on the right side of the button to indicate a group. Tap it to bring up the command set in the Command Bar Settings dialog.

Moving icons by dragging and dropping
You can move an icon on the Command Bar without opening the Command Bar Settings dialog by holding down Ctrl while dragging and dropping.
Changing the icon
Use the Command Bar Settings dialog to change the Command Bar icon and color. First. tap the icon that you want to change on the Command Bar.

In the Command Bar Settings dialog, tap Settings.
In the Icon settings dialog, set the image and color you want and tap OK. Depending on the function selected, the available options may differ.
The icon will now change to reflect the new settings changed in the Icon settings dialog.

Tap Close in the Command Bar Settings dialog to finish editing.
Memo | The icons used for the Selection Launcher are shared between the Command Bar and Quick Access palette. Changing an icon for it from the Icon settings dialog will change how it appears on both the Command Bar and the Selection Launcher. |
Icon settings dialog
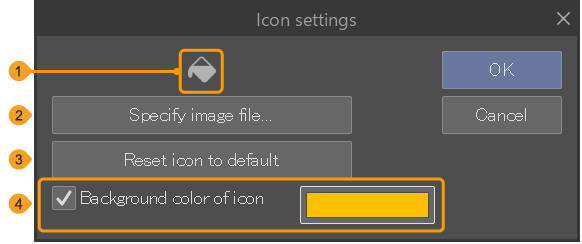
(1)Preview
A preview of the icon. This shows the icon image without the background color.
(2)Specify image file
You can import an image to use as your icon. Tap this to bring up a dialog that lets you select an image file to use. You can use BMP, JPEG, PNG, TIFF, and Targa files.
(3)Reset icon to default
This will reset your icon to the default settings.
(4)Background color
Turn this on to change the background color. Tap the displayed color to bring up the Color settings dialog where you can set the background color.