Binding list
Go to the Story menu > Binding process > Show binding list to have the Page Manager switch to a binding list view. In this view mode you can see each page’s file information displayed in a list; the cover page, cover (inside), main text pages will all be labeled. You can check the layout of the pages as well as check and edit each page’s information.
You can also go to the File menu > Export multiple pages > Export fanzine printing data dialog to check your export settings and write a comment for the print vendor.
This view works the same as the normal Page Manager in that you can select a page by tapping it. Double tap a page to open it.
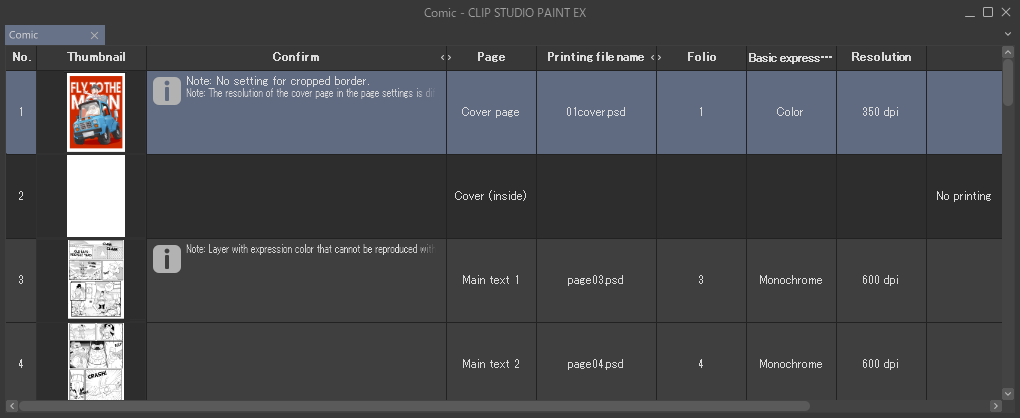
·Confirm will display a message if there is something wrong with the page data. Please see below for more information about error messages and how to resolve them.
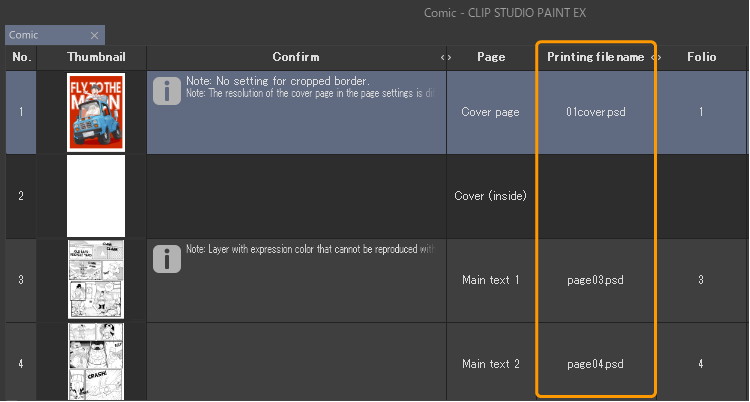
·Printing file name is the name that will appear as the file name when exporting the data for fanzine printing.
·When you export the data from Export fanzine printing data you can add a comment for the printing vendor. Double tap the Memo box to add a comment.
Confirm message
If you see a message in the Confirm box, you may be able to fix your data by following the below.
Message | Solution |
|---|---|
No setting for trim border. | This means there is nothing set for the Trim size. Select the page and use the Story menu > Change page settings dialog to set the Trim size. |
Finish size differs from basic size. | The Trim size setting in the project settings and the individual page are different. Select the page and use the Story menu > Change page settings dialog to set the Trim size to be the same as the project settings. |
Bleed width is not set. | This means the Bleed width has not been set. Select the page and use the Story menu > Change page settings dialog to set the Bleed width. |
Bleed width is different from width of basic setting. | The Bleed width setting in the New dialog box and the individual page are different. Select the page and use the Story menu > Change page settings dialog to set the Bleed width to be the same as the project settings. |
Cover page is set with monochrome, but basic expression colors on canvas aren't set with monochrome. | The current expression color of the cover page is not the same as when the project was created. Select the page and use the Story menu > Change page settings dialog to set the Basic expression color to monochrome. |
Cover page is set with gray, but basic expression colors on canvas are set with monochrome. | The current expression color of the cover page is not the same as when the project was created. Select the page and use the Story menu > Change page settings dialog to set the Basic expression color to be the same as the project settings. |
Body pages are set to monochrome, but the basic expression color for the canvas is not monochrome. | The Basic expression color setting in the project settings and the individual page are different. Select the page, and in the Change page settings dialog, change the Basic expression color to monochrome. |
Width of spine is set to 0.0mm or narrower. | The spine width (the width of the edges of the pages) is set to 0.0 mm. Select the cover page and use the Story menu > Change page settings dialog to turn on Align crop marks and set the gap width. |
Layer with expression color that cannot be reproduced with basic expression colors may be contained. | You are using layers with more colors than the page's Basic expression color. You need to reduce the colors if the Basic expression color is set to Monochrome, as the printing data may not be able to reproduce Color or Gray expression colors. Use the Layer Properties palette to change the Tone or Expression color settings. |
Folio is outside of cropped border. | Folio has been set outside the cropped border. Open the page and using the Object tool, move the folio to be inside of the cropped border. |
Text is outside of or near cropped border. | Dialogue or other text is outside the cropped border or is within 5 mm of the border. Open the page and using the Object tool, move the text to be more than 5 mm inside of the cropped border. |
Body text page is set to export with color. | The Basic expression color in the project settings is set to Color or Gray for the body pages. Use the Change project settings dialog to change the Basic expression color to Monochrome. |
The resolution of the cover page in the page settings is different from the project settings. | The Resolution setting in the project settings and the cover page are different. Select the cover page, and in the Change page settings dialog, adjust the resolution to be the same as the project settings. |
The resolution in the page settings is different from the project settings. | The Resolution setting in the project settings and the individual page are different. Select the page, and in the Change page settings dialog, adjust the resolution to be the same as the page settings. |
Print file name settings
Go to the Story menu > Binding process > Print file name settings dialog to add prefixes and suffixes to the exported print file names. If nothing is entered, the file name will be the page number, ex.“01.psd."
In the Print file name settings dialog box, you can add in what characters you want to add to the Cover page, Back cover page, and body page file names.Prefix will be added before the page number and Suffix will be added after the page number.
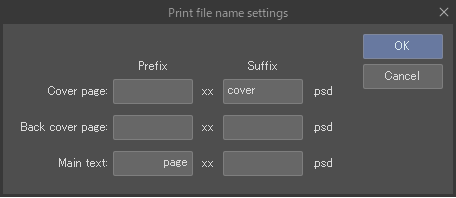
Tap OK and the new file name will be reflected in Printing file name when in Show binding list view. These file names will be reflected when exporting data from the File menu > Export multiple pages > Export fanzine printing data.
Allow cover pages to be moved
Go to the Story menu > Binding process > Allow cover pages to be moved to be able to move the cover page and back cover page in the Page Manager and when in the Show binding list view mode. If you perform this action again, you can lock the cover and back cover page from being moved.