Selection Launcher
The Selection Launcher is the grey bar that appears at the bottom of a selection. It contains functions and shortcuts that can alter the selection. You can choose to show or hide the Selection Launcher from the View menu > Selection Launcher.
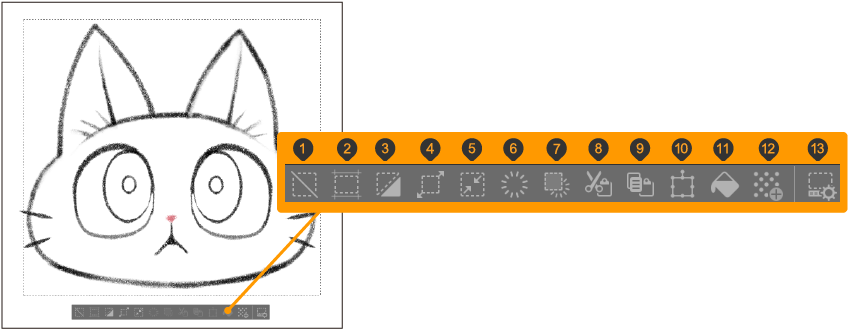
(1)Deselect
(2)Crop
Crops the canvas size to the size of the selected area.
(3)Invert selected area
(4)Expand selected area
(5)Shrink selected area
(6)Delete
Deletes anything inside the selected area.
(7)Clear outside selection
(8)Cut and paste
(9)Copy and paste
(10)Move/Transform
Use the Transform command on the selected area.
(11)Fill
(12)New tone
Creates a new tone layer in the selection.
(13)Selection Launcher Settings
Open settings to customize the Selection Launcher.
Memo | You cannot use customize the Selection Launcher or use Fill, New tone, or Selection Launcher Settings in Clip Studio Paint DEBUT. |
Moving the Selection Launcher
You can move the Selection Launcher by dragging the handle at the bottom.
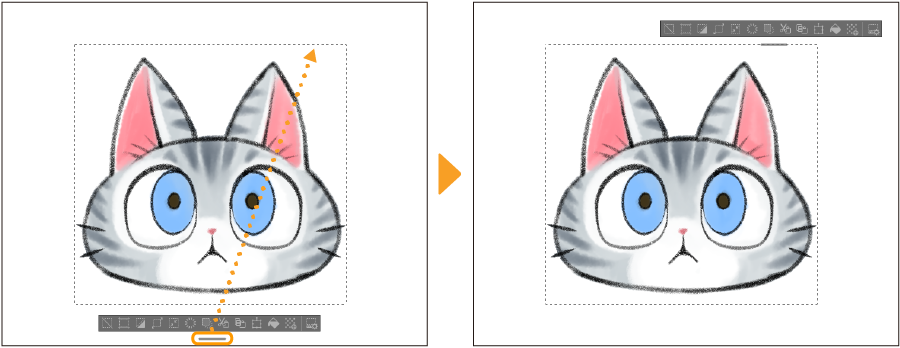
After moving the Selection Launcher manually, it will not adjust position even if you change the size or position of the selection itself. When you make a new selection, the Selection Launcher will appear in the default position again.
You can also tap the Esc key while holding the drag handle to return the Selection Launcher to the default position.
Customizing the Selection Launcher
In the Selection Launcher Settings, you can add and remove operations on the Selection Launcher. You can also change what each icon looks like.
You can access the Selection Launcher Settings dialog from the Selection Launcher or from the View menu > Selection Launcher Settings.
Memo | You cannot use Selection Launcher Settings in Clip Studio Paint DEBUT. |
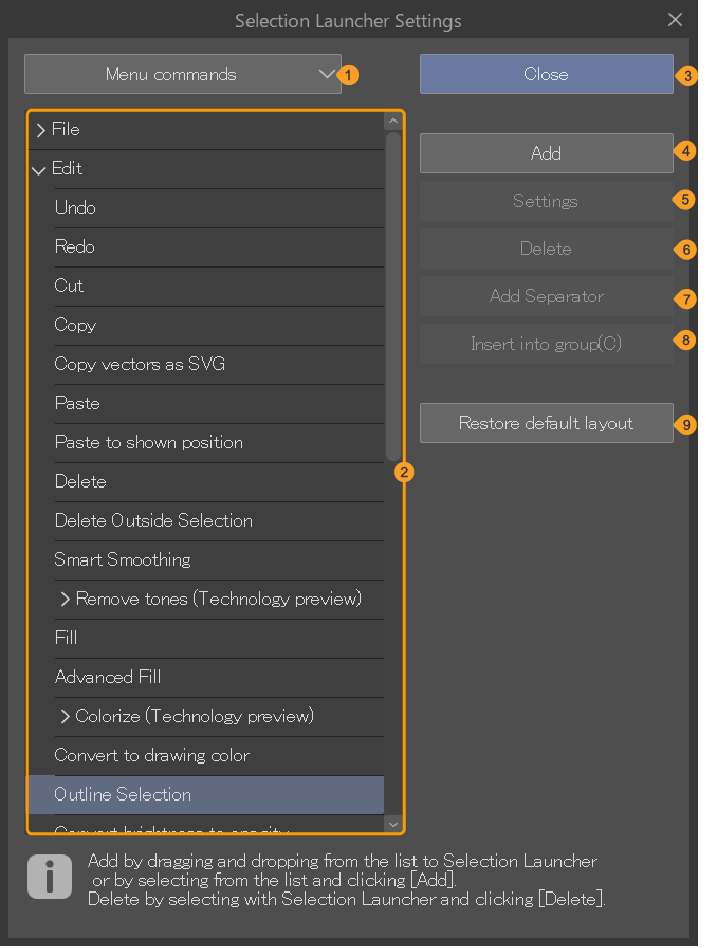
(1)Category
Categories include Menu commands, Pop-up palettes, Options, Tools, Auto actions, and Drawing color. A list displays with each category.
Drawing Color: This opens the Color settings dialog, where you can select a color to be added to the Selection Launcher. Tap the icon on the Selection Launcher to switch to the selected color.
Pop-up palettes: A function that pops up a menu next to the cursor.
(2)List
Lists the functions available to set to the Selection Launcher.
(3)Close
Closes the Selection Launcher Settings dialog.
(4)Add
Adds items selected from the list to the selection launcher.
(5)Settings
Selects the icon of the Selection Launcher and makes setting changes to the icon design and name. The dialog displayed will differ depending on the selected item.
·Selecting Main Menu, Pop-up Palette, Options, or Auto Actions shows the Icon Settings dialog.
·Selecting Tools shows the Sub-Tool Settings dialog.
·Selecting Drawing Color shows the Name Settings dialog.
(6)Delete
Deletes selected icons and separators from the Selection Launcher.
(7)Add Separator
Adds a separator to the right side of a selected icon on the Selection Launcher. Dragging and dropping the selection launcher icon onto a separator or the right or left edge of the selection launcher will create a separator at the drop point.
(8)Insert into group
You can add icons in a hierarchical order to icons selected on the Selection Launcher.
(9)Restore default layout
Returns the layout of the Selection Launcher to its default state. This deletes any added icons however, any images and background colors set to icons will stay the same.
Adding icons
1From the Selection Launcher, tap Selection Launcher Settings.
2From the selection launcher, tap where you want to add the icon.
![]()
3In the Selection Launcher Settings dialog, set as follows.
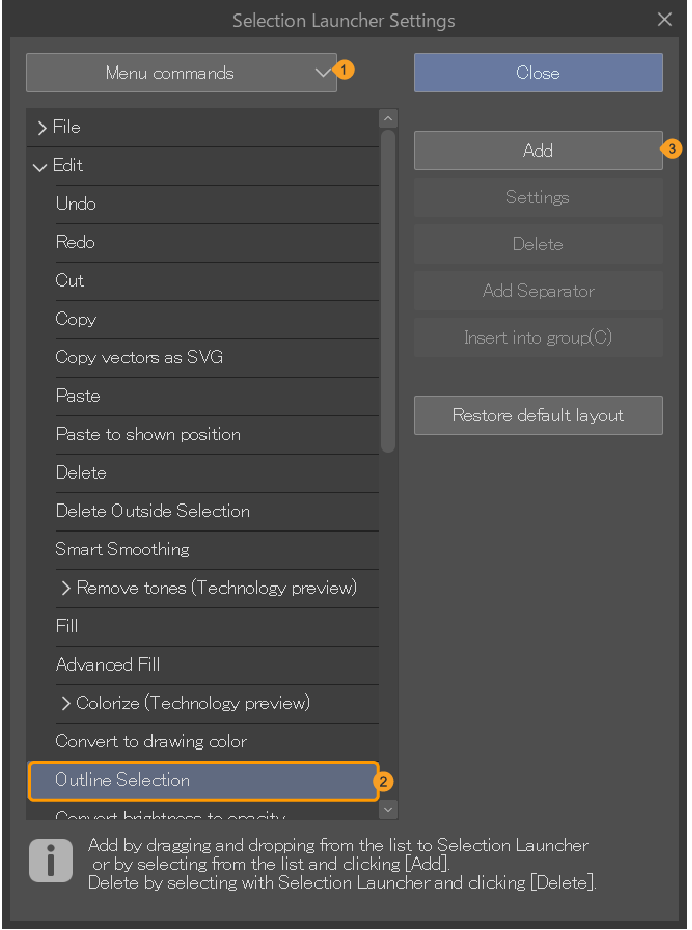
(1)Select the type of icon to add.
(2)Select functions to add to the Selection Launcher from the list.
(3)Tap Add. Alternatively, icons can also be dragged and dropped from the list onto the Selection Launcher.
4The icon for the selected command will be added to the right side of the icon selected in step 2.
![]()
5Tap Close on the Selection Launcher Settings dialog.
Adding from the command bar or palette
You can add icons to the Selection Launcher by dragging and dropping them from the palette to the Selection Launcher. The icons that can be added are as follows:
·Tool icons in the Tool palette
·Tool icons and sub tool groups in the Sub Tool palette
·Auto actions in the Auto Action palette
Icons in the command bar and Quick Access palette can also be added to the Selection Launcher. In this case, drag and drop the icon while holding Ctrl. These operations are not available when the Selection Launcher Settings dialog is displayed.
Memo | You cannot add icons in Clip Studio Paint DEBUT. |
Deleting icons
To delete an icon or separator, open the context menu for the icon you want to remove and tap Delete.
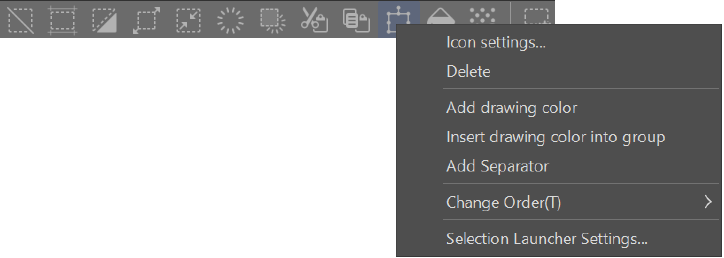
The menu displays differently between operating systems.
Windows/macOS: Right-click on the icon you want to delete.
Tablets: Press and hold the icon you want to delete.
You can also remove icons and separators from the Selection Launcher Settings dialog. While the dialog is open, select the icon or separator you want to remove from the selection launcher, then tap Delete.
Memo | You cannot delete icons in Clip Studio Paint DEBUT. |
Arranging icons in hierarchical order
You can add additional functions in drop-down list form to icons in the Selection Launcher.
1Tap Selection launcher > Selection Launcher Settings.
2Tap the icon you want to add.
![]()
3In the Selection Launcher Settings dialog, set as follows.
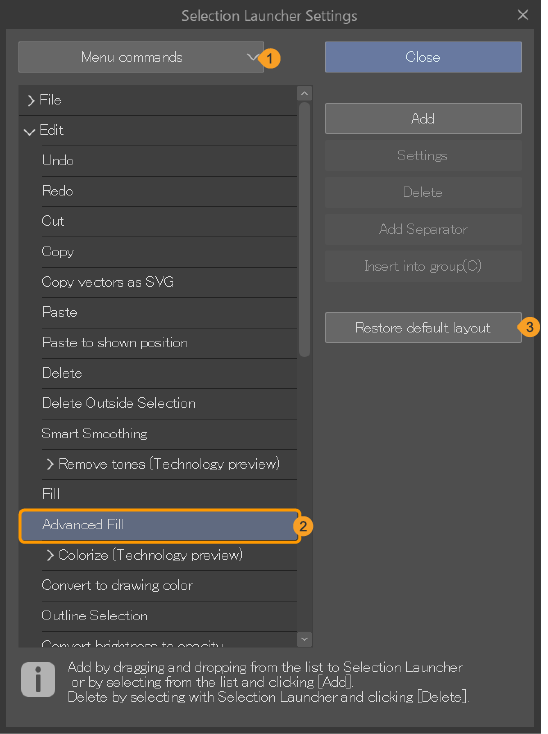
(1)Select the function location.
(2)Select a function to add from the list.
(3)Tap Insert into group.
4The function selected is added to the icon you choose in step 2. and arranged into hierarchical order underneath it. An arrow icon will now appear to the icon’s left indicating that more functions can be found by tapping on it. To reorder the drop-down list, hold Ctrl and drag and drop the icons as needed.

5Tap Close on the Selection Launcher Settings dialog.
In addition to the above method, you can also arrange icons in hierarchical order by selecting an item in the list from the Selection Launcher Settings dialog and dragging and dropping it onto the icon in the Selection Launcher.
Memo | You cannot arrange icons in Clip Studio Paint DEBUT. |
Changing an icon’s design
1Tap Selection launcher > Selection Launcher Settings.
2Tap the icon you want to add.
![]()
3Tap Settings.
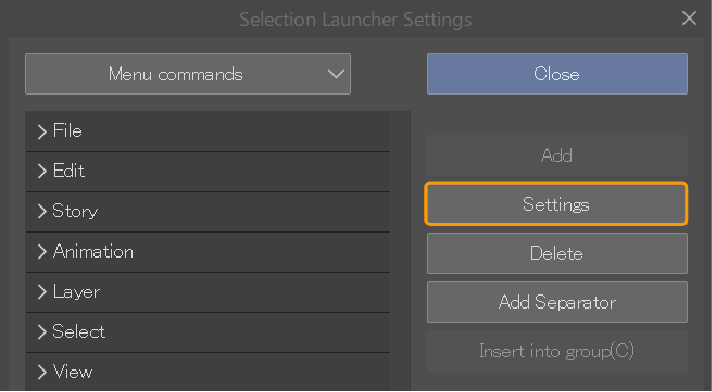
4In the Icon Settings dialog, set the image and background color of the icon.
The items displayed will differ depending on the icon you select.
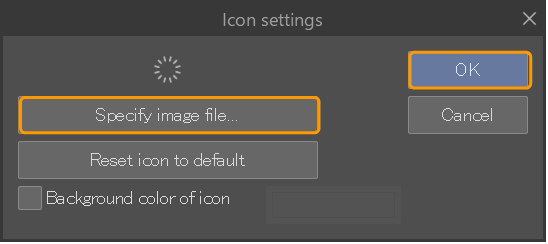
5The icon selected in Step 2 will now be changed.
![]()
6Tap Close in the Selection Launcher Settings dialog.
The icons used in the Selection Launcher, Command Bar, and Quick Access palette are shared. If you change the design of an icon in the Selection Launcher, both the Command Bar and the Quick Access palette icons will also be changed.
Memo | You cannot use change an icon’s design in Clip Studio Paint DEBUT. |
Replacing Icons
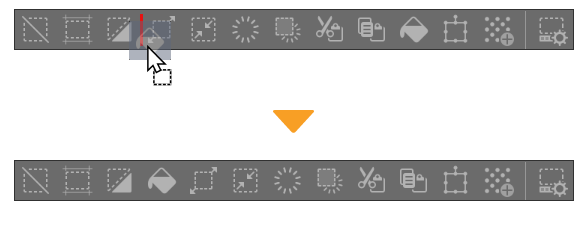
While the Selection Launcher Settings dialog is displayed, you can drag and drop its icons to change their positions. Dragging and dropping directly onto an icon will add it to its drop-down list. Even if the Selection Launcher Settings dialog is closed, you can still drag and drop icons to change their position by holding down Ctrl.
Memo | You cannot replace icons in Clip Studio Paint DEBUT. |